
Instruction manual
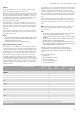
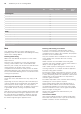
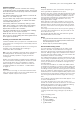


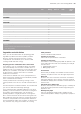


Table Of Contents
- [en] Instruction manual
- Table of contents
- [en] Instruction manual
- ( Important safety information 5
- ] Causes of damage 7
- 7 Environmental protection 8
- * Getting to know your appliance 9
- _ Accessories 11
- K Before using for the first time 13
- 1 Operating the appliance 14
- O Time-setting options 15
- A Childproof lock 16
- ^ Microwave 17
- Q Basic settings 19
- F Sabbath mode 20
- D Cleaning agent 21
- . Cleaning function 23
- p Rails 24
- q Appliance door 25
- 3 Trouble shooting 28
- 4 Customer service 29
- n Baking and roasting assistant 29
- P Programmes 30
- J Tested for you in our cooking studio 31
- 8 Intended use
- ( Important safety information
- ] Causes of damage
- 7 Environmental protection
- * Getting to know your appliance
- _ Accessories
- K Before using for the first time
- Before using for the first time
- Initial use
- 2. Use the ( or ) button to select the language.
- 3. Use the % button to return to "Language".
- 4. Use the ) button to select the next setting.
- 2. Use the ( or ) button to select the current hour.
- 3. Use the & button to navigate to the next line.
- 4. Use the ( or ) button to select the current minute.
- 5. Press the % button repeatedly until "Time" appears.
- 6. Use the ) button to select the next setting.
- 2. Use the ( or ) button to select the current day.
- 3. Use the & button to navigate to the next line.
- 4. Use the ( or ) button to select the current month.
- 5. Use the & button to navigate to the next line.
- 6. Use the ( or ) button to select the current year.
- 7. Press the % button repeatedly until "Date" appears.
- 8. Use the ) button to apply the settings.
- 2. Remove leftover packaging, such as polystyrene pellets, from the cooking compartment.
- 3. Before heating the appliance, wipe the smooth surfaces in the cooking compartment with a soft, wet cloth.
- 4. Use the # touch button to switch on the appliance.
- 5. Set the heating type and temperature, then start the appliance operation. ~ "Setting and starting the appliance operation" on page 14
- 6. Keep the kitchen ventilated while the appliance is heating up.
- 7. Use the # touch button to switch off the appliance after the indicated cooking time.
- 8. Wait until the cooking compartment has cooled down.
- 9. Clean the smooth surfaces with soapy water and a dish cloth.
- 1 Operating the appliance
- Operating the appliance
- Switching the appliance on and off
- Setting and starting the appliance operation
- 2. Use the ( or ) button to select the type of heating.
- 3. Use the & button to navigate to the next line.
- 4. Use the ( or ) button to select the temperature.
- 5. Touch the # touch button to start the appliance operation.
- 2. Use the & or % button to navigate to the line for the setting that should be changed.
- 3. Use the ( or ) button to change the setting.
- 4. Use the # touch button to start the changed operation.
- 2. Touch the # touch button to start the appliance operation.
- 3. Touch the ° touch button to activate the "Rapid heating" function.
- 4. Once the set temperature has been reached, the "Rapid heating" function switches off automatically. The ° symbol disappears from the display. Place the food in the cooking compartment.
- O Time-setting options
- Time-setting options
- Time-setting option
- Use
- Note:
- Showing and hiding the time-setting options
- Setting the timer
- 2. Select the cooking time using the ) button.
- 3. Touch the 0 touch button to start the timer.
- 2. Set the type of heating and temperature.
- 3. Touch the 0 touch button.
- 4. Use the ( or ) button to set the cooking time.
- 5. Touch the # touch button to start the set cooking time.
- 2. Touch the # touch button.
- 3. Set the type of heating and temperature.
- 4. Touch the 0 touch button.
- 5. Select the cooking time using the ) button.
- 6. Use the & button to navigate to the "* Ready at" line.
- 7. Select the end time using the ) button.
- 8. Touch the # touch button.
- 2. Use the & or % button to navigate through the lines.
- 3. If necessary, change the setting using the ( or ) button. Set "00:00" to delete a time function.
- A Childproof lock
- Childproof lock
- Lock
- Activate/deactivate
- Note:
- Automatic childproof lock
- 2. Touch the 0 touch button.
- 3. Use the ( or ) button to select "MyProfile".
- 4. Use the & button to navigate to the next line.
- 5. Use the ( or ) button to select "Automatic childproof lock".
- 6. Use the & button to navigate to the bottom line.
- 7. Use the ) button to select "Activated".
- 8. Touch the 0 touch button.
- 9. Use the & button to navigate to the next line to save the setting.
- 2. Touch the ± touch button.
- 3. Switch on the required appliance operation.
- 2. Touch the ± touch button.
- 3. Touch the 0 touch button.
- 4. Use the ( or ) button to select "MyProfile".
- 5. Use the & button to navigate to the next line.
- 6. Use the ( or ) button to select "Automatic childproof lock".
- 7. Use the & button to navigate to the bottom line.
- 8. Use the ( button to select "Deactivated".
- 9. Touch the 0 touch button.
- 10. Use the & button to navigate to the next line to save the setting.
- 11. Touch the ± touch button.
- 2. Press and hold the 0 touch button until "Childproof lock deactivated" appears on the display.
- ^ Microwave
- Microwave
- Cookware
- 2. Check the temperature of the cookware during this time.
- : Warning
- Risk of burns!
- Accessories included
- Microwave power settings
- Setting the microwave
- 2. Touch the 0 touch button.
- 3. Use the ( or ) button to select "Microwave •".
- 4. Use the & button to open the microwave menu.
- 5. Use the ( or ) button to set the required microwave output setting.
- 6. Use the & button to navigate to the next line.
- 7. Use the ( or ) button to set the required cooking time.
- 8. Touch the # touch button to start the appliance operation.
- 2. Touch the # touch button to start the appliance operation.
- 2. Remove the worst dirt from the cooking compartment immediately and wipe away moisture from the cooking compartment floor.
- 3. If necessary, touch the # touch button to switch the appliance on.
- 4. Touch the 0 touch button to display the operating modes.
- 5. Use the ( or ) button to select "Drying ª".
- 6. Use the & button to navigate to the next line.
- 7. Use the & button to navigate to the next line.
- 8. Touch the # touch button.
- 9. Open the appliance door and leave it open for 1 to 2 minutes so that the moisture in the cooking compartment can escape.
- 2. Touch the 0 touch button.
- 3. Use the ( or ) button to select "Microwave combination operation ¡".
- 4. Touch the & touch button.
- 5. Use the ( or ) touch button to set the required type of heating.
- 6. Use the & button to navigate to the next line.
- 7. Use the & button to navigate to the next line.
- 8. Use the & button to navigate to the next line.
- 9. Touch the # touch button.
- Q Basic settings
- Basic settings
- Changing MyProfile
- 2. Touch the 0 touch button.
- 3. Use the ( or ) button to select "MyProfile 4".
- 4. Use the & button to navigate to the next line.
- 5. Use the ( or ) button to select the setting.
- 6. Use the & button to navigate to the selection.
- 7. Use the ( or ) button to select the setting.
- 8. Touch the 0 touch button.
- 9. To save the setting, use the & button to select "Save".
- 2. Touch the 0 touch button.
- 3. Use the ( or ) button to select "MyProfile 4".
- 4. Use the & button to navigate to the next line.
- 5. Use the ( or ) button to select "Favourites".
- 6. Use the & button to select "Setting favourites".
- 7. Use the ( or ) button to select the heating type.
- 8. Use the & button to navigate to the next line.
- 9. Use the ( or ) button to select "Activated" or "Deactivated".
- 10. Touch the 0 touch button.
- 11. To save the setting, use the & button to select "Save".
- F Sabbath mode
- Sabbath mode
- Starting Sabbath mode
- 2. Use the ( or ) button to select "Sabbath mode".
- 3. Use the & button to navigate to the next line.
- 4. Use the ( or ) button to select the temperature.
- 5. Use the & button to navigate to the next line.
- 6. Use the ( or ) button to select the cooking time.
- 7. Touch the # touch button.
- D Cleaning agent
- . Cleaning function
- Cleaning function
- : Warning
- Risk of scalding!
- Starting
- 2. Mix 0.4 litres of water (not distilled water) with a drop of washing-up liquid and pour into the middle of the cooking compartment floor.
- 3. Touch the # touch button.
- 4. Touch the 0 touch button.
- 5. Use the ( or ) button to select "EasyClean š".
- 6. Use the & button to navigate to the next line.
- 7. Touch the # touch button.
- 2. Clean the smooth surfaces in the cooking compartment with a dish cloth or a soft brush. Stubborn residues can be removed using a stainless steel scouring pad.
- 3. Remove limescale with a cloth soaked in vinegar. Then wipe with clean water and rub dry with a soft cloth (including under the door seal).
- 4. Use the # touch button to switch off the appliance.
- 5. Leave the appliance door ajar in the stop position (approx. 30°) for approx. 1 hour to allow the enamel surfaces in the cooking compartment to dry thoroughly.
- p Rails
- Rails
- Detaching and refitting the rails
- : Warning
- Risk of burns!
- Detaching the rails
- 2. and detach it (fig. ").
- 3. Then swing the entire rail outwards ‚ and detach it at the rear ƒ (fig. #).
- 2. Use the hook to mount the front holder at the top into the round hole ‚, set it at a slight incline, attach it at the bottom, and straighten it ƒ (fig. ").
- 3. Use the hook to attach the rear holder into the upper hole ‚ and push it into the lower hole ƒ (fig. #).
- 2. Pull the rail forwards (fig. ").
- 3. Then fold it forwards and insert it (fig. #)
- 4. and push it downwards (fig. $).
- q Appliance door
- Appliance door
- Removing the door cover
- 2. Press on the right and left side of the cover (fig. !).
- 3. Remove the cover (fig. "). Close the appliance door carefully
- 4. Open the appliance door again slightly. Put the cover back in place and press on it until it clicks audibly into place (fig. #).
- 5. Close the appliance door.
- 2. Press on the right and left side of the cover (fig. !).
- 3. Remove the cover (fig. ").
- 4. Undo and remove the screws on the left and right of the appliance door (fig. #).
- 5. Before closing the door again, trap a tea towel that has been folded several times in the door (fig. $).
- 6. Push both retainers at the top of the intermediate panel upwards, but do not remove them (fig. %). Hold the panel with one hand. Take out the panel.
- : Warning
- : Warning
- Risk of injury!
- Fitting the door panels on the appliance
- 2. Push both retainers downwards (fig. ").
- 3. Insert the front panel downwards into the retainers (fig. #).
- 4. Close the front panel until both upper hooks are opposite the opening (fig. $).
- 5. Press the front panel down until it clicks audibly into place (fig. %).
- 6. Open the appliance door again slightly and remove the tea towel.
- 7. Screw both screws back in on the left and right.
- 8. Put the cover back in place and press on it until it clicks audibly into place (fig. &).
- 9. Close the appliance door.
- 3 Trouble shooting
- 4 Customer service
- n Baking and roasting assistant
- Baking and roasting assistant
- Information on the settings
- Selecting a meal
- Setting the food
- 2. Touch the 0 touch button.
- 3. Use the ( or ) button to select the "Baking and roasting assistant".
- 4. Use the & button to navigate to the next line.
- 5. Use the ( or ) button to select the required category.
- 6. Use the & button to navigate to the next line.
- 7. Use the ( or ) button to select the required meal.
- 8. Use the & button to navigate to the next line.
- 9. If required, you can change the recommended settings. Touch the & button to do this.
- 10. Touch the # touch button to start the appliance operation.
- 2. If necessary, use the ( or ) button to change the recommended setting.
- 3. Touch the # touch button to start "Continue cooking".
- P Programmes
- Programmes
- Information on the settings
- Selecting a dish
- Setting the programme
- 2. Touch the 0 touch button.
- 3. Use the ( or ) button to select "Microwave programmes".
- 4. Use the & button to navigate to the next line.
- 5. Use the ( or ) button to select the required microwave programme.
- 6. Use the & button to navigate to the next line.
- 7. Use the ( or ) button to set the weight.
- 8. Firstly touch the % n button to navigate upwards and then touch the ) button to navigate to the next line.
- 9. Touch the # touch button to start the appliance operation.
- 2. If necessary, use the ( or ) button to change the recommended setting.
- 3. Touch the # touch button to start "Continue cooking".
- J Tested for you in our cooking studio
- Tested for you in our cooking studio
- Note:
- Silicone moulds
- Cakes and small baked items
- Bread and rolls
- Pizza, quiche and savoury cakes
- Bakes and soufflés
- Poultry
- Meat
- Fish
- Vegetables and side dishes
- Dessert
- 2. Stir in 150 g (chilled) yogurt.
- 3. Pour into cups or small jars and cover with cling film.
- 4. Place the cups or jars onto the cooking compartment floor and use the settings indicated in the table.
- 5. After preparation, leave the yogurt to cool in the refrigerator.
- 2. Pour the rice and milk into a tall container which is suitable for microwave use.
- 3. Use the settings indicated in the table.
- 4. As soon as the milk starts to rise, stir thoroughly and reduce the microwave power as indicated in the table.
- : Warning
- : Warning
- : Warning
- Risk of scalding!
- Caution!
- Recommended setting values
- Dish
- Cookware
- Shelf position
- Type of heating
- Temperature in °C
- MW power in watts
- Cooking time in mins.
- Keeping warm
- Test dishes
- Baking
- Notes
- Dish
- Accessories/cookware
- Shelf position
- Type of heating
- Temperature in °C
- Cooking time in mins.
- Grilling
- Dish
- Accessories
- Shelf position
- Type of heating
- Temperature in °C
- Cooking time in mins.
- Preparing food with a microwave
- Dish
- Accessories/cookware
- Shelf position
- Type of heating
- Temperature in °C
- MW power in watts
- Cooking time in mins.
- [en] Instruction manual

en Tested for you in our cooking studio
44
Dish Accessories/cookware Shelf posi-
tion
Type of
heating
Tempera-
ture in °C
MW power in
watts
Cooking
time in
mins.
Pork
Joint of pork without rind, e.g. neck,
1.5 kg
Cookware, uncovered 1
‡
180-200 - 120-130
Joint of pork without rind, e.g. neck,
1.5 kg
Cookware, covered 1
‡
180-200 180 40-50
Joint of pork with rind, e.g. shoulder,
2 kg
Cookware, uncovered 1
‡
190-200 - 130-140
Pork tenderloin steak, 1.5 kg Cookware, uncovered 1
‡
220-230 - 70-80
Pork tenderloin steak, 1.5 kg Cookware, covered 1
‡
230-240 90 50-60
Fillet of pork, 400 g Wire rack 2
‡
220-230 - 20-25
Smoked pork on the bone, 1 kg (with
a little added water)
Cookware, covered 1
‡
210-220 - 60-80
Smoked pork on the bone, 1 kg Cookware, uncovered 1
•
- 360 40-50
Pork steaks, 2 cm thick Wire rack 3
ˆ
250 - 16-20
Pork medallions, 3 cm thick (preheat
oven for 5 mins.)
Wire rack 3
ˆ
290* - 8-12
Beef
Fillet of beef, medium, 1 kg Cookware, uncovered 1
‡
210-220 - 40-50
Fillet of beef, medium, 1 kg Cookware, covered 1
ƒ
180-200 90 30-40
Pot-roasted beef, 1.5 kg Cookware, covered 1
‡
200-220 - 130-140
Sirloin, medium, 1.5 kg Cookware, uncovered 1
‡
220-230 - 60-70
Sirloin, medium, 1.5 kg Cookware, uncovered 1
ƒ
240-260 180 30-40
Steak, 3 cm thick, medium Wire rack 2
ˆ
290 - 15-20
Burger, 3-4 cm thick**** Wire rack 2
ˆ
290 - 20-30
Veal
Joint of veal, 1.5 kg Cookware, uncovered 1
‡
160-170 - 100-120
Joint of veal, 1.5 kg Cookware, covered 1
‚
200-210 90 70-80
Knuckle of veal, 1.5 kg Cookware, uncovered 1
ƒ
200-210 - 100-110
Knuckle of veal, 1.5 kg Cookware, uncovered 1
‡
200-220 180 30
90 30-40
Lamb
Leg of lamb, boned, medium, 1.5 kg Cookware, uncovered 1
‡
170-190 - 50-70
Leg of lamb, boned, medium, 1.5 kg Cookware, covered 1
‚
240-260 360 30
180 35-40
Saddle of lamb on the bone** Cookware, uncovered 1
‡
180-190 - 40-50
Saddle of lamb on the bone** Cookware, uncovered 1
‡
190-210 90 30-40
Lamb cutlet*** Wire rack 2
ˆ
290 - 12-18
Sausages
Grilled sausages Wire rack 2
ˆ
290 - 10-20
* Preheat
** Do not turn
*** Slide the universal pan in underneath at shelf position 1
**** Turn after 2/3 of the total time