[en] Instruction manual Combination steam oven C47C42.3. / C47C62.3.
Ú Table of contents e[nuoIrs]ctimanul Important safety information.....................................................4 Causes of damage .............................................................................5 Your new appliance ....................................................................6 Control panel .......................................................................................6 Operating modes ................................................................................
: Important safety information Read these instructions carefully. Only then will you be able to operate your appliance safely and correctly. Retain the instruction manual and installation instructions for future use or for subsequent owners. This appliance is only intended to be fully fitted in a kitchen. Observe the special installation instructions. Check the appliance for damage after unpacking it. Do not connect the appliance if it has been damaged in transport.
Hot liquid may spill over the sides of cooking containers when they are removed from the cooking compartment. Remove hot cooking containers with care and always wear oven gloves. Risk of injury! ■ Scratched glass in the appliance door may develop into a crack. Do not use a glass scraper, sharp or abrasive cleaning aids or detergents. ■ Flammable liquids can catch fire in the cooking compartment when it is hot (explosion). Do not fill the water tank with any flammable fluids (e.g. alcoholic drinks).
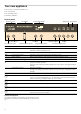
Your new appliance In this section, you will find information on ■ the control panel ■ the operating modes ■ automatic calibration Control panel (OHFWURQLF FORFN 7H[W GLVSOD\ 7HPSHUDWXUH GLVSOD\ 6WDUW EXWWRQ 6WRS EXWWRQ 3 5RWDU\ VHOHFWRU &ORFN IXQFWLRQ EXWWRQ ,QIR EXWWRQ 2SHUDWLQJ PRGH VHOHFWRU Control element Operating mode selector 1DYLJDWLRQ EXWWRQ 7HPSHUDWXUH VHOHFWRU 0 6WDUW 6WRS 0HPRU\ $XWRPDWLF SURJUDPPHV Use/meaning Switching the appliance on and off Selects the desired operat
Operating modes Using the operating mode selector, you can select the following operating modes: Operating mode Use é 8 3 Steam cooking 35 - 100 °C For vegetables, fish, side dishes, for juicing fruit and for blanching. CircoSteam® 120 - 230 °C for meat, bakes and baked goods. Hot air and steam are combined. Hot air 30 - 230 °C for moist cakes, sponge, pot roasts. A fan in the back wall of the oven distributes the heat evenly inside the cooking compartment.
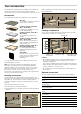
Your accessories The accessories supplied with your appliance are suitable for making many dishes. Ensure that you always insert the accessories into the cooking compartment the right way round. When inserting the cooking container, ensure that the lug (a) is facing downwards.
Accessories Order no.
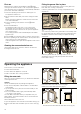
First use Fitting the grease filter in place Before first use, heat the empty appliance with é Steam cooking for 20 minutes at 100 °C. Do not open the appliance door during this time. The appliance is automatically calibrated (see section: Automatic calibration). Hook the enclosed grease filter onto the hot air grille in the back wall of the cooking compartment. Leave the grease filter in the cooking compartment for all applications. 1. Press the operating mode selector so that it pops out.
Switching on the appliance water tank to the "max" mark, slide it back in and start the appliance. : Risk of scalding! When you open the appliance door and remove the cooking containers, hot liquids may squirt out because the cooking containers may have warped. When opening, do not stand too close to the appliance. Open the appliance door carefully. Remove the cooking container carefully. Keep children at a safe distance.
After each use Drying the cooking compartment Emptying the water tank. : Risk of scalding! The water in the evaporator dish may still be hot. Allow it to cool before wiping. 1. Open the appliance door carefully. Hot steam will escape. 1. Leave the appliance door ajar until the appliance has cooled 2. Remove and clean the water tank. 3. Thoroughly dry the seal in the tank cover and the tank recess in the appliance. down. 2.
The appliance switches off automatically at the time set for the end of operation. 1. Turn the operating mode selector back to the Û position. 2. Press the KJ clock function button to exit the clock function. Preset operation The appliance switches on automatically, then switches off automatically at the time preselected for the end of operation. Bear in mind that food that spoils easily must not stay in the cooking compartment for too long.
Automatic programmes The automatic programmes enable you to prepare food very easily. There are 16 programme groups containing a total of 70 programmes. In this section, you will find out ■ how to set one of the automatic programmes ■ hints and tips on the programmes ■ Which programmes you can set (programme tables) Enter the weight A default weight appears on the temperature display. 8. Turn the temperature selector to set the weight of the items to be cooked.
Programme tables Follow the instructions for the programmes. Vegetables Do not season vegetables until after cooking. Programme Notes Accessories Level Steam cauliflower/In florets* florets of equal size Perforated cooking container 3 + 1 Baking tray Steam broccoli florets* florets of equal size Perforated cooking container 3 + 1 Baking tray Steam green beans* - Perforated cooking container 3 + 1 Baking tray Steam sliced carrots* slices, approx.
Programme Note Accessories Level Risotto max. 2 kg solid cooking container 2 Lentils max. 0.55 kg solid cooking container 2 Programme Notes Accessories Level Bake, savoury, cooked ingredients* max. 4 cm deep Wire rack + ovenproof dish 2 Bake, sweet* max. 4 cm deep Wire rack + ovenproof dish 2 Accessories Level Bakes * You can set a preselection mode for this programme Poultry Do not place chicken breasts or chicken portions on top of each other in the ovenware.
Meat loaf Programme Notes Accessories Level Made from fresh minced meat total weight 0.5 - 2 kg baking tray 2 Fish When preparing fish, grease the perforated cooking container. Do not place whole fish, fish fillets or fish fingers on top of each other. Enter the weight of the heaviest fish and choose pieces as similar in size as possible. Programme Note Accessories Level Steam whole, fresh fish 0.
Programme Notes Accessories Level Rye bread/Bake* 0.6 - 2 kg Baking tray + greaseproof paper 2 Rye bread/prove and bake note the message Baking tray + greaseproof paper 2 White bread/Bake* 0.4 - 2 kg Baking tray + greaseproof paper 2 White bread/prove and bake note the message Baking tray + greaseproof paper 2 Bread rolls/Bake fresh bread rolls* Weight per piece 0.05 - 0.1 kg Baking tray + greaseproof paper 2 Bread rolls/bake frozen bread rolls Total weight 0.
Special Sterilising bottles Always clean the bottles with a bottle brush immediately after drinking. Then clean them in the dishwasher. The programme is designed for 1 litre jars. For larger or smaller jars, you must adjust the cooking result individually. Place the bottles in the perforated cooking container so that they do not touch one another. After the end of the programme, open the appliance door to prevent cooking from continuing.
Childproof lock In this section, you can read about Locking the appliance permanently ■ how to lock your appliance 1. Switch off the appliance. ■ how to lock your appliance permanently 2. Press and hold the ± info button for 3 seconds to go to the basic settings menu. Lock 3. Press the ± info button briefly and repeatedly until ™‚‹ Once it has been locked, the appliance cannot be switched on accidentally or by unauthorised users (e.g. by children playing). 4.
You can change the following basic settings: Basic settings menu Basic settings menu Setting symbol Sub menu Basic setting Setting symbol Water hardness range softened ™‡‹ 1-soft ™‡‚ Sub menu Basic setting Select language Additional languages are possible.
Salts are very corrosive and can cause rust. Remove remains of acidic sauces (ketchup, mustard) or salted food from the cooking compartment immediately after cooling. Do not use hard scouring pads or cleaning sponges. Cleaning agents Appliance exterior (with aluminium front) Use soapy water and dry with a soft cloth. Mild window cleaning agent - wipe the aluminium front horizontally and without applying pressure using a soft window cloth or a lint-free microfibre cloth.
Starting the cleaning aid 1. Press the operating mode selector to make it pop out. The appliance switches on. 2. Turn the operating mode selector to > EasyClean®. 3. If required, fill the water tank with water, reinsert it and press the Start button. Now proceed as described in the section “Emptying the evaporator dish and wiping out the appliance”. 3. Fill the water tank with water up to the "max" mark and slide it Descaling 4. Press the Start button.
3. Remove the remaining water from the evaporator dish using the cleaning sponge. 4. Close the appliance door. 2nd rinse Press the Start button. The appliance starts rinsing. "2nd rinse" appears in the display. Removing the remaining water After 20 seconds, "End" and "Empty evaporator dish" appear in the text display. Removing the appliance door 1. Open the appliance door fully. 2. Fold out the locking levers on the left and right fully (figure A). The hinges are secured and cannot snap closed. 3.
2. Grip the door panel next to the hinges and pull it out of the plug-in holders (not visible). 3. Lift the door panel slightly and remove it in the direction of the hinges. Cleaning the rails The rails can be removed for cleaning. : Risk of burning due to hot components in the cooking compartment! Wait until the cooking compartment has cooled down.
Troubleshooting Malfunctions often have simple explanations. Please read the following instructions before calling the after-sales service. Repairs may only be carried out by fully trained after-sales service technicians. Incorrect repairs to your appliance may present considerable risks for the user. : Risk of electric shock! ■ ■ Work on the appliance electronics may only be performed by a specialist. Always disconnect the appliance from the power supply when work is carried out on the electronics.
Problem Possible cause There is a "pop" noise during cooking Cold/warm effect with frozen food, caused This is normal by the steam Notes/remedy When you cook with steam, a lot of steam The appliance is being automatically caliis created brated This is normal When cooking with steam, a great deal of The appliance is unable to calibrate itself steam is created again automatically if cooking times are too short Restore the appliance to the factory setting (see section: Basic settings).
After-sales service Our after-sales service is there for you if your appliance needs to be repaired. We will always find the right solution in order to avoid unnecessary visits from a service technician. Please note that there will be a fee for a visit by a service technician in the event of a malfunction, even during the warranty period. E number and FD number Please find the contact data of all countries in the enclosed customer service list. When calling us, please give the product number (E no.
Cooking times and quantities The cooking times when steaming depend on the item size, but do not depend on the total quantity. The appliance can steam food to a maximum of 2 kg. Follow the unit sizes given in the tables. The cooking time is reduced for smaller pieces and increased for larger ones. Cooking time is also influenced by the quality and ripeness of the food. The values quoted can therefore only serve as a guideline. Distributing food evenly Always distribute the food evenly in the ovenware.
Food Size Accessories Operating mode Temperature in °C Cooking time in min.
Food Amount Accessories Level Operating mode Temperature in °C Cooking time in min. Chicken breast 0.15 kg each Perforated + Baking tray 3 1 Steam cooking 100 15 25 Chicken portions 0.12 kg each Wire rack + baking tray 2 CircoSteam® 20 35 Duck, whole 2 kg Wire rack + baking tray 2 180 200 CircoSteam® 170 60 80 Hot air 210 15 - 20 10 - 15 Duck breast* 0.35 kg each Wire rack + baking tray 2 CircoSteam® 170 180 Rolled turkey joint 1.
Miscellaneous Food Amount Accessories Level Operating mode Temperature in °C Cooking time in min. Meat loaf made from 0.5 kg minced meat Baking tray 2 CircoSteam® 140 - 150 45 60 Saddle of venison on the bone* 0.6 - 0.8 kg Wire rack + baking tray 2 CircoSteam® 150 - 170 15 - 30 Boned leg of lamb 1.5 kg Wire rack + baking tray 2 CircoSteam® 170 180 60 80 Saddle of lamb on the 1.5 kg bone* Wire rack + baking tray 2 CircoSteam® 160 170 15 25 Rabbit portions 1.
Food Amount Accessories Level Temperature in °C Cooking time in min. Boned leg of lamb 1 - 1.5 kg Baking tray 2 80 140 - 160 Sirloin 1.5 - 2.5 kg Baking tray 2 80 150 180 Fillet of pork - Baking tray 2 80 90 50 - 70 Pork medallions - Baking tray 2 80 60 80 Beef steaks approx. 3 cm thick Baking tray 2 80 40 60 Duck breast - 2 80 35 - 55 Baking tray Bakes, soup ingredients, etc. Food Accessories Level Operating mode Temperature in °C Cooking time in min.
Cakes in tins Food Accessories Level Operating mode Temperature in °C Cooking time in min.
Baking tips You want to bake according to your own Use similar items in the baking tables as a guide recipe How to tell whether sponge cake is baked through Approx. 10 minutes before the end of the baking time stated in the recipe, insert a cocktail stick into the cake at its deepest point. If the cocktail stick comes out clean, the cake is ready. The cake collapses Next time, use less liquid or set the baking temperature 10 °C lower. Note the stirring times indicated in the recipe.
Food Amount Accessories Level Temperature in°C Cooking time in min. Fish fillet 0.4 kg perforated + baking tray 3 1 45 - 50 15 - 20 Whole fish 1 kg perforated + baking tray 3 1 45 - 50 40 50 Goulash - perforated + baking tray 3 1 45 - 50 40 50 Joint of beef - perforated + baking tray 3 1 45 - 50 70 80 Dough proving Stand the dough bowl on the wire rack. Do not cover the dough.
Frozen products Observe the instructions on the packaging. Food Accessories Chips The cooking times indicated apply to dishes placed in a cold cooking compartment. Level Operating mode Temperature in °C Cooking time in min.
Test dishes These tables have been produced for test institutes to facilitate the inspection and testing of the various appliances. Baking Test dishes tested in accordance with standards EN 50304/ EN 60350 (2009) and IEC 60350. Note: For baking, use the lower of the temperatures indicated first. The values in the table apply to dishes placed in a cold cooking compartment. Food Accessories Level Operating mode Temperature in °C Cooking time in min.
Constructa Neff Vertriebs-GmbH Carl-Wery-Straße 34 D-81739 München *9000746284* 9000746284 930731