EXTRACTOR HOOD [en] Instructions for installation and use
en Table of contents [ e n ] I n s t r u c t i o n s f o r i n s t al a t i o n a n d u s e INSTRUCTION MANUAL.......................................................... 2 8 Intended use ..........................................................2 ( Important safety information ...............................3 7 Environmental protection.....................................5 Ç Operating modes...................................................5 1 Operating the appliance ......................................
Important safety information en (Important safety information :Warning – Danger of suffocation! Packaging material is dangerous to children. Never allow children to play with packaging material. I mpor t ant saf et y i nf or mat i on : Warning – Danger of death! Risk of poisoning from flue gases that are drawn back in. Always ensure adequate fresh air in the room if the appliance is being operated in exhaust air mode at the same time as room airdependent heat-producing appliance is being operated.
en Important safety information : Warning – Risk of injury! Causes of damage ■ Caution! Risk of damage due to corrosion. Always switch on the appliance while cooking to avoid condensation. Condensate can produce corrosion damage. Components inside the appliance may have sharp edges. Wear protective gloves. Risk of injury! ■ Items placed on the appliance may fall down. Do not place any objects on the appliance.
Environmental protection 7Environmental protection Your new appliance is particularly energy-efficient. Here you can find tips on how to save even more energy when using the appliance, and how to dispose of your appliance properly. Envi r onment al pr ot ect i on en ÇOperating modes Oper at i ng modes Exhaust air mode The air which is drawn in is cleaned by the grease filters and conveyed to the exterior by a pipe system.
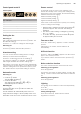
en Operating the appliance 1Operating the appliance These instructions apply to several appliance variants. It is possible that individual features are described which do not apply to your appliance. Oper at i ng t he ap l i ance Note: Switch on the extractor hood when you start cooking and switch it off again several minutes after you have finished cooking. This is the most effective way of removing the kitchen fumes. Control panel model 1 The noise reduction function reduces the fan noise.
Operating the appliance en Control panel model 2 Sensor control Control panel In automatic mode, a sensor in the extractor hood detects the intensity of the cooking and roasting fumes. Depending on the sensor setting, the fan automatically switches to another fan setting.
en Cleaning and maintenance Saturation display When the metal mesh grease filters or the activated carbon filter are saturated, a signal sounds for approx. 4 seconds after the fan is switched off. In addition, this symbol is indicated on the display: ª If you have not yet done so, the metal mesh grease filters should be cleaned now. For instructions on how to clean the metal mesh grease filters, please refer to the section Cleaning and maintenance.
Cleaning and maintenance Area Stainless steel Cleaning agent Hot soapy water: Clean with a dish cloth and then dry with a soft cloth. Clean stainless steel surfaces in the grind direction only. Special stainless steel cleaning products are available from our after-sales service or from specialist retailers. Apply a very thin layer of the cleaning product with a soft cloth. Painted surfaces Hot soapy water: Clean using a damp dish cloth and dry with a soft cloth/towel.
en Trouble shooting 3Trouble shooting Malfunctions often have simple explanations. Please read the following notes before calling the after-sales service. Tr oubl e sho t i ng : Warning – Risk of electric shock! Incorrect repairs are dangerous. Repairs may only be carried out and damaged power cables replaced by one of our trained after-sales technicians. If the appliance is defective, unplug the appliance from the mains or switch off the circuit breaker in the fuse box. Contact the after-sales service.
Customer service en Accessories (not included in the scope of delivery) Note: These instructions apply to several appliance models. It may be the case that an optional accessory that is listed does not apply for your appliance. Note: Observe the installation instructions in the accessory.
Installation instructions en INSTALLATION INSTRUCTIONS I nst al at i on i nst r uct i onsInstallation instructions These instructions apply to several appliance variants. It is possible that individual features are described which do not apply to your appliance. ■ ■ ■ This appliance is installed in a upper cabinet. Follow the enclosed installation instructions for additional special accessories (e.g. for circulating-air mode). The surfaces of the appliance are sensitive.
Important safety information (Important safety information Read these instructions carefully. Only then will you be able to operate your appliance safely and correctly. Retain the instruction manual and installation instructions for future use or for subsequent owners. The appliance can only be used safely if it is correctly installed according to the safety instructions. The installer is responsible for ensuring that the appliance works perfectly at its installation location.
en General information : Warning – Risk of injury! Components inside the appliance may have sharp edges. Wear protective gloves. Risk of injury! ■ The appliance may fall down if it has not been properly fastened in place. All fastening components must be fixed firmly and securely. Risk of injury! ■ The appliance is heavy. To move the appliance, 2 people are required. Use only suitable tools and equipment. ■ : Warning – Risk of electric shock! Components inside the appliance may have sharp edges.
General information en Electrical connection : Warning – Risk of electric shock! Components inside the appliance may have sharp edges. These may damage the connecting cable. Do not kink or pinch the connecting cable during installation. PP The required connection data can be found on the rating plate inside the appliance; to do this, remove the metal mesh grease filter. Length of the cable: approx. 1.30 m This appliance complies with the EC interference suppression regulations.
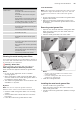
General information en Body wall thickness: 16 mm 1. Screw the mounting pieces to the body on the left and right. ¨ 2. Remove the tabs from the bottom of the mounting pieces. © 2. Connect the power cord provided to the appliance.¨ 3. Use the strain relief to secure the power cord in place.© $ $ PP % % PP [ Body wall thickness: 19 mm 1. Fold out the tabs on both of the mounting pieces. ¨ 2. Screw the mounting pieces to the body on the left and right. © 3.
Installation 5Installation I n s t a l a t i on $ % Sliding the appliance up into place en 1. Slide the appliance up into place and make sure it is positioned correctly. ¨ 2. Measure the distance between the appliance and the wall, and mark this on the filler strip. 3. If required, shorten the filler strip to the required & dimension. © 3. Carefully remove the appliance.
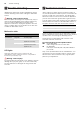
en Installation 2. Shorten the spacer to the required dimension and Final fitting stage insert it into the slot specified. 1. Slide the appliance up into place. ¨ 2. Lock the fastening bolts on the left and right. © 3. Fit the protective caps on the left and right. ª $ % & Connecting the pipes Note: If an aluminium pipe is used, smooth the area where it is to be connected before you connect it. 4. Establish the electrical connection.
Installation en 19
*9001058693* 9001058693 980402 en