
Assembly & Installation Instructions

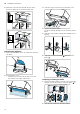
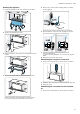
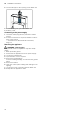


Table Of Contents
- Extractor hood
- en
- Table of contents
- 1 Safety
- 2 Avoiding material damage
- 3 Environmental protection and saving energy
- 4 Operating modes
- 5 Familiarising yourself with your appliance
- 6 Accessories
- 7 Basic operation
- 8 Cleaning and servicing
- 9 Troubleshooting
- 10 Disposal
- 11 Customer Service
- 12 Installation instructions
- 12.1 Scope of delivery
- 12.2 Appliance dimensions
- 12.3 Safety clearances
- 12.4 Secure installation
- 12.5 General information
- 12.6 Instructions for the electrical connection
- 12.7 Information on the installation situation
- 12.8 Instructions for the exhaust air pipe
- 12.9 Instructions for the air extraction mode
- 12.10 Information about circulating-air mode
- 12.11 Installation
- 12.11.1 Checking the unit
- 12.11.2 Preparing the units
- 12.11.3 Preparing the appliance
- 12.11.4 Preparing circulating-air mode
- 12.11.5 Installing the appliance
- 12.11.6 Establishing the exhaust air connection
- 12.11.7 Establishing the connection for the circulated air
- 12.11.8 Connecting to the power supply
- 12.11.9 Removing the appliance

en Installation instructions
14
2.
Make the cut-out for the exhaust air pipe either
above the fitted unit or behind the fitted unit.
Preparing the appliance
1.
Fit the one-way flaps on the air outlet and click them
into place.
2.
Open the filter cover.
‒ Grasp the front corners of the filter cover and
pull it down in a single, swift motion.
3.
Undo the hinge lock and remove the filter cover.
4.
Remove the grease filters.
To avoid causing damage, do not bend the grease
filters.
5.
Undo the control panel cabling and cabling for the
lighting.
6.
Undo the screws in the frame and remove the
frame .
Preparing circulating-air mode
1.
Position the filter retainer correctly on the motor
and turn it to the front until it clicks into place .
2.
Slide the odour filter into the filter retainer.