
Assembly & Installation Instructions

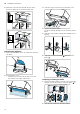
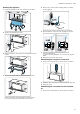
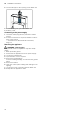


Table Of Contents
- Extractor hood
- en
- Table of contents
- 1 Safety
- 2 Avoiding material damage
- 3 Environmental protection and saving energy
- 4 Operating modes
- 5 Familiarising yourself with your appliance
- 6 Accessories
- 7 Basic operation
- 8 Cleaning and servicing
- 9 Troubleshooting
- 10 Disposal
- 11 Customer Service
- 12 Installation instructions
- 12.1 Scope of delivery
- 12.2 Appliance dimensions
- 12.3 Safety clearances
- 12.4 Secure installation
- 12.5 General information
- 12.6 Instructions for the electrical connection
- 12.7 Information on the installation situation
- 12.8 Instructions for the exhaust air pipe
- 12.9 Instructions for the air extraction mode
- 12.10 Information about circulating-air mode
- 12.11 Installation
- 12.11.1 Checking the unit
- 12.11.2 Preparing the units
- 12.11.3 Preparing the appliance
- 12.11.4 Preparing circulating-air mode
- 12.11.5 Installing the appliance
- 12.11.6 Establishing the exhaust air connection
- 12.11.7 Establishing the connection for the circulated air
- 12.11.8 Connecting to the power supply
- 12.11.9 Removing the appliance

Installation instructions en
15
Installing the appliance
1.
Insert the appliance into the opening in the fitted
unit and screw it to the fitted unit .
2.
Tighten the fastening screws.
3.
Attach the frame and screw it to the appliance from
below.
4.
Secure the frame and the appliance with screws.
If the screws are not accessible from the exterior,
the screws can also be fitted from the interior.
5.
Restore the control panel cabling and the cabling
for the lighting.
The plug can only be inserted into one position.
6.
Ensure that the connector has engaged correctly.
7.
Fit the grease filters.
To avoid causing damage, do not bend the grease
filters.
8.
Attach and close the filter cover.
Establishing the exhaust air connection
1.
Secure the exhaust pipe to the air pipe connector.
2.
Establish the connection to the exhaust air opening.
3.
Seal the joints.
Establishing the connection for the circulated
air
1.
Secure the exhaust pipe to the air pipe connector.