[en] Instruction manual Double oven U14M42.
Ú Table of contents e[nuoIrs]ctimanul Important safety information.....................................................4 Causes of damage .............................................................................5 Energy and environment tips ....................................................5 Saving energy......................................................................................5 Environmentally-friendly disposal.....................................................5 Your new appliance ...
: Important safety information Read these instructions carefully. Only then will you be able to operate your appliance safely and correctly. Retain the instruction manual and installation instructions for future use or for subsequent owners. This appliance is only intended to be fully fitted in a kitchen. Observe the special installation instructions. Check the appliance for damage after unpacking it. Do not connect the appliance if it has been damaged in transport.
Risk of injury! Scratched glass in the appliance door may develop into a crack. Do not use a glass scraper, sharp or abrasive cleaning aids or detergents. Risk of electric shock! ■ Incorrect repairs are dangerous. Repairs may only be carried out by one of our trained after-sales engineers. If the appliance is faulty, unplug the mains plug or switch off the fuse in the fuse box. Contact the after-sales service. ■ The cable insulation on electrical appliances may melt when touching hot parts of the appliance.
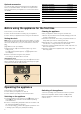
Your new appliance In this section, you will find information on ■ the control panel ■ the operating modes Control panel %RWWRP RYHQ 7HPSHUDWXUH LQGLFDWRU ODPS 7RS RYHQ (OHFWURQLF FORFN 7HPSHUDWXUH LQGLFDWRU ODPS 2SHUDWLQJ PRGH VHOHFWRU Control element KJ 7HPSHUDWXUH VHOHFWRU 5RWDU\ VHOHFWRU &ORFN IXQFWLRQ EXWWRQ 2SHUDWLQJ PRGH 7HPSHUDWXUH VHOHFWRU VHOHFWRU Use Clock function button Selects the desired clock function (see sec
Your accessories In this section, you will find information on ■ ■ When inserting the baking tray or the universal pan, check Your accessories ■ the correct way to insert the accessories into the cooking compartment ■ ■ the shelf positions ■ the optional accessories that the lug (a) is in the rear part of the of the accessory that the sloping edge of the accessory faces towards the appliance door when it is inserted Accessories D D The following accessories are included with your appliance: Wi
Optional accessories You can purchase optional accessories from the after-sales service or specialist retailers. You will find a comprehensive range of products for your appliance in our brochures and on our website. Optional accessories Order no. System steamer N8642X3 Grill set Z1240X2 Glass pan Z1262X0 Extra-deep pan, enamelled Z1272X0 Optional accessories Order no.
Electronic clock Clock display In this section, you can read about ■ ■ ■ ■ how to set the timer how to switch your appliance off automatically (cooking time and end of operation) how to switch your appliance on and off automatically (preset operation) how to set the time &ORFN IXQFWLRQ EXWWRQ Clock function 5RWDU\ VHOHFWRU Use Q Timer You can use the minute minder as an egg timer or a kitchen timer. The appliance does not switch on or off automatically.
Once the cooking time has elapsed, the bottom oven switches off automatically. 1. Turn the operating mode and temperature selector back to the Û zero position. 2. Press the KJ clock function button to exit the clock function. End of operation Automatic switch-off at a set time. 1. Set the operating mode and temperature for the bottom oven. The bottom oven starts heating. 2. Press the KJ clock function button repeatedly until theKJ and y symbols light up. 3.
Baking on one level If you are baking on one level with 3 CircoTherm®, always place a round tin in the centre of the wire rack (figure A) and always place a loaf tin diagonally (figure B). $ Place the lower baking tin to the left (figure A) and the upper baking tin to the right (figure B) on the wire rack. % $ % Four baking tins on two levels If you are baking on one level with 3CircoTherm®, always place two round baking tins diagonally to each other on the wire rack (figure C).
Meal Oven Swiss roll õ õ ô õ õ õ õ õ õ õ ô õ õ õ õ ô õ õ õ õ õ õ õ õ õ õ õ õ õ õ õ õ õ õ Tart Pies Biscuits Meringue Pavlova Fruit crumble Yorkshire pudding Vol au vents Quiche (White) bread Homemade pizza Jacket potatoes Setting 3 % % 3 % 3 3 3 3 % % 3 3 3 % % 3 % 3 % 3 % 3 3 3 % 3 % 3 % 3 3 % 3 Level Temperature in °C Time in minutes 1 180 190* 10 - 15 2 190 200* 10 - 15 1 180 190* 10 - 15 1 160 170* 50 - 60 1 180 190* 50 - 60 1+3 160 170* 50 - 60 1 170 180*
Meal Oven Setting Level Temperature in °C Time in minutes Frozen pizza õ 3 1 180 - 200* 15 - 25 õ % 2 190 - 210* 15 - 25 ô % 1 180 - 200* 10 - 20 õ 3 1+3 170 - 190* 20 - 30 õ 3 1 200 - 210* 10 - 15 õ % 2 190 - 210* 10 - 15 õ 3 1 180 - 190* 10 - 20 õ % 2 190 - 200* 10 - 20 õ 3 1+3 170 - 180* 15 - 20 õ 3 1 180 - 200* 25 - 30 õ % 2 190 - 210* 25 - 30 õ 3 1 180 - 190* 20 - 25 õ % 2 190 - 200* 20 - 25 õ 3 1 180 - 190* 25 - 30 õ % 2 19
Frozen products are not browned, not crispy or the specified times are not correct Saving energy Remove ice from frozen products before baking. Do not use frozen products that are heavily frosted Only preheat the appliance when it is specified in the baking table that you should do so. Use dark baking tins as these absorb the heat better. Make use of the residual heat with longer baking times and switch the oven off 5 10 minutes before the end of the baking time.
Standing time At the end of the cooking time, switch the oven off and leave the roast to stand for approximately 10 minutes in the cooking compartment with the door closed. The recommended standing time is not included in the cooking times specified. Meal Oven Setting Level Temperature in °C Time, min. per 500 g + add.
Meal Oven Setting Level Temperature in °C Time, min. per 500 g + add. time õ 3 1+3 160 30 + 25* õ 3 1+3 180 20 + 25 Casseroles Oven Setting Level Temperature in °C Time, min. per 500 g + add.
You can influence the grilling result by changing the position of the wire rack. Note: Always use the universal pan in the standard position (not the other way up).
Meal Oven Setting Level Temperature in °C Time in minutes õ ( 4 270 Gammon Steaks, 1 - 2 cm thick 1st side: 9 - 12 2nd side: 5 - 7 ô ( 2 270 1st side: 10 - 12 2nd side: 5 - 7 Chicken Drumsticks õ ( 3 250 1st side: 15 - 17 2nd side: 10 - 13 ô ( 2 250 1st side: 16 - 20 2nd side: 12 - 15 Breast (boneless) õ ( 4 250 1st side: 12 - 15 2nd side: 7 - 10 ô ( 2 250 1st side: 13 - 15 2nd side: 8 - 10 Whole chicken õ 4 2 200 230 70 - 90*** Quarter õ 4 2 210 230 40 -
Yoghurt You can also use the appliance to make home-made yoghurt: The heat of the \ cooking compartment light is used for this. 5. Switch on the appliance. õ Main oven: Set the operating mode selector to CircoTherm® and preheat for 5 minutes at 50 °C. or ô Top oven: Set the operating mode selector to Fullsurface grill and preheat for 15 minutes at 100 °C. 1. Remove accessories and hook-in racks, telescopic shelves or separate fitting systems. 2. Heat 1 litre of long-life milk (3.
Appliance part Cleaning agent/aid Door seal Hook-in rack/telescopic shelf Accessories Hot soapy water Hot soapy water Soak in hot soapy water, clean with a brush and sponge or wash in the dishwasher. Keeping the appliance clean To avoid getting the cooking compartment dirty, ■ ■ ■ ■ ■ clean the cooking compartment after each use, as dirt will bake on the next time it is heated up, and this can only be removed with difficulty always remove flecks of limescale, grease, starch and albumin (e.g.
Removing the door panel Fitting the door panel Note: Before removing, make a note of which way round the door panel is fitted, so that it is not refitted the wrong way round. 1. Insert the door panel at an angle towards the back into both brackets as far as it will go. The smooth surface must face outwards. 1. Unhook the appliance door and lay it on a soft, clean surface with the front side facing downwards (see section: Removing and installing the appliance door). 2.
Faults and repairs It is not always necessary to call the after-sales service. Sometimes, you can find a remedy yourself. You will find some tips for troubleshooting in the following table. : Risk of electric shock! ■ ■ Problem Work on the appliance electronics may only be performed by a specialist. Always disconnect the appliance from the power supply when work is carried out on the electronics. Switch off the circuit breaker or remove the fuse from your household fuse box.
After-sales service Our after-sales service is there for you if your appliance needs to be repaired. We will always find the right solution in order to avoid unnecessary visits from a service technician. Please note that there will be a fee for a visit by a service technician in the event of a malfunction, even during the warranty period. E number and FD number Please find the contact data of all countries in the enclosed customer service list. When calling us, please give the product number (E no.
Constructa Neff Vertriebs-GmbH Carl-Wery-Straße 34 D-81739 München *9000735712* 9000735712 940313