User Guide www.nektartech.com www.nektartech.
Content Introduction 4 Box Content Impact LX Features Minimum System Requirements Getting Started 4 4 4 5 Connection and Power Nektar DAW Integration Register for Updates Keyboard, Octave and Transpose 5 5 5 6 Octave Shift Program, MIDI Channel and Preset Control with the Octave Buttons Transpose, Program, MIDI Channel and Preset Control with the Transpose Buttons Wheels and Foot Switch 6 6 6 7 Pitch bend and Modulation Wheels Foot Switch Controlling MIDI Software 7 7 8 Mixer, Instrument and Prese
Dispose of product securely, avoiding exposure to food sources and ground water. Only use the product in accordance with the instructions. Note: This equipment has been tested and found to comply with the limits for a Class B digital device, pursuant to part 15 of the FCC Rules. These limits are designed to provide reasonable protection against harmful interference in a residential installation.
Introduction Thank you for buying the Nektar Impact LX+ controller keyboard. The Impact LX+ controllers are available in 25, 49, 61 and 88 note versions and come with setup software for many of the most popular DAWs. This means that for supported DAWs, the setup work has largely been done and you can focus on expanding your creative horizon with your new controller.
Getting Started Connection and Power The Impact LX+ is USB Class compliant. This means there is no driver to install to get the keyboard set up with your computer. Impact LX+ uses the built-in USB MIDI driver which is already part of your operating system on Windows and OS X.
Keyboard, Octave and Transpose The Impact LX+ keyboard is velocity sensitive so you can play the instrument expressively. There are 4 different velocity curves to choose from, each with varying dynamics. In addition, there are 3 fixed velocity settings. We recommend you spend a little time playing with the default velocity curve and then determine if you need more or less sensitivity.
Wheels and Foot Switch Pitch bend and Modulation Wheels The two wheels below the Octave and Transpose buttons are typically used for Pitch bend and Modulation. The Pitch bend wheel is spring loaded and automatically reverts to it’s center position upon release. It’s ideal to bend notes when you are playing phrases that require this kind of articulation. The bend range is determined by the receiving instrument. The Modulation wheel can be freely positioned and is programmed to control modulation by default.
Controlling MIDI Software Impact LX+ has incredible flexibility when it comes to controlling a DAW or other MIDI software. There are typically 3 different ways to set up Impact LX+‘s many controls, though it’s not uncommon to use a combination of different approaches. 1. Install the Impact DAW integration files for use with an existing DAW (must be on our supported list) 2. Set up a DAW with controller learn 3.
Controlling MIDI Software (cont) Global Controls Global controls are controls that are not stored in a preset and therefore Pitch bend/Modulation wheels plus the Foot Switch fall in this category. The 6 transport buttons in addition, are also global controls and assignments are stored over power cycling. As you change presets or adjust your preset controls, global controls remain unchanged. This makes sense since Transport and keyboard controls typically are set up to do one thing specifically. www.
Function Buttons The second row of buttons below the display contains 5 function and menu buttons. The buttons primary functions are to change track and patches in DAWs that are supported by Nektar DAW Integration. The following describes their secondary function. Shift/Mute When you press and hold this button, the MIDI output from real-time controls is muted. This allows you to reposition faders and pots without sending MIDI data.
Pads The 8 pads are velocity sensitive and programmable with either note or MIDI switch messages. This means you can use them as regular MIDI buttons as well as to punch out your drum beats and percussive melody parts. In addition, the pads have 4 velocity curve options and 3 fixed velocity options you can choose between, depending on what you are doing and your playing style. Pad Maps You can load and save up to 4 different pad setups in 4 memory locations called Pad maps.
What the Pad‘s LED Colors Tell You The pads color coding provides information about their current status. As you change pad maps for instance, you will notice that the MIDI note off color changes. This tells you which pad map is currently loaded.: PAD MAP COLOR 1 Green 2 Orange 3 Yellow 4 Red The above Pad Map color coding is only true when pads are programmed with MIDI notes.
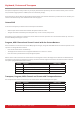
Pads Maps Default Settings Map 1 Note Note No. Data 1 Data 2 Data 3 Chan P1 C1 36 0 127 0 Global P2 C#1 37 0 127 0 Global P3 D1 38 0 127 0 Global P4 D#1 39 0 127 0 Global P5 E1 40 0 127 0 Global P6 F1 41 0 127 0 Global P7 F#1 42 0 127 0 Global P8 G1 43 0 127 0 Global Map 2 Note Note No.
Setup Menu The Setup menu gives access to additional functions such as control assign, load, save, selecting velocity curves and more. To enter the menu, press the [Shift]+[Patch>] (Setup) buttons. This will mute the MIDI output of the keyboard and instead the keyboard now is used to select menus. When the Setup menu is active, the display will show {S.E.t.} with the 3 dots blinking for as long as the menu is active.
Assigning Controls to MIDI messages Since the Mixer and Instrument presets are read-only, the first 4 functions C1-E1 applies only to Presets and cannot be selected if either Mixer or the Instrument [Inst.] preset is selected. To enter the Setup menu’s assign functions, please do the following: • Press [Preset] • Press [Shift]+[Patch>] (Setup) • The display now reads {S.E.t.
Assignment Types (E1) Most of the controls in the default presets are assigned to MIDI CC messages. But there are several other options and the below chart shows you which are available for the two types of controls.
Drawbar On/Off (F1) The Drawbar function reverses the value output of the 9 faders from the default 0-127 to 127-0. This can also be achieved by reversing the min/max values of a control when you program Data 1 and Data 2. However if you don’t want to change the reversal permanently in your preset, this function is ideal and here is how to activate it: • Press F1.
Global Functions and Options Unlike the Control Assign functions, Global functions can be accessed regardless of what preset has been selected. And just to recap: Pressing [Shift]+[Patch>] (Setup) buttons will activate the Setup menu and the display will show {S.E.t.} with the 3 dots blinking for as long as the menu is active. The following assumes the Setup menu is active.
Pads Velocity Curves (D2) There are 4 different pad velocity curves and 3 fixed velocity levels to choose between, depending on how sensitive and dynamic you want the Impact LX+ pads to play. Name Description Display abbreviation Normal Focus on mid to high velocity levels PC1 Soft The most dynamic curve with a focus on the low to mid velocity levels PC2 Hard Focus on the higher velocity levels.
Bank MSB (F#2) This function will send a Bank MSB MIDI message from the keyboard. Note, most software products don’t respond to Bank change messages but many MIDI hardware products do. Here is how you send out a Bank MSB message • Press the F#2 key on your keyboard to select Bank MSB. The display show the last sent Bank message or 000 by default • Change the value in decrements/increments using the keys with the -/+ symbols screened above (C3/C#3).
USB Port Setup (A2) Impact LX+ has one physical USB port however there are 2 virtual ports as you may have discovered during the MIDI setup of your music software. The additional virtual port is used by the Impact DAW software to handle communication with your DAW. You only need to change the USB Port Setup setting if the Impact LX+ setup instructions for your DAW specifically advises that this should be done. www.nektartech.
User Preset 1 GM Instrument Faders Ctrl Msg Type CC Data 1 Data 2 Chan Param F1 MIDI CC 73 127 0 Global Attack F2 MIDI CC 75 127 0 Global Decay F3 MIDI CC 72 127 0 Global Release F4 MIDI CC 91 127 0 Global Effect depth 1 (Reverb Send level) F5 MIDI CC 92 127 0 Global Effect depth 2 F6 MIDI CC 93 127 0 Global Effect depth 3 (Chorus send level) F7 MIDI CC 94 127 0 Global Effect depth 4 F8 MIDI CC 95 127 0 Global Effect depth 5 F9 MIDI CC 7 127
User Preset 2 GM Mixer 1-8 Faders Ctrl Msg Type CC Data 1 Data 2 Chan Param F1 MIDI CC 7 127 0 1 CH1 Volume F2 MIDI CC 7 127 0 2 CH2 Volume F3 MIDI CC 7 127 0 3 CH3 Volume F4 MIDI CC 7 127 0 4 CH4 Volume F5 MIDI CC 7 127 0 5 CH5 Volume F6 MIDI CC 7 127 0 6 CH6 Volume F7 MIDI CC 7 127 0 7 CH7 Volume F8 MIDI CC 7 127 0 8 CH8 Volume F9 MIDI CC 7 127 0 G Selected CH Volume Ctrl Msg Type CC Data 1 Data 2 Chan Param B1 MIDI CC (Toggle)
User Preset 3 GM Mixer 9-16 Faders Ctrl Msg Type CC Data 1 Data 2 Chan Param F1 MIDI CC 7 127 0 9 CH1 Volume F2 MIDI CC 7 127 0 10 CH2 Volume F3 MIDI CC 7 127 0 11 CH3 Volume F4 MIDI CC 7 127 0 12 CH4 Volume F5 MIDI CC 7 127 0 13 CH5 Volume F6 MIDI CC 7 127 0 14 CH6 Volume F7 MIDI CC 7 127 0 15 CH7 Volume F8 MIDI CC 7 127 0 16 CH8 Volume F9 MIDI CC 7 127 0 G Selected CH Volume Ctrl Msg Type CC Data 1 Data 2 Chan Param B1 MIDI CC (
User Preset 4 “Learn Friendly” 1 Faders Ctrl Msg Type CC Data 1 Data 2 Chan F1 MIDI CC 80 127 0 Global F2 MIDI CC 81 127 0 Global F3 MIDI CC 82 127 0 Global F4 MIDI CC 83 127 0 Global F5 MIDI CC 85 127 0 Global F6 MIDI CC 86 127 0 Global F7 MIDI CC 87 127 0 Global F8 MIDI CC 88 127 0 Global F9 MIDI CC 3 127 0 Global Ctrl Msg Type CC Data 1 Data 2 Chan B1 MIDI CC (Toggle) 66 127 0 Global B2 MIDI CC (Toggle) 67 127 0 Global B3 MIDI
User Preset 5 “Learn Friendly” 2 Faders Ctrl Msg Type CC Data 1 Data 2 Chan F1 MIDI CC 80 127 0 Global F2 MIDI CC 81 127 0 Global F3 MIDI CC 82 127 0 Global F4 MIDI CC 83 127 0 Global F5 MIDI CC 85 127 0 Global F6 MIDI CC 86 127 0 Global F7 MIDI CC 87 127 0 Global F8 MIDI CC 88 127 0 Global F9 MIDI CC 3 127 0 Global Ctrl Msg Type CC Data 1 Data 2 Chan B1 MIDI CC (Trig) 66 127 0 Global B2 MIDI CC (Trig) 67 127 0 Global B3 MIDI CC
Factory Restore If you need to restore factory settings for example if you by mistake managed to change the assignments needed for DAW integration files, here is how you do that. • Make sure your Impact LX+ is switched off • Press the [Octave up]+[Octave down] • Switch your Impact LX+ on www.nektartech.
www.nektartech.