
User's Manual


8 Nektar Impact LX49+ & LX61+ User Guide www.nektartech.com
Impact LX+ has incredible flexibility when it comes to controlling a DAW or other MIDI software. There are typically 3 different ways to set
up Impact LX+‘s many controls, though it’s not uncommon to use a combination of different approaches.
1. Install the Impact DAW integration files for use with an existing DAW (must be on our supported list)
2. Set up a DAW with controller learn
3. Programming Impact LX+ controls for your software
Option 1 only requires installation of our DAW integration files and following the included PDF guide. You will need to create a user here:
www.nektartech.com/registration and register your LX+ to get access to the files and PDF user guide.
If you plan to use your DAWs learn function or Impacts presets at a later stage, we do recommend reading through this chapter in order to
understand how Impact LX+ is structured. Lets start with an overview of what is stored in memory.
Mixer, Instrument and Presets
Impact LX+ has 5 user configurable presets though in reality, the total amount of useable presets is 7. That‘s because the Mixer and Instru-
ment buttons each recall a read-only preset..
A preset contains control settings for the 9 faders, 9 fader buttons and 8 pots.
The Preset button recalls the currently selected user preset and there are 3 different ways you can recall any of the 5 presets:
1. Press and hold [Preset] while using the -/+ keys (C3/C#3) to change the preset selection.
2. Assign either the Octave or Transpose buttons to change preset (described on page 6)
3. Use the Setup menu to load a specific Preset
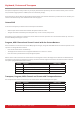
Below is a list of what each of the 5 presets are programmed to by default. Each can be programmed with your own MIDI settings which
we will cover later.
Preset Description
1 GM Instrument preset
2 GM Mixer ch 1-8
3 GM Mixer ch 9-16
4 Learn friendly 1 (Fader buttons Toggle)
5 Learn friendly 2 (Fader buttons Trigger)
Presets 1, 4 and 5 are set up to transmit on the global MIDI channel. When you change the global MIDI channel (as described earlier, you
can use the Octave and Transpose buttons to do this at any time) you therefore change the MIDI channel that these presets transmit on.
With 16 MIDI channels available it means you can create 16 unique setups and just change the MIDI channel to switch between them.
A list of controller assignments for each of the 5 presets is available on pages 22-26.
Controlling MIDI Software