
Owner's manual


________________________________________________________________________________________
Document No. DOC-IPC-003,
User Manual iPC-Series & nPC300, Rev B Rel. 12-2013 Page 20 of 24
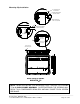
Drive Removal and Replacement
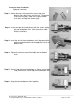
These products are equipped with an easily removable SATA drives. They are designed so that there
is no need to remove the cover on these units to change a drive. There is no reason to remove the rear cover
from the unit. The drive is simply removed by loosening the two thumbscrews and pulling the drive out.
Remove all power to the unit before removing the drive.
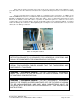
There are no cables to remove when pulling the drive from the chassis. Once the drive is removed
there are four screws on the back of the bracket that hold the drive. If the drive is being replaced these screws
secure the drive to the plate. To reinstall the drive simply insert the bracket with drive attached into the chassis
and slide forward. Completely push the drive in and secure the thumbscrews before reapplying power to the
unit.
Solid State Drives mount directly to the bracket; however a thin plastic insulator is required to be
inserted between the bracket and a standard rotating media hard drive. When the unit is ordered with a
rotating hard drive these insulators are pre-installed.
Various drive options with a mounting bracket pre-installed are available for purchase from Nematron.
If a spare drive is required these are recommended. These spare drives can be used with third party software
to create complete system backups for your installation.
Drive Removal