
Instruction Manual

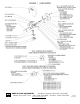
Table Of Contents

2
To Clean
Minimize the use of alkaline cleansers to clean the machine. Such cleansers may cause pitting which could eventually impair cleaning
and necessitate replacement of the machine.
The EASY SLICER™ can be washed as an assembled unit by loosening the LOCKING SCREW and removing the UNIT to a sink or
dishwasher.
The EASY SLICER™ was designed for easy disassembly for cleaning as follows:
1. Turn SHAFT LOCK ASSEMBLY counter-clockwise to the stop and pull the ROTARY SLICING UNIT away from the TROUGH & LEG
ASSEMBLY (this will slip out easily). BE CAREFUL OF THE SHARP BLADES!
2. Lift the GUARD off the TROUGH AND LEG ASSEMBLY.
3. Remove HINGE PIN and the COVER comes off.
4. Turn the PUSH ROD counter-clockwise to unthread it from the PUSH PLATE. This permits removal of the PUSH ROD and the PUSH
PLATE.
5. Remove the LOCK PIN by pulling it to the left, and pull the SHAFT LOCK ASSEMBLY to remove it from the TROUGH & LEG
ASSEMBLY.
NOTE: Periodically clean the shaft lock bore with (47945) BRASS BRUSH provided with the EASY SLICER to prevent the lock from
becoming difficult to turn.
6. When desired, the unit can be further disassembled as follows:
a) Loosen the thumbscrew to remove the ADJUSTING PLATE ASSEMBLY.
b) Remove the nut by turning it counter-clockwise, to remove the CARRIER AND BLADE ASSEMBLY.
c) Remove the screws to remove BLADES. NOTE: Mark the SCREWS so they can be put back in the same position to maintain a
smooth surface on the other side of the BLADE CARRIER.
d) Remove the corresponding screw by turning counter-clockwise to remove the GUIDE, the LEG or the HANDLE.
Wash with soap and water or mild detergent. Immediately after cleaning, reassemble by reversing the disassembly process described
above. This will protect the blade and avoid the risk of losing any of the parts.
To Clean Shredder
Follow instructions TO CLEAN (above) except remove the SHAFT by turning counter-clockwise and remove the screws to remove the
BLADE.
To Clean Fixed Cut Assembly
Follow instructions TO CLEAN (above) except remove the SHAFT by turning counter-clockwise and remove screws to remove BLADES.
NOTE: Mark the screws so they can be put back in the same position to maintain a smooth surface on the other side of the blade carrier.
To Sharpen Slicer Blades
To prolong the sharpness of your BLADES, they can be honed as follows:
1) If the unit is adjustable, adjust to the maximum slice width (1/2”).
2) Remove the ROTARY SLICING UNIT from the TROUGH AND LEG ASSEMBLY.
3) Use a fine honing stone (do not file) on the flat side of BLADE and, if needed, on the beveled side (be sure to maintain the original
sharpening angles).
Send your BLADES to NEMCO for sharpening when BLADES are too dull to restore by honing, or when the honing has altered original
bevels.
To Remove Blades
SLICER BLADES: Remove the ROTARY SLICING UNIT from the machine as for cleaning and remove flat head screws to release BLADES.
SHREDDER BLADES: Remove SHAFT and screws by turning counter-clockwise.
To Change Accessories
1. Turn SHAFT LOCK ASSEMBLY counter-clockwise to the stop and pull the ACCESSORIES from the TROUGH AND LEG ASSEMBLY.
2. Install the alternate ACCESSORY and turn the SHAFT LOCK clockwise to the stop.
To Lubricate
Lubricate the following places with mineral oil or equivalent (do not use cooking oil – it becomes sticky):
Arms on PUSH PLATE (Top & Bottom)
Grooves in the TROUGH
Plastic Bearings in the TROUGH
Slots in the ADJUSTABLE SLICER SHAFT
Frequency of lubrication will vary with the amount of use and cleaning methods. Lubricate when needed.
Other Repairs
Replacement of most parts or assemblies is simple and obvious. If other repair is needed, we recommend the unit be returned to NEMCO.
NEMCO FOOD EQUIPMENT 301 Meuse Argonne, Hicksville, OH 43526
Phone: (419) 542-7751 Fax: (419) 542-6690 Toll free: 1-800-782-6761 46016
. www.nemcofoodequip.com 9/8/04