
Instruction Manual

6
3
PRE-OPERATING CHECKS
AND ADJUSTMENTS
Before replacing the Cutting Guard, perform the
following checks:
Note: These steps presume that you will be
processing medium-sized shrimp. If you will be
working small or large shrimp, the Depth Cut Roller
must be changed and the Feeder Discs will need
readjustment. The steps needed to do each of
these are covered later in this booklet.
CAUTION: USE CARE WHEN WORKING NEAR
THE EXPOSED BLADE. IT IS SHARP AND CAN CUT
FINGERS, USE CUT PROTECTIVE GLOVES!
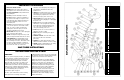
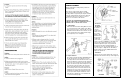
1. Cutting Blade
Make sure that the Round Cutting Blade is secure
on its shaft and cannot slip. Hold the Inner Blade
Nut (closest to the motor - Item 12) with one of the
included wrenches. With the other wrench, turn the
Outer Cap Nut (Item 16) clockwise until it is tight
(See Figure A). Do not overtighten.
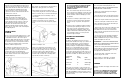
2. Depth Cut Roller
The Depth Cut Roller should be centered between
the two Feeder Discs (See Figure B). If it is not
correctly positioned, unscrew and remove the outer
plastic Jam Nut (Item 7) from the Feeder shaft and
remove the Outer Feeder Disc (Item 8). Slide the
Depth Cut Roller along its shaft until it just touches
the Inner Disc (Item 9). Replace the Outer Disc.
When remounting this Disc, make sure that the
two raised keys on the Inner Disc fit into the two
keyways in the center of the Outer Disk that are
marked ‘M’ (for medium sized shrimp). It may be
necessary to lift the Depth Cut Roller in order to
mate the Discs. Replace the outer Jam Nut and
screw down until finger tight.
3. Feeder Disc
Assembly
Positioning
Look down
over the
Feeder Discs.
Make sure that
the Cutting
Blade is cen-
tered between
the two Discs
and that the
groove in the
Depth Cut Roller is centered over the Blade. If it
is incorrectly positioned, unscrew the Feeder
Shaft inner plastic nut (Item 10) by hand until
the entire Feeder Disc assembly will slide on
its shaft. The nut is unscrewed by turning it clock-
wise. See Figure C. Align the Disc Assembly so
that the blade is properly centered and hand
tighten the plastic nut.
4. Lubrication
Remove the cap from the dropper tip of the food
lubricant bottle. Puncture the top of the dropper tip