
Instruction Manual

4
with a pin or small nail. Place several drops of
lubricant on the Depth Adjustment Shaft on both
sides of the Roller at its center hole. Lift the bent
Roller Shaft and slide the Roller back and forth on
it, over the lubricant, until lubricant is worked
under the Roller. To ensure smooth and quiet
operation, the Roller should be lubricated in this
manner before each use.
5. Cutting Guard Replacement
Make sure that the power switch is in the
‘OFF’ position before proceeding. Make sure
that the notch in the top of the Cutting Guard
mates with the projection at the top of the front
plate and that the Guard snaps into place on
both sides. The threaded end of the Depth
Adjusting Shaft fits through the plastic washer
in the open arc in the front of the Guard. Replace
the Adjusting Knob.
PICKING A WORK
LOCATION
Choose a work location with adequate space so that
you can work freely, that is well lighted, and is close
to a standard 120 volt A.C. (240 volt for export
model) three blade wall outlet (the line cord is about
six feet long). Arrange to drape the line cord (and
the extension cord, if one is used) where it will not
interfere with your working freedom of movement
and where it will not trip passersby.
The ShrimpPro should be placed on a flat, non-
porous surface with the exit chute over the counter
edge above a sing or catch tray. DO NOT select
a location which can be flooded with water.
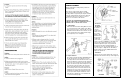
The user must always work on the right side of the
machine with the Feed Slot in the Cutting Guard
facing him (Figure D).
CUTTING AND DEVEINING SHRIMP
To be cleanly cut, shrimp must be raw, fully thawed
and firm. The cutting procedure is as follows:
1. After making sure that power switch is in the
‘OFF’ position, plug the line cord into the wall outlet.
2. Place a container, tray or 1/2 size steam table pan
containing thawed, uncooked shrimp on top of
the machine.
3. Loosen Depth Adjustment Knob and slide it to the
shallowest cut position (top of arc, away from
‘Deeper Cut’ arrow as shown in Figure E.) Tighten
Knob.
4. Turn the ShrimpPro ‘ON’.
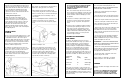
5. Pick up on shrimp at the tail end. Turn it so the
back of the shrimp is away from you and lower it
into the Feeder opening on the top of the Cutting
Guard (see Figure F). The shrimp should be
inserted so that it falls between the Feeder Discs
and the Depth Cut Roller. The cut shrimp will be
deposited in your sink or catch tray.
5
WARNING: NEVER, UNDER ANY CIRCUMSTANCES,
ALLOW YOUR FINGERS TO ENTER THE FEEDER
SLOT, A FINGER CAN BE DRAWN INTO THE
MACHINE BY THE FEEDER DISCS AND BE
SEVERELY INJURED.
Also, do not allow foreign objects to enter the slot.
They could cause the ShrimpPro to jam and create
serious damage. Should shrimp not feed properly,
turn the machine off before attempting to correct
the problem.
6. Inspect the cut shrimp. If greater depth of cut is
desired, loosen the Depth Cut Knob and slide it
down to a deeper cut position, then tighten the
Knob.
7. Pass the same cut shrimp through the machine
again and again, adjusting the depth of cut each
time until you get the cut depth that you want.
Depending upon the adjustment, shrimp can be
lightly cut and deveined, butterflied or split, (knob
in the full down position) or cut in any desired
depth from light to full split.
SETTING UP FOR DIFFERENT
SIZE SHRIMP
At delivery, the ShrimpPro has been set up for
shrimp in the medium size range. If you want to cut
shrimp of a different size, you must change the
Depth Cut Roller and readjust the Feeder Disc
spacing. ShrimpPro is shipped with two additional
Rollers; one for small shrimp and one for large
shrimp. The chart below shows which Roller is
designed for each shrimp size group and what
Feeder Disc spacing setting goes with each. Due to
shrimp size and packing variations, your experience
may differ somewhat. Use what works best for you.
Shrimp Size Disc
Range Setting Roller
70/80-41/50 S thinnest (S)
36/40-U/15 M medium (M)
U/12-U/8 L thickest (L)
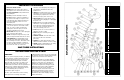
The steps you must take to set the machine up to
cut different size shrimp are similar to those covered
in the earlier Section of PRE-OPERATING CHECKS
AND ADJUSTMENTS. Refer back to that Section’s
text and illustrations if you require clarification of the
instructions below.
1. Make sure that the ShrimpPro power switch is in
the ‘OFF’ position and unplug the line cord.
NOTE: ALWAYS UNPLUG THE MACHINE BEFORE
REMOVING THE CUTTING GUARD.
2. Remove the Cutting Guard by unscrewing the
Depth Adjustment Knob.
3. Unscrew and remove the Feeder Shaft outer plas-
tic nut, then remove the Outer (female) Feeder Disc.
4. Remove the Depth Cut Roller from the bent shaft.
5. Select the new Depth Cut Roller from the chart
above and slide it onto the Roller shaft until it just
touches the Inner Feeder Disc.
6. Remount the Outer Feeder Disc, making sure that
it always engages the correct keys around the
inner diameter of the Inner Disc as listed in the
chart. Screw the outer plastic nut back on the shaft,
making it hand tight.
7. Loosen the inner Feeder Shaft Nut and slide the
Disc assembly along the shaft until the Cutting
Blade is centered over the groove in the selected
Roller. Hand tighten the inner nut.
A REMINDER — USE CAUTION WHEN WORKING
NEAR THE CUTTING BLADE! IT IS ALWAYS BEST TO
USE CUT PROTECTIVE GLOVES.
8. Replace the Cutting Guard and Depth Adjustment
Knob, making sure that Depth Shaft goes through
the plastic Guide Washer in Guard arc opening.
Set adjustment for shallowest cut.
9. Check power switch. It should be in the ‘OFF’
position. Plug the line cord in.
10. Turn machine on and begin to cut shrimp.
Adjust for depth of cut as described earlier.
CLEANING
ShrimpPro should be thoroughly cleaned after each
days use.
CAUTION: DO NOT IMMERSE THE UNIT IN WATER.
THIS COULD CAUSE DAMAGE TO THE MACHINE
AND CREATE THE POSSIBILITY OF OPERATOR
ELECTRICAL SHOCK THE NEXT TIME IT IS USED.