
Manual

*Patents Pending
©2007 NEMO Equipment, Inc.
MOKI
™
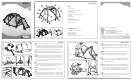
OVERVIEW
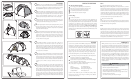
SET UP
To take down Moki™, first empty tent, remove accessories (including
the vestibule, Pawprint™, and Cheez™ insulation), and shake out
moisture and debris. Water will add weight to your pack and can lead to
mildew.
1
Unclip and remove the exterior poles. Carefully pull the interior poles
out through the main door. If the pole wraps bind to the interior poles,
it may be necessary to detach them before removing the poles.
2
Try to clean as much dirt and debris from your tent as possible before
packing it. This will help preserve the breathability of the tent fabrics
and reduce overall wear and tear.
3
Stuff the tent shell into its dry bag style stuff sack. Fold the top edge of
the stuff sack down several times to make an airtight seal. Allow excess
air to escape while compressing. Secure the stuff sack with the
compression straps on both sides. Place the poles into the pole bag.
See features section for more about modular packing of Moki™.
4
Remember to leave no trace even in winter. Before leaving your
campsite take a thorough look around making sure you have not left
anything behind, out of place, or damaged.
5
TAKE DOWN
1
2
3
6
4
1. Internal Poles
2. Zipper for Vestibule Attachment
3. External Poles
4. PU Weather Window
5. Internally Deployable Strutted Vents
6. Side Door
7. 2nd Main Door
8. Pole Sleeves
9. Multiple Guy-out Points
10. Reinforced Corner Pockets
11. Door Tie-backs
12. PU Weather Checking Window
13. Zip-on Vestibule
14. Upper Vestibule Panel
15. Connection Panel
16. Cheez™ Insulation (Sold Separately)
www.nemoequipment.com
NEMO EQUIPMENT INC.
100 Factory Street, Nashua, NH 03060
Phone: 1-800-997-9301
E-mail: journey@nemoequipment.com
Lay out the contents of Moki™ and make sure that you received your
tent and the following: 4 long poles, one short pole, curved vestibule
pole, vestibule, upper vestibule panel, connection panel with red Velcro,
pole stuff sack, dry bag style stuff sack, 10 stakes, guy lines, Seamgrip®
with nozzle, Tear-aid™ fabric repair patchs and pole repair sleeve.
Seam sealing adds strength and waterproofness to tent. It needs at least
24 hours to cure before using. See insert with included Seamgrip®.
Begin the setup of your tent by staking it out on level ground. Insert one
end of a black pole through pole sleeve and into grommet on red
webbing. Place other end of pole through opposite pole sleeve and into
grommet on red webbing. Repeat with second pole in the grommets on
black webbing. Clip tent to poles.
Zip the upper vestibule panel to the vestibule and to the tent. Slide the
vestibule pole through the sleeve. Attach pole to grommets in tent
anchors. Then attach vestibule grommets to pole ends and tighten
webbing to hold vestibule in place. Stake out the vestibule front corners.
Vestibule and Cheez™
Moki™
4
2
1
6
6
5
4
4
3
4
5
6
7
10
11
2
9
1
16
14
12
13
The corners of Moki™ are reinforced to receive the ends of the orange
interior poles. Place pole ends in button snaps at corners. Use the Velcro
wraps to secure the poles along the inside of the tent shell.
5
Insert short pole into grommets on webbing between top vents. Use
finger loops to help get the pole in and out.
3
4
15
8
8