NEMO MISSION Our 2010 product line is the result of 8 years of devoted labor and half a million years or so of developing better tools for shelter and survival. NEMO is about what we have just discovered and what we have known for a long time. It’s about beautiful design and intelligent engineering. It’s about serene cloudless days and bitter cold nights spent battling snow drifts and frostbite.
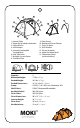
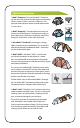
5 4 14 6 13 7 2 12 8 1 9 11 10 1. Internal Poles 2. Zipper for Vestibule Attachment 3. External Poles 4. UVX Window 5. Internally Deployable Strutted Vents 6. Dual Side Doors 7. Multiple Guy-out Points 8. 2nd Main Door Capacity: Minimum Weight: Packed Weight: Packed Dimensions: Frame: Shell Fabric: Vestibule Fabric: Floor Fabric: Floor Dimensions: Interior Height: Floor Area: Vestibule Area: 9. Pole Sleeves 10. Reinforced Corner Pockets 11. Door Tie-backs 12. UVX Window 13.
Preparing Your Tent 1. Lay out the contents of your Moki™ tent, and make sure that you received the following: tent shell, four long poles, one short pole, one curved vestibule pole, vestibule, upper vestibule panel, connection panel with red Velcro®, pole stuff sack, dry bag style stuff sack, storage stuff sack, 10 stakes, guy lines, Seamgrip® with nozzle, Tear-aid™ fabric repair patches, and pole repair sleeve. 2. NOTE: TENT IS NOT FULLY WATERPROOF UNTIL IT IS SEAM SEALED.
MOKI™ Defending Against Every Element. When we say 4 season, we mean it. Our ambassadors take Moki™ to the Himalayas and we use it for surf trips on the coast. Over half of Moki’s™ single-wall exterior is convertible to mesh, which gives you the flexibility and comfort you need in any climate. A large vestibule is included with Moki™ and an optional, additional vestibule can be zipped to the opposite door for extra gear storage.
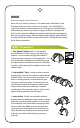
Optional Accessories 1. Moki™ Footprint: To install the Moki™ Footprint, slip the split rings over each of the eight corresponding corner anchors. Make sure the Footprint is not exposed under the tent shell or it could collect water in a rain storm. 2. Moki™ Pawprint™: Connect the button snaps on the corners of the Pawprint™ to the button snaps on the inside corners of the tent. Attach the sides of the Pawprint™ with Velcro® to the sides of the tent. 3.
NEMO Quality There is a reason why our logo resembles a medieval shield. If you’ve ever seen an authentic medieval shield or piece of armor, the detail and quality of craftsmanship are astonishing. Hours were spent shaping and perfecting every component knowing the gravity of purpose and the need for reliable performance. At NEMO, we take the same approach to quality. We know from our own experience how vital a tent can be for comfort and survival.
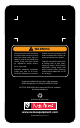
WARNING Never place your stove, campfire, or other flame source in or near your tent. Never cook, light, or refuel a stove or any other heat source inside your tent. Death by suffocation and/or serious burns is possible. Maintain adequate ventilation inside your tent at all times. Death by suffocation is possible. Anchor your tent properly at all times to reduce the risk of loss or injury to the tent or occupants.
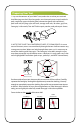
INSTRUCTIONS FOR SETUP 1 To contact NEMO Customer Service Email: journey@nemoequipment.com Phone: 800-997-9301 Stake Corners (optional) Secure the corner anchors by pounding the stakes into the ground with a rock or hard object. If the ground is too hard, trap the stakes under a rock or another heavy object. 2 Attach Outer Poles Insert a long black pole through the short black sleeve on Moki’s™ side and into grommet on red webbing. Repeat on opposite side.