
Manual

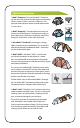


Optional Accessories
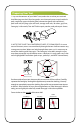
1. Moki™ Footprint: To install the Moki™ Footprint,
slip the split rings over each of the eight corresponding
corner anchors. Make sure the Footprint is not
exposed under the tent shell or it could collect water
in a rain storm.
2. Moki™ Pawprint™: Connect the button snaps on
the corners of the Pawprint™ to the button snaps on
the inside corners of the tent. Attach the sides of the
Pawprint™ with Velcro® to the sides of the tent.
3. Extra Moki™ Vestibule: For extra gear storage,
add a vestibule to your second door. This vestibule is
identical to the one included with Moki™. Vestibules
can be used on either door.
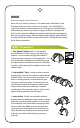
4. Moki™ APRI™: The Moki™ APRI™ is built for the
most brutal conditions on the planet. It is made
from a metallized fabric laminate that substantially
increases the temperature inside the tent while staying
completely breathable.
It is easiest to install the APRI™ before the inner poles
are in position. Lay the APRI™ on top of the poles and
connect the snaps on the corners to the upper snap in
the corners of the tent. Place the pole ends in the large
button snaps like the usual setup.
Pull the Velcro® tabs on the inside of Moki™ through
the slits of the APRI™ and connect them to the inside.
Connect the Velcro® along the sides at floor level.
5. Moki™ Link™: The Moki™ Link™ enhances the living
space between two Moki™ tents. Use it as a communal
meeting space, versatile entrance, sleeping area for
pets, or covered storage for your wet gear.
To install, first zip the Connection Panel (included
with each Moki™ tent) to both sides of the Link™.
Insert a pole into each pole sleeve. Finish by zipping
the Connection panels to the Moki™ tent doors and
staking in place. Make sure to close all snaps.