
Manual

©2006 NEMO Equipment, Inc.
*Patents Pending
TENSHI™
OVERVIEW
SET UP
To take Tenshi™ down, first remove all gear (including the vestibule,
condensation curtain and RIF) and as much moisture as possible. Water
will add weight to your pack and can lead to mildew.
1
If the pole wraps are stuck to the poles, it may be necessary to detach
them before removing the poles. Pull the poles straight out. If the pole
sections have frozen together, simply warm them in your gloved hand
for a minute or two and they should separate easily.
2
Try to clean as much dirt and debris from your tent as possible before
packing it. This will help preserve the breathability of the tent fabrics
and reduce overall wear and tear.
3
With your foot on the accessory pocket of the stuff sack, stuff the tent
into the large mesh pocket.
4
Place the poles inside the pole pocket, and roll the stuff sack up
securing it with the compression straps. The Tenshi stuff sack also works
very well as a hanging drying bag. See the features section for more
information.
5
Remember to leave no trace even in winter. Before leaving your
campsite take a thorough look around making sure you have not left
anything behind, out of place, or damaged.
6
TAKE DOWN
1
2
3
6
4
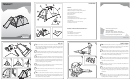
1. Removable Condensation Curtain
2. Waterproof Zipper for Vestibule Attachment
3. Internally Deployable Strutted Vents
4. Pressure Porting™
5. Guy-out Point
6. Replaceable Anchors
7. Triangulated Guy-out Points
8. Sleep Tight Anchor Transfer™ (STAT™) System
9. Rear Window
10. Hypalon® Reinforced Corner Pockets
11. Front Door Tie-backs
12. Snow Skirt
13. PU Weather Checking Window
14. Vestibule Door Tie-backs
15. Removable Insulated Floor (RIF™)
www.nemoequipment.com
NEMO EQUIPMENT
100 Factory Street, Nashua, NH 03060
Phone/Fax: 1-800-997-9301/ 603-881-9358
E-mail: journey@nemoequipment.com
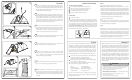
Lay out the contents of Tenshi™ and make sure that you received your
tent and all of the following items: vestibule, condensation curtain, stuff
sack, 2 straight poles, vestibule pole, 8 stakes, guy lines, Seamgrip® with
nozzle, and pole repair sleeve.
Seam sealing adds strength and waterproofness to the tent. It needs at
least 24 hours to cure before using. See Care and Field Repair section for
more information.
Begin the setup of your tent by staking it out. This will help prevent the
tent from blowing away. The corners of the tent are reinforced with
Hypalon® to receive the ends of the poles. If applicable, slide the RIF into
Tenshi™ with the shiny sil-nylon side down and the orange corner up.
Place poles through the corner grommets.
To set up the optional vestibule, insert the pre-bent pole into the
vestibule pole sleeve. Place each pole tip in the grommet at the end of
the vestibule and front corners of Tenshi. Zip the vestibule to the tent.
Stake out the corners of the vestibule.
With both poles secured in the Hypalon® corners, use the Velcro wraps
to secure them along the inside of the tent shell.
5
To use the Condensation Curtain, match the Velcro on the curtain to the
Velcro on the inside of Tenshi™.
9
15
1
2
3
4
5
6
7
8
10
11
14
13
12
Vestibule and Removable Insulated Floor™
Tenshi™
54
2
1
3
6
6
5
3
4