
Instruction Manual

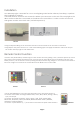
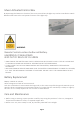
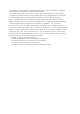
Table Of Contents

Installaon
Your RGB Strip Light is intended for use as mood lighng under kitchen cabinets, benchtops, anywhere
that a highlight is required.
o Remove contents from box and connect the White 4 pin connector on the end of the strip light to the
White 4 inlet socket that is connected to the White music control box. To make sure the arrow mark
side against another arrow mark side. (see below picture A)
o Plug the bayonet fing on the end of the lead wire into the socket on the end of the control box
o Plug adaptor into power and turn on. Peel off the backing paper and apply the adhesive side of the strip to
the surface the Strip Light is to be adhered to.
Remote Control Funcon
o Remove the plasc baery isolaon tag from the remote control by pulling it out. (see below picture B) o Point
the remote control towards the Black sensor on the end of the short White lead on the White music box. (see
below picture C). Do not have the sensor poinng directly towards strong sunlight. o The remote control need to
be in line of sight to a maximum of around 10 from the Black sensor on the cable.
Use the OFF/ON buons to turn the Light Strip ON or OFF. (see below picture D)
o Press the Color buon to change between Red, Green, Blue, White, Orange, Yellow,
Cyan, and Purple.
o Press the
12 Preset Funcons : Auto, Jump, Fade, Flash, Move Right,
Move Le, Outward, Inward, Rainbow,White Outward Inward, Meteor,
and Music synchronizaon.
o Press the 2 speed buons (+ /-) to increase or decrease the speed of the funcons.
Picture A
Page 3
Picture
plasc baery isolaon tag
B Picture C
Picture D
Blacksensor
(IR RECEIVOR)