HELIOS H4000 HD Upscaling DVD Player Users Manual Digital Revolution. Your Way.
General Introduction Thank you for purchasing your new Helios H4000 HD Upscaling DVD player. The H4000 is integrated with the latest cutting edge video technology. The main feature of the player is to upscale standard DVD titles and MPEG4 files to high definition resolution. In addition, the H4000 offers a large selection of High Definition video modes and connection options.
Table of Contents General: Safety Precautions 2 Player Features 4 Package Contents 4 Supported Disc Formats 5 Regional Code Distribution 6 DVD Disc Logos 6 Disc Usage and Maintenance 7 Using the Player: Display Panel 8 Remote Control 9 Front Panel Overview 10 Rear Panel Overview 10 System Connections 11 Playing Discs 17 Using OSD Guide Menu 18 Player Menu System 24 Getting Help: Troubleshooting 31 Product Specifications 32 1
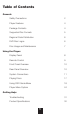
Safety Precautions 1)Symbols An exclamation point within a triangle is an alert for important instructions on the use of the player. To avoid the risk of electric shock, DO NOT open the cover of the player. A lighting flash and arrowhead within a triangle is a warning sign alerting you of dangerous voltage inside the player. CAUTION: To reduce the risk of fire, electrical shock or damage to the player, do not expose this device to moisture and do not place water filled objects close to or on top of it.
3)Maintenance Notice a. Do not expose the player to excessive heat, direct sunlight, dust, moisture, vibration, shock, moisture, liquids, speakers or magnetic objects. b. Trouble with getting the player to work may arise due to condensation on the lens when moved from a warm to cold environment. To resolve this, turn on the player to warm it up, and then play a disc 1-2 hours after. (Do not leave a disc inside the player while it is warming up) c.
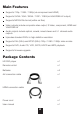
Main Features Supports 720p / 1080i / 1080p (via component and HDMI) Supports SVGA / XGA / SXGA / 720P / 1080i (via VGA/RGB-HV output) Supports MPEG4 file format (within avi files) Video outputs include composite video output, S-Video, component, HDMI and VGA/RGB-HV Audio outputs include optical, coaxial, mixed stereo and 5.
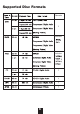
Supported Disc Formats Remarks Includes Includes 5
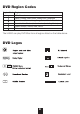
DVD Region Codes Region Code Region USA, Canada Japan, Europe, South Africa, Middle East, Greenland South Korea, Taiwan, Hong Kong, Parts of South East Asia Australia, New Zealand, Latin America (including Mexico) Eastern Europe, Russia, India, Africa China The H4000 can play DVD titles from all regions listed on the table above.
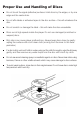
Proper Use and Handling of Discs Do not touch the signal (reflective) surfaces. Hold discs by the edges, or by one edge and the center hole. Do not affix labels or adhesive tapes to the disc surface this will unbalance the disc. Do not scratch or damage the label this will make the disc unreadable. Discs run at high speeds inside the player. Do not use damaged (scratched or warped) discs. Dirty discs can cause player malfunctions.
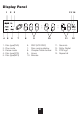
Display Panel 1 4 1. 2. 3. 4. 5. 5 2 6 3 13 14 7 Disc type(DVD) Play mode Pause mode Disc type(VCD) Disc type(MP3) 8 9 6. 7. 8. 9. 10. 10 PBC (VCD PBC) Disc running display Chapter/Track number Hours Minutes 8 11 11. 12. 13. 14.
Remote Control Overview DISPLAY 1 2 A-B 9 MUTE 3 REPEAT PROGRAM EJECT 4 ANGLE 5 6 7 8 VGA HD 50/60hz PAL/NTSC 10 TITLE MENU 13 11 12 DVD MENU 14 15 ENTER 17 16 18 19 20 23 21 22 24 25 26 27 VOL 28 29 32 30 SUBTITLE 35 39 1 SETUP 2 6 40 CLEAR 43 STEP 9 44 31 AUDIO 33 36 5 ZOOM 34 3 37 7 41 0 45 4 38 8 42 BOOK MARK 46 SEARCH 47 H4000 HD UPSCALING DVD PLAYER 1. Power on/off 2. Display: show or hide OSD menu 3.
Front Panel Overview H4000 HD UPSCALING DVD PLAYER 1 2 3 4 5 67 8 9 1. Disc Tray (Note: load discs label-side up) 2. Sensor: point remote control towards sensor to operate the player 3. LED screen: displays system information 4. [Stop] Stop playback 5. Power on/off 6. [Previous] Previous: skips to previous track or page 7. [Eject] Open/Close: inserts or ejects disc tray 8. [Play Pause]Play/Pause: plays or pauses disc 9.
How to connect the player to your AV system Connecting via composite video Using the AV cables supplied, insert the yellow cable into the video socket of your TV. Insert the white cable into the left channel socket and the red cable into the right channel socket , and then connect the other ends of the white (left) and red (right) cables to the corresponding inputs on your TV.
Connecting via component video connection Insert one end of the component video (Y / Cb / Cr) cable into the red/blue/green socket of the component video output located on the rear of the player. Insert the other end of the cable into the component video input socket located on your TV. Use the supplied audio cable to connect the player to your TV. Or you can use digital audio connection (coaxial/optical) or 5.1 channel connection to your AV receiver.
Connecting to VGA/RGB-HV Use the VGA cable to connect the VGA/RGB -HV output of the player to the VGA or RGB-HV input of your TV. Connecting to a 2 channel audio amplifier Connect the video output of the DVD player to the video input of your TV using the corresponding cables (video cable / S-video cable / component cable). Connect the audio cables FL and FR to the sound input L/R socket on the amplifier.
Connecting to AV receiver for digital audio connection Connect the video output of the DVD player to the video input of your TV using the corresponding cables (video cable / S-video cable / component cable). Use a fiber optic cable or coaxial cable to connect the optical or coaxial socket located on the rear panel of the player to the AV receiver. To setup the Digital Audio options you can go to the system setup.
Connecting to a 5.1 channel amplifier Connect the video output of the DVD player to the video input of your TV using the corresponding cables (video cable / S-video cable / component cable). Connect the 5.1 audio output terminals of the player to the amplifier using the respective connection cables (L and R of MIXED/FRONT, L and R of SURROUND, CENTER and SUBWOOFER). Ensure that the 6 speakers are connected to the corresponding outputs of the amplifier.
Recommended Speaker Layout for 5.
Playing Discs 1. This player can play all kinds of discs including DVD, VCD, Audio CD, CVD, SVCD, MP3 and JPEG 2. Play discs: i. Connect TV set to the player ii. Turn on the player iii. Eject the tray by pressing the Open/Close button iv. Place the disc on the tray and press Open/Close v. The disc will be played automatically (some discs may require you to press the Play button to play) 3. Zoom: Press the ZOOM button to enlarge the image.
Using On Screen Display Menu The OSD (On Screen Display) menu lets you select from playback options while playing a disc. Press DISPLAY to see playback options. Use cursor keys to select a playback function. Note: you can only select a playback function that is supported by the disc you are playing. If a function is not supported by the disc, the icon will be highlighted grey.
Time Display This function is used to display the time elapsed on the disc or to seek to a specific time on the disc. 1. Press DISPLAY on the remote control to open the OSD menu. 2. Use the numeric buttons to input the desired time in HH:MM:SS format. Select Title This function is used to select different titles when playing a disc with more than one title (for example, a TV series). 1. While playing a disc Press DISPLAY. 2. Use the cursor keys to highlight the Title option 3.
Select Audio Language This function is used to select different audio tracks (Languages) when playing a disc with more than one Audio language track. 1. While playing a disc, press DISPLAY. 2. Use the cursor keys to highlight the Audio options 3. Use the [Up] [down] buttons to select the desired subtitle set from those available on the disc 4.
Bookmark Setup Press DISPLAY on the remote control and use cursor keys to highlight the bookmark options. Press ENTER to display the menu 1. Select a bookmark that is not yet used. The current play time (play time elapsed) will be displayed beside the bookmark. 2. When you reach the desired point for the bookmark, press ENTER. The bookmark is now created. Clear Bookmark Bookmarks are automatically cleared when the disc is ejected or the player is switched off. To clear a disc while still playing: 1.
Play Mode When playing a disc, using the OSD menu you can choose from the following Playing Modes - Normal, Random or Program. Normal: Play the disc according to the recording sequence from start to Finish. Random: Randomly play disc content. While playing a disc press DISPLAY Use the cursor keys to highlight the playing options. Press [Up] [Down] to select Random play and press ENTER. To switch back to normal play mode, repeat steps 1-3 and select Normal play instead of Random.
Playing mpeg4 When you insert a disc with Mp4DivX files, the first file automatically begins to play*. You can also manually select which file to play from STOP mode by pressing play to see a list of the files. To see file / folder information, select the file and press ENTER. To play a file, select it and press Play. To play all the files in a folder / disc start playing the first file and then press display to open the OSD. Then select the desired playback / repeat option.
Player Setup Menu The Player setup menu is different from the disc menu and OSD. It is used to alter the players Audio, Video and user options as well as set default settings. The menu can be used under STOP mode by pressing SETUP on the remote control. Within the Setup menu, if an option has a sub menu there will be an arrowhead on the right hand side of the option. Press ENTER to open the sub menu or press the [Right] button.
Stereo Sound 1. Select sound menu to open player setup 2. Use cursor keys to highlight STEREO option 3. Press [OK] to turn stereo sound ON or OFF Speaker Setup Speaker setup allows you to set up speaker size, distance and volume 1. Select SOUND menu and press [OK] 2. Use the cursor to select speaker setup Speaker Using this option, you can setup the speaker according to the volume of the player.
Distance Using this option you can setup the distance between audience and speakers, in order to get the best performance. The Default setting is 3.3 meters. You can adjust the distance for front, middle and surround speakers. 1. Select a speaker (L Front / R Front / Center / L Surround / R Surround) 2. Use the cursor keys to adjust distance from 1m to 6.6m Volume 1. Select SOUND menu 2. Use cursor to select SPEAKER SETUP and press OK 3. Select VOLUMR option and press OK 4. Select the desired speaker 5.
Smart Play If Smart Play is enabled (On) discs are automatically played when they are loaded into the player. 1. Press [SETUP] on remote control and select the SETUP option. Press OK 2. Use cursor to select SOUND and press [OK] 3. Use cursor to select SMART PLAY and press [OK] to turn easy play On / Off Display Setup In the display menu you can adjust the TV System, TV Image, S-Video, HD Scan frequency, Video options, HDMI mode and HDMI Select options. DISPLAY TV IMAGE HD SCAN FREQ BRIGHTNESS 1.
NTSC Changes the video signals of a PAL DVD disc and outputs it in NTSC format PAL Changes the video signals of a NTSC disc and outputs it in the PAL format Progressive Scan output The player supports 480NTSC (USA) and 576 PAL (Europe) progressive scan output. Progressive scan output can improve image quality. When using progressive scan output, it is required to connect the player using the component video out jacks or HDMI to a TV that is able to accept the video signal in progressive format.
Video Options Use the video options to set the levels of the various video properties: Color, Contrast, Brightness, Tint, Black level 1. Press SETUP on the remote control 2. Use cursor to select DISPLAY and press OK 3. Use cursor to select VIDEO OPTIONS 4. Use cursor to select the desired property and press OK 5.Use the cursor UP / Down to change the selected value. HDMI Mode Use this option to manually select one of three available HDMI modes ¨C YcbCr422 / YcbCr444 / RGB 1.
Languages You can individually set the language that the player uses for: Player menu - Setup menus etc.... Disc menu - Menus when playing discs Audio - Default audio language to select with videos Subtitle - Default Subtitle language to select with videos 1. Press SETUP on the remote control 2. Use cursor to select LANGUAGES and press OK 3. Use cursor to select desired option and press OK 4.
Troubleshooting Problem Possible Cause and Solution No Power 1. Ensure the power lead is firmly connected to the player and plugged into the socket fully. 2. Switch the power on Can not play Disc 1. Switch the power on. 2. The Disc type is not supported by the player or is seriously damaged. Only use discs that can be played by this player 3. Wrong side of disc place the disc on the tray with printed side up. 4. Restriction of Disc level. Cancel the restriction. 5. Condensation on the laser lense.
Product Specification Disc types Formats DVD/SVCD/VCD/CD/HDCD/MP3/MP3/WMA MPEG4(DivX, Xvid, MPEG1, MPEG2 and MPEG4) video file playback. Video output Composite video, S-Video, Y, Pb/Cb, Pr/Cr Component video, VGA/RGB-HV video, * HDMI (Video & Audio) * DVI available by using a HDMI to DVI cable. Audio output 2 channel mixed audio out 5.