
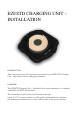
User Manual


A.4. Marking Charging Location
Discuss the options for marking the charging spot with the customer. Some may
prefer a permanent mark, either a highly visible mark or a subtle mark that
blends with the background. A highly visible mark may be preferred in
environments where multiple users will be using the device and aren’t familiar
with the area. Subtle or temporary markings may be more appropriate where
there are a limited number of users that will become familiar with the location
over time.
Marking options include laser engraving or inlays for permanent marks, and
stickers for temporary marks. Laser engraving will leave a slight depression and
may be more difficult to clean. For high visibility markings choose a
contrasting color. In commercial environments this may incorporate corporate
color logos. For subtle markings a complementary color should be used.
Translucent White Joint Adhesive or Joint Adhesive is often a good choice for
subtle inlays. For particulate colors matching one of the particulates may work
well. The uniform shape of the mark will help it stand out when viewed at close
distances, but it will blend into the background at greater distances.
A.5. Additional Materials and Equipment
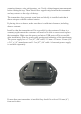
In addition to the transmitter, fabrication will require 100% silicone adhesive,
denatured alcohol and a clean cloth. Using a CNC with a flat-tipped end mill bit
is highly recommended for accurately cutting the cavity.
Some form of cable management (conduit, clips, etc.) will be necessary.
B. VERIFY TRANSMITTER OPERATION
B.1. Important Testing Guidance
Verify the transmitter is operational before installing by plugging it in. A green
LED should blink once.
DO NOT TEST BY PLACING A RECEIVER IN CONTACT WITH THE
TRANSMITTER.
The transmitter is optimized for the installation distance, bringing the
transmitter and receiver in direct contact may damage the devices. Always
test with something nonmetallic of 8 mm (0.315") thickness in between the
transmitter and receiver.