
User Manual

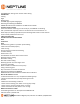
Table Of Contents

1600 Alabama Highway 229, Tallassee AL 36078 (334)293-6555
If continuous leak is repaired
If a continuous leak is found and repaired, complete the following
steps:
1 Use no water for at least 15 minutes.
2 Check the leak icon.
3 If the leak is OFF, then a leak is no longer indicated.
If intermittent leak is repaired
If an intermittent leak is found and repaired, complete the following
steps:
1 Check the leak icon after at least 24 hours.
2 If the leak has been correctly repaired, the leak icon changes
from Continuous ON to Flashing.
Software
A software update is required for EZRoute or RouteMAPS to interpret
the advanced feature data communicated from the Neptune
R900i SP.
Table 4 Checklist for Leaks
Check all faucets for possible leaks.
Check all toilets and toilet valves.
Check the ice maker and water dispenser.
Check the yard and surrounding grounds for a wet
spot or indication of a leaking pipe.
10 R900i SP Inside and Pit Installation and Maintenance Guide
5 Installing the Inside Version
This section describes storage and unpacking instructions, preliminary tests, tools,
materials, site selection, and inside installation of theR900i SP version MIU.
Prior to Installation
Storage
Upon receipt, inspect shipping containers for damage, and inspect the contents of
any damaged cartons prior to storage.
Once the inspection is complete, store the cartons in a clean, dry environment. The
unit should be in sleep mode until it is exposed to light.
Unpacking
As with all precision electronic instruments, the R900i SP MIU should be
handled carefully; however, no additional special handling is required. When
shipped, the assembly is lying on its side. You should lift the assembly out of the
box by the meter main case. Refrain from lifiting using the battery assembly.
After unpacking the MIU, inspect it for damage. If the MIU appears to be damaged
or proves to be defective upon installation, notify your Neptune Sales Representative.
If one or more items requires reshipment, use the original cardboard box and
packing material.
Figure 5 R900i SP Inside Installation
Installing the Inside Version
R900i SP Inside and Pit Installation and Maintenance Guide 11
Tools Needed
Table 1 on page -5 shows the recommended tools you need to successfully install