
User's Manual


Model: R900-v2 Advanced Compliance Solutions FCC ID: P2SNTGSRFV2
ACS Report: 02-0177-15C Page 3
Connect the 3-conductor wire to the encoder register’s terminals per the manufacturer’s instructions,
using the color code
in Table 1.
1. Thread the cable around the strain relief posts of the encoder.
2. Apply moisture protection compound to the terminal screws and exposed wires. (Neptune
recommends Dow Corning
Compound #4).
3. Snap the cover onto the encoder register.
4. Proceed to the section entitled “Installing the MIU.”
Table 1
Encoder Register
Wire Color / Encoder Terminal
Neptune ARB V Black / B Green / G Red / R
Neptune ProRead Black / B Green / G Red / R
Neptune E-Coder Black / B Green / G Red / R
Sensus ECRII Black / R Green / B Red / G
Testing the MIU Installation
After the MIU has been installed and wired, follow these steps to verify that the MIU is working properly:
Power up the handheld unit (HHU) test device and start the testing
program provided.
Warning:
To avoid RF signal saturation of the HHU, position the receiver at least 2 to 3 feet from
the MIU.
When the MIU is installed correctly, its MIU ID and a meter reading will appear on the HHU’s display
within one minute. Verify that this is the correct meter reading by comparing it to the meter’s dial.
If a meter reading does not appear on the HHU’s display or the meter reading in the HHU’s display is not
the same as the reading on the meter’s dial:
Reactivate the MIU using the magnet.
Verify all electrical connections.
Test the installation again (repeat above steps).
If a ProRead Encoder Register is used:
Insure the unit is programmed in “3-wire mode”.
Verify all electrical connections.
Reactivate the MIU using the magnet
If a problem still exists contact your Neptune representative.
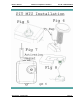
Pit MIU Installation
Note: Before wiring the encoder register, make sure the cable is long enough so that
when the installation is complete, the pit lid (with MIU attached) can be removed easily
without straining the cable.