Manual Nero BackItUp
Copyright and Trademark Information This document and all its contents herein are subject to and protected by international copyright and other intellectual property rights and are the property of Nero AG and its subsidiaries, affiliates or licensors. All rights reserved. No part of this document may be reproduced, transmitted or transcribed without the express written permission of Nero AG. All trade names and trademarks and/or service marks are the property of their respective owners.
Table of contents 1 1.1 1.2 1.3 1.4 1.5 Start Successfully About the Manual About Nero BackItUp Versions of Nero BackItUp Working With Nero BackItUp Starting the Program 5 5 5 6 6 7 2 User Interface 8 3 3.1 3.2 About Nero LIVEBackup Nero LIVEBackup Area Activating Nero LIVEBackup 10 10 11 4 Backup With Nero BackItUp 14 5 Storing Online With Autobackup 16 6 Backing Up Files 19 7 Back Up Media Library 22 8 Backing Up Drives 24 9 9.1 9.
14.3 Erase Rewritable Disc Window 51 15 15.1 15.2 15.3 15.4 Nero BackItUp Options Overview Setting Up FTP Server Connection Remote Proxy Setting Up E-Mail Account Creating Filter 53 53 55 56 57 16 16.1 16.2 16.2.1 16.3 16.3.1 16.3.2 16.4 16.4.1 16.4.2 16.5 16.
Start Successfully 1 Start Successfully 1.1 About the Manual This manual is intended for all users who want to learn how to use Nero BackItUp. It is process-based and explains how to achieve a specific objective on a step-by-step basis. To make best use of this documentation, please note the following conventions: Indicates warnings, preconditions or instructions that have to be precisely followed. Indicates additional information or advice. 1.
Start Successfully tion, if you want to. The backup target is found and suggested automatically. The default schedule is every two hours, but you can also change that of course. Nero BackItUp ImageTool is another tool for backing up files and drives. The Nero BackItUp ImageTool is included on the bootable disc that you can create with Nero BackItUp. With the Nero BackItUp ImageTool, you can back up and restore drives.
Start Successfully 1.5 Starting the Program To start Nero BackItUp, proceed as follows: 1. If you have the desktop shortcut available: 1. Click the Nero BackItUp desktop icon. 2. If you want to start via the start menu: 1. Select Start (the start icon) > (All) Programs > Nero > Nero 11 > Nero BackItUp. The Nero BackItUp window is opened. Additionally, Nero BackItUp can be started from the Welcome Application. You have started Nero BackItUp.
User Interface 2 User Interface The Nero BackItUp user interface is the starting point for using the Nero LIVEBackup feature, and for backups, restores, syncs, and any other task that you can carry out with Nero BackItUp. You can start a task via the links that are provided in the user interface in the Additional Task area. The header bar gives you the possibility to create a disc with Nero BackItUp ImageTool, to open the disc options, the general options and the help.
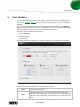
User Interface Options Help Opens the Options window. Displays help options and the About window, where you can find the version number of the application. The following areas are available: Enables Nero LIVEBackup to automatically back up your whole system on a regular basis. Backup source and backup target are suggested Nero LIVEBackup automatically. You can also add and exclude individual partitions and define your own time schedule at any time within the application.
About Nero LIVEBackup 3 About Nero LIVEBackup The most convenient way to backup your whole system is to turn on the Nero LIVEBackup feature once. This feature can be found on the Nero BackItUp start screen in the upper area. Simply move the slider to On to turn it on. The backup source is per default the whole system and the backup target is found and suggested automatically. The backup default schedule is every two hours. You can change these settings with the Configure button.
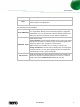
About Nero LIVEBackup Opens a message explaining the reason for warning. Information Last Backup Information Status Button Run now Button Restore Button Configure 3.2 Displays date and time of last successful backup run. A click on the link opens the restore view with the latest backup run preselected. Only available if at least one backup has been executed. Gives information on Nero LIVEBackup conditions. Only available if at least one backup has been executed. Starts the next backup run manually.
About Nero LIVEBackup Configure 2. Click the Change button to select another backup destination. Nero LIVEBackup performs a search for suitable backup targets. All targets are displayed with an explanation about why they are suitable. The best fitting target is preselected. 3. Click the Change button to select other backup sources. All connected hard drives are displayed. 4. Enter your desired backup schedule in the input field. 5. Click the OK button. 3. Move the slider to the right to On.
About Nero LIVEBackup Nero LIVEBackup is running You have activated Nero LIVEBackup. Backup runs will be executed at the defined schedule. If the backup target is removed, there will be a warning icon in the status area and you will be notified that the backup target has been disconnected. Nero LIVEBackup will, however, continue the backup automatically when the backup target is reconnected.
Backup With Nero BackItUp 4 Backup With Nero BackItUp With Nero BackItUp you can back up data. The Create a backup area in the Additional Tasks area is your starting point for choosing a type of backup outside Nero LIVEBackup. Click within the Create a backup area to get an overview about the backup possibilites. The following backup tasks are available: Manage Nero Online Backup With Nero BackItUp, you can set up and configure Autobackup, the automatic online backup feature.
Backup With Nero BackItUp Drive backup If you choose drive backup, entire drives (hard drives and/or partitions) are backed up, including programs and the operating system. When restoring a drive backup, programs and operating systems are restored, in contrast to file backup restoring. So, a drive backup is useful to restore the whole operating system plus programs in case of hardware damage.
Storing Online With Autobackup 5 Storing Online With Autobackup With Nero BackItUp you can set up and configure Autobackup to automatically back up files and folders online, using the Internet service Nero Online Backup as a backup location. Once it has been set up, Autobackup is available in the Windows notification area and backs up the folders that you specify in the background in the defined sequence.
Storing Online With Autobackup Online Autobackup - Source information 3. Specify which file type you want to backup: 1. Click the button in front of the file type you want to configure. 2. Select the check box in front of the file extension you want to include in the backup. 3. Clear the check box in front of the file extension you want to exclude from the backup. 4. Select the Add file type check box at the end of the file extension list and enter the file extension you want to add to the backup. 4.
Storing Online With Autobackup 6. If you already have a login: 1. Enter your Subscription ID and your Password in the input fields. 2. To keep the login information, select the Remember my password check box. 7. If you have not yet subscribed to the Nero Online Backup service: 1. Select the I do not have a Nero Online Backup account and want to subscribe now option button. 2. Click the button. The Nero Online Backup - Create new account screen is displayed. 3.
Backing Up Files 6 Backing Up Files With Nero BackItUp you can carry out file backups. This means that individual files can be backed up and then restored at a later point in time. In comparison to drive backups, it is not possible to restore operating systems or programs with this option. The first step is selecting files and folders to back up. The next step is to select a target where to save the backup.
Backing Up Files The Step 2 of 3 – Please select your target screen is displayed. File Backup - Select targets 5. Click the icon that represents your desired target and specify the target in the drop-down menu. 6. Click the Browse button to specify the chosen target path. 7. If you want to back up to different targets, click the Add target button and repeat the two previous steps. 8. Click the button.
Backing Up Files File Backup - Configure your backup 9. Enter a name for the backup in the Backup name input field. 10. If you want to schedule this backup or run it on a regular basis: 1. Select the backup schedule type in the Time schedule drop-down menu. 2. Click the Edit button if you want to specify the schedule. The Define your time schedule window is opened. 3. Select the start date and other time settings that are appropriate to your backup schedule. 4.
Back Up Media Library 7 Back Up Media Library With Nero BackItUp you can back up the content of the media library. With this backup type the folders that were indexed by Nero Kwik Media are backed up. You can select single folders as well as complete categories (Photo, Video, Music). Nero BackItUp only backs up the content, meaning the files itself, not the media library database.
Back Up Media Library 3. Select the check box in front of the file category that you want to add to the backup, or select the check box in front the folder that you want to add to the backup. 4. Click the button. The Step 2 of 3 – Please select your target screen is displayed. 5. Click the icon that represents your desired target and specify the target in the drop-down menu. 6. Click the Browse button to specify the chosen target path. 7.
Backing Up Drives 8 Backing Up Drives With Nero BackItUp you can carry out drive backups. When restoring a drive backup, programs and operating systems are restored, in contrast to file backup restoring. The drive backup can be updated. The update type Incremental backup is available for this purpose. The first step is selecting a drive to back up. The next step is to select a target where to save the backup.
Backing Up Drives 3. Select a partition in the left to show the information in the right. Select the check box in front of the partition that you want to add to the backup. The selected partitions are added to the backup. 4. Click the button. The Step 2 of 3 – Please select your target screen is displayed. 5. Click the icon that represents your desired target and specify the target in the drop-down menu. 6. Click the Browse button to specify the chosen target path. 7.
Backup Settings Screen 9 Backup Settings Screen After selecting the source to be backed up and specifying the target for the backup, you configure the backup settings in the Step 3 of 3 - Please select your backup options screen and start the backup process. File Backup - Please configure your backup The following setting options are available in the Backup type and name area: Select backup type Backup Name Specifies the type of backup.
Backup Settings Screen Once: Makes exactly one backup. Daily: Makes daily backups. Weekly: Makes weekly backups on one or more defined days (e.g. every Tuesday and Thursday). Monthly: Makes monthly backups. When Idle: Starts the backup when the computer is inactive, i.e. no applications are active and there is no user input. At System Startup: Starts the backup when the operating system is started. At Log on: Starts the backup when you log into the system.
Backup Settings Screen The option to shut down the computer after a job has been finished can be selected at any time in the context menu of Nero BackItUp Agent. The Nero BackItUp Agent is available in your computer's notification area. See also Backup and Restore Expert Options Overview →42 9.1 About Backup Types There are four backup types in Nero BackItUp: Full Backup Differential Backup Incremental Backup Update Backup For file backups, all four backup types are available.
Backup Settings Screen Incremental Backup (Above) and Differential Backup (Below) The picture above shows the difference between incremental and differential backups (which are represented as curved lines): With the incremental backup type, the changes that were made compared to the last backup are saved: The second backup run (2.) is compared to the first (1.), and the third backup run (3.) is compared to the second (2.).
Backup Settings Screen Data backup distinction between differential and incremental backup 1 1st backup 4 Data on the computer White: Original data Black: Changed data 2 2nd backup 5 Incremental backup Data that has been modified since the first backup is backed up 3 3rd backup 6 Differential backup Data that has been modified since the previous backup is backed up Nero BackItUp 30
Backup Settings Screen The following table provides information to help you determine the correct update type for your file backup: Backup type Storage space requirement for the backup set Effort involved in restoring Full backup Extremely high Extremely low (only the Yes current version is required) Differential backup Mid Low (current and first version must be kept) Yes Incremental backup Low High (all versions must be kept) Yes Extremely low Extremely low (only the No current version is r
Syncing With Nero BackItUp 10 Syncing With Nero BackItUp With Nero BackItUp you can synchronize (“sync”) files between two folders. You can use the sync function within the application or you can use the standalone sync tool that comes with Nero BackItUp. Synchronizing exchanges files between two folders. The folders can be located on the same computer or on different computers and devices.
Syncing With Nero BackItUp 3. Click the Left folder Browse button to choose the left folder. 4. Click the Right folder Browse button to choose the right folder. 5. Click the button. The Step 2 of 2 – Please select your synchronization options screen is displayed. New Data Synchronization - Finalize Settings 6. Select a sync type in the Select a type drop-down menu (see About Sync Types→ 34). 7. Enter a name for the sync job in the Type a name input field. 8.
Syncing With Nero BackItUp 10.2 About Sync Types Nero BackItUp has five sync types: Mirror Copy Update Partial mirror Partial synchronization The following pictures show examplary sync cycles for each of the sync types illustrating the differences between the sync types. As a precondition, you have executed a first syncing run. This way, each of the two folders contains four identical files. This is shown in the first step.
Syncing With Nero BackItUp Copy Update The Copy type copies new and updated files from the left to the right folder. Files that are deleted in the left folder are also deleted in the right folder. The Update type has the same function as the Copy type with the exception that the Update type does not delete.
Syncing With Nero BackItUp Partial synchronization The Partial synchronization type copies updated files from the right to the left folder. This sync type only deals with the same files, new files or deleted files will be ignored. Note that Nero BackItUp cannot identify changed or renamed files during the first run. The reason is that sync information is stored in a separate file and changes are compared to this information. You can also specify how Nero BackItUp should handle a conflict.
Restore With Nero BackItUp 11 Restore With Nero BackItUp 11.1 Restore Files and Folders With Nero BackItUp you can restore file backups. The content of the file backup is restored during this process. You can exclude individual files from the restore process or select specific files to be restored. It is even possible to choose a drive backup to restore individual files.
Restore With Nero BackItUp 3. Make the backup available: 1. If the backup is located on a disc, insert the disc in a drive. 2. If the backup has been saved to hard drive, network drive, or removable medium, ensure that your computer has access to the respective drive. 4. Select the desired backup job in the job navigation slider with the help of the arrow buttons. 5. If your selected backup is a drive backup, select the Restore files option button. 6.
Restore With Nero BackItUp Use the search field to search through the backup for specific files (for file name or meta data) so that they can be added to the restore. 11. Click the button. The Step 2 of 2 - Please select your restore options screen is displayed. Restore options 12. If you want to restore the backup to the original path, select the Restore to original path option button. 13.
Restore With Nero BackItUp The Browse For Folder window is opened. 3. Select the desired restore path and click the OK button. The Browse For Folder window is closed and the selected path is transferred. 4. If you want to keep the original directory structure, enable the Preserve original directory structure check box. 15. Use the How to resolve conflicts option buttons to choose the action to take when a file to be restored is already (or is still) on the computer. 16.
Restore With Nero BackItUp 2. If the backup has been saved to hard drive, network drive, or removable medium, ensure that your computer has access to the respective drive. 4. Select the desired backup job in the job navigation slider with the help of the arrow buttons. 5. If your selected backup job has several runs, select the version in the upper run navigation slider. The partitions of the backup are displayed in the left area. Partitions that were not part of the drive backup are grayed out. 6.
Backup and Restore Expert Options Overview 12 Backup and Restore Expert Options Overview You can define expert option settings for the backup or the restore in the Expert options area. You can display this area by clicking Expert options in the configuration or settings screens. We recommend that you only change the default settings if you have extensive knowledge in the area of backup. The following options are available: File Filters Offers options for using filters for the backup.
Backup and Restore Expert Options Overview Miscellaneous Burning Offers several specific options (see Miscellaneous→ 44). Offers several burn options such as choosing the write speed and automatically erasing rewritable discs. Only available for backups. Purge Offers options to delete backups automatically. Only available for backups. 12.1 E-mail Notification With Nero BackItUp you can set up automatic e-mail notifications for certain events.
Backup and Restore Expert Options Overview Drop-down menu Send notifications from this e-mail account Button Create New List E-mail Notifications Chooses the account used for sending the e-mail notifications. Opens the E-mail accounts window, where you can create a new e-mail account. Opens the E-mail events window, where you can enter the email address to which the notification will be sent. Click All information to select all events as a trigger for e-mail notifications. 12.
Backup and Restore Expert Options Overview Check box Execute backup on button press Allocates the backup job to the "Push for Backup" service. This service can be started only from an appropriately equipped external hard drive and the corresponding software with the help of the hard drive's "Push for Backup" button, and carries out a previously defined backup automatically with Nero BackItUp. Only available if such a hard drive is connected.
Manage Your Backup and Sync Job Screen 13 Manage Your Backup and Sync Job Screen The Manage your backup and sync job screen shows all planned and executed jobs (File Backups, Drive Backups, Sync jobs). The screen is displayed by clicking the Manage backup or sync jobs link in the Additional Tasks area. The jobs are displayed in chronological order, first all planned jobs, then all already executed jobs. The newest job is on top of the list.
Manage Your Backup and Sync Job Screen The following setting options are available for a job: Run now Executes the job immediately. Restore Displays the restore view. The latest backup of the selected job is preselected. Only available for a backup job. Edit Copy Displays the job’s configuration allowing you to change them. Saves a copy of the selected job under a new name allowing you to change the settings.
Manage Your Backup and Sync Job Screen About deleting backups in general If you want to delete backups, keep in mind, that the backup file itself is physically stored either on hard drive, on an removable medium, an online storage or a disc – wherever you have stored it. If you want to remove a backup file physically, you have to delete it from your hard drive, destroy the disc – or whatever action seems reasonable to erase the file.
Tools 14 Tools 14.1 Creating Bootable Nero BackItUp ImageTool With Nero BackItUp, you can create a bootable CD or DVD including Nero BackItUp ImageTool. The FTP servers that you entered in the Nero BackItUp options are applied. To create a bootable CD/DVD, proceed as follows: 1. Insert a writable CD/DVD in the burner. 2. Click the disc icon > Create ImageTool Disc menu. The Create Nero BackItUp ImageTool, Nero’s disaster recovery solution, to CD or DVD screen is opened. Create bootable disc 3.
Tools 14.2 Creating Standalone Nero BackItUp SyncTool Nero BackItUp can be used to create Nero BackItUp SyncTool. This tool is used for sync functions, and can be run from hard drive, removable medium (USB) or an optical disc. To create Nero BackItUp SyncTool, proceed as follows: 1. Click the Tools > Create SyncTool Media menu. The Create Nero BackItUp SyncTool to your preferred media screen is opened. Create standalone sync client 2.
Tools 5. Click the button. The creation process begins; you can track the process via the messages in the task bar. After the creation process is completed, the disc is ejected. You have created the standalone Nero BackItUp SyncTool and can now start it. See also Nero BackItUp SyncTool →69 14.3 Erase Rewritable Disc Window Nero BackItUp can be used to erase rewritable discs, i.e. discs with the RW specification, as long as your recorder supports this feature.
Tools The following configuration options are available in the Erase Rewritable Disc window: Selection list Select recorder Defines the desired recorder. Defines the erase method. Two options are available: Selection list Select the erase method to be used Button Erase Button Cancel The Quick-erase rewritable disc method does not physically erase all data from the disc, but only the references to the contents. The disc will appear to be empty even though the data is still physically available.
Nero BackItUp Options Overview 15 Nero BackItUp Options Overview You can define options for working with Nero BackItUp in the Options window. You can open the window via the button. The following options are available: General Backs up files and folders starting from the shell context menu. The shell context menu offers various pertinent information and is opened by clicking a file or folder with the right mouse button in the Windows Explorer. Help Enables tooltips.
Nero BackItUp Options Overview Remote Host Settings 4. Enter a name for the connection in the Host/Server name input field. 5. Enter the required values Host/Server address, Login name, Password, Server type, Port and Transfer mode. The values for Host/Server address, Login name, Password, Server type, Port and Transfer mode are provided by the FTP server provider, e.g. your webspace provider or your network administrator. 6.
Nero BackItUp Options Overview 9. Click the Save button. The FTP server is saved and displayed in the list of FTP servers. You can now store other FTP server information or close the window and use the FTP server for backups and restores. The created FTP servers are saved when creating a bootable CD/DVD and applied to the respective Nero BackItUp ImageTool options. (To enable them in Nero BackItUp ImageTool, the network must be configured in the Nero BackItUp ImageTool options.) 15.
Nero BackItUp Options Overview 15.3 Setting Up E-Mail Account In Nero BackItUp you can add your e-mail account information. Thus can be used to send status information about backup and restore processes via e-mail. The receiver is later on added in the same screen where you set up options regarding your backup or restore (see Backup And Restore Expert Options→ 42). To set up an e-mail account, proceed as follows: 1. Click the button. The Options window is opened. 2.
Nero BackItUp Options Overview Note, that the Server name input field requires an SMTP server, because Nero BackItUp uses the account information only to send e-mails (not to receive). You need to enter your complete e-mail address (e.g.john.doe@domain.example) in the User name input field. The values for Server name, Port, Authentication type and the secure connection are provided by your e-mail provider or your network administrator. 8. Enter your e-mail address in the E-Mail from input field. 9.
Nero BackItUp Options Overview Create a new filter 4. If you want to filter by File Extension: 1. Select the Exclude file types from my backup option entry to exclude files with a certain file extension. 2. Select the Include only files types in my backup option entry to include files with a certain file extension. 3. Click the blue underlined file types link. The Add File Types To Filter window is opened. 4. Select an entry on the left and click the >> button to add file extensions. 5.
Nero BackItUp Options Overview 3. Select a specific date using the calendar or a time frame using the calendar or the input fields. 4. Click the OK button. The window is closed. The selected date or period of time is added to the filter. 6. If you want to filter by Size: 1. Select with the option entries whether the desired files must have a certain minimum or maximum size. 2. Specify the size in MB in the input field. 7. If you want to exclude a specific path: 1.
Nero BackItUp ImageTool 16 Nero BackItUp ImageTool Nero BackItUp ImageTool is a backup and restore program that is similar to Nero BackItUp, and which is run from a bootable CD or DVD without Windows being active. The bootable CD or DVD is created with Nero BackItUp. Nero BackItUp ImageTool is intended for backing up and restoring drives. Since Nero BackItUp ImageTool is booted from a CD or DVD, the computer's hard drives are not active.
Nero BackItUp ImageTool 3. Click the OK button. The Nero BackItUp ImageTool window is opened. A window with a license agreement is opened. 4. Please read the license agreement carefully and select the appropriate check box if you agree to the terms of the agreement. Using Nero BackItUp ImageTool is not possible without your consent to this agreement. 5. Click the Next button. The window with the license agreement is closed. You can now start using Nero BackItUp ImageTool.
Nero BackItUp ImageTool The following menu icons are available: Backup Performs a drive backup. Restore Includes restore tasks. You can restore the full system or restore single files from a backup archive. Network Configures your network, so that a network drive or FTP server can be used. Tools Exit Offers the option to show mounted partitions. You can also start a shell command box to type and execute Linux shell commands.
Nero BackItUp ImageTool 16.3 Drive Backup With Nero BackItUp ImageTool you can back up a hard drive or partition. The advantage in comparison to drive backups made with Nero BackItUp is that the drive is not active, since Nero BackItUp ImageTool is booted from the disc. This way, no verification errors occur during the backup process - active hard drives can be backed up. To back up a drive with Nero BackItUp ImageTool, you must first select the backup source.
Nero BackItUp ImageTool 10. Remove the recorded disc and insert a new blank disc. The backup process resumes and the newly inserted blank disc is burned. 11. Repeat the previous step until the backup has been completely burned to disc. Once the backup is complete, the disc is ejected and the Backup Process window is opened. After the backup has been written completely, Nero BackItUp ImageTool will want to verify the data by default.
Nero BackItUp ImageTool The Step 2 of 3 - Select target and options screen is displayed. 4. Select a hard drive, a network drive, removable media, or the desired FTP server in the Target drop-down menu. 5. If you selected a hard drive as a target, specify the folder in which the backup should be saved in the Target path input field. 6. If you selected an FTP server as a target, choose a folder if applicable. 7. Make additional settings as desired. 8. Click the Next button.
Nero BackItUp ImageTool The Please select what you want to restore screen is displayed. The backed up hard drive with all partitions or the backed up partition of the hard drive is displayed. Partitions that are not backed up are grayed out. 6. Select the hard drive or partition that you want to restore. For technical reasons, only one single partition or one hard drive with all partitions can be restored during one restore process. 7.
Nero BackItUp ImageTool The Please select the files you want to extract from backup screen is displayed. The files and folders of the backup are displayed. 6. Select the check box preceding the folder or the file that you want to restore. Select a folder in the left to show the contained files in the right. 7. Click the Next button. The Please select the target and restore options screen is displayed. 8.
Nero BackItUp ImageTool See also Setting Up FTP Server Connection →53 Remote Proxy →55 16.6 Exiting Nero BackItUp ImageTool To exit Nero BackItUp ImageTool, proceed as follows: 1. Remove the bootable CD/DVD from the drive. 2. If the drive is locked, open the extended area and click the Eject Disc button. 3. Click the Exit button. 4. If you want to reboot your computer system, click the Reboot button. If you want to shutdown your computer system, click the Shutdown button.
Nero BackItUp SyncTool 17 Nero BackItUp SyncTool Nero BackItUp SyncTool is a program that is used for sync functions. It is run from hard drive, removable medium (USB) or an optical disc. Nero BackItUp SyncTool is created with Nero BackItUp. It offers the same features as the sync feature integrated in Nero BackItUp. Nero BackItUp SyncTool is particularly useful when you want to automatically sync the same folders.
Technical Information 18 Technical Information 18.1 System Requirements Nero BackItUp is part of the Nero product you have installed. Its system requirements are the same. Detailed system requirements of this and all other Nero products can be found in the Support section on our Web site www.nero.com.
Glossary 19 Glossary Backup Copying data from the computer to an alternative storage medium. Backups are created in a special format with the help of a backup program. Bootable CD Booting refers to loading the operating system when a computer is started. This is normally done from the hard drive. However, if you do not want to boot or cannot boot your computer from your hard drive for whatever reason, you can load an operating environment from the drive with a boot CD.
Index 20 Index Drive Backing up .................................................... 25 Backing up with Nero BackItUp ImageTool.... 63 Access rights Back up......................................................... 44 Restore ......................................................... 45 Autobackup Change settings ............................................ 16 Setting up...................................................... 16 Storing online ................................................ 16 Turn off ...
Index Nero BackItUp ImageTool Rewritable disc Backing up to FTP server .............................. 64 Backing up to hard drive................................ 64 Create ........................................................... 49 Drive backup ................................................. 63 Erase disc ..................................................... 62 Execute Linux shell commands ..................... 62 Exit...........................................................62, 68 Explanation ....
Contact 21 Contact Nero BackItUp is a Nero AG product. Nero AG Im Stoeckmaedle 18 Internet: www.nero.com 76307 Karlsbad Help: http://support.nero.com Germany Fax: +49 724 892 8499 330 N Brand Blvd Suite 800 Internet: www.nero.com Glendale, CA 91203-2335 Help: http://support.nero.com USA Fax: (818) 956 7094 E-mail: US-CustomerSupport@nero.com Rover Center-kita 8F-B, 1-2-2 Nakagawa-chuou Tsuzuki-ku Internet: www.nero.com Yokohama, Kanagawa Help: http://support.nero.com Nero Inc.