Nero BackItUp
Copyright and Trademark Information This document and all its contents herein are subject to and protected by international copyright and other intellectual property rights and are the property of Nero AG and its subsidiaries, affiliates or licensors. All rights reserved. No part of this document may be reproduced, transmitted or transcribed without the express written permission of Nero AG. All trade names and trademarks and/or service marks are the property of their respective owners.
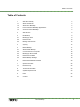
Table of Contents Table of Contents 1 1.1 1.2 1.3 1.4 Start Successfully About the Manual About Nero BackItUp How to Get Nero BackItUp Applications Versions of Nero BackItUp 4 4 4 5 5 2 Start Screen 6 3 3.1 3.2 3.3 File Backup Backing Up Files Restore Files Manage Jobs Screen 8 8 10 12 4 Syncing 15 5 5.1 5.2 5.3 5.4 5.
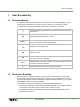
Start Successfully 1 Start Successfully 1.1 About the Manual This manual is intended for all users who want to learn how to use Nero BackItUp. It is process-based and explains how to achieve a specific objective on a step-by-step basis. To make best use of this documentation, please note the following conventions: Indicates warnings, preconditions or instructions that have to be precisely followed. Indicates additional information or advice. 1.
Start Successfully 1.3 How to Get Nero BackItUp Applications You get the PC application plus a 1-year subscription to Nero Cloud if you purchase the box version of Nero 2014 / Nero 2014 Platinum. You can also download the free version from www.nero.com and subscribe to one of the offered Nero Cloud storage spaces. The Nero BackItUp app can be installed via Google Play or another Android app online store.
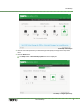
Start Screen 2 Start Screen The Nero BackItUp user interface is the starting point for backups, restores, syncs, and any other task that you can carry out with Nero BackItUp on your PC. You can start a task via the links that are provided in the start screen and the header bar. Start screen The following icons are available on the top side of the window: Home Displays the start screen. Log In Allows you to log in to Nero Cloud. If you have no account yet, you can register here.
Start Screen In the area on the right the following buttons are available: Shows your default backup plan and all other backup jobs that have been carried out recently, and that are planned. You can run, restore or File Backup Jobs modify a job. By clicking onto a job's area you can even deactivate/activate and delete a job. Clicking Create new backup you can plan a new backup. Restore Mobile Backup Shows your backups, allowing you to restore the files.
File Backup 3 File Backup 3.1 Backing Up Files With Nero BackItUp you can carry out file backups. This means that individual files can be backed up and then restored at a later point in time. The integrated storing possibilty to Nero Cloud provides a highly secure backup storage. The first step is selecting files and folders to back up. The next step is to select a target where to save the backup.
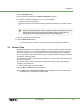
File Backup File Backup - Select targets 4. Click the icon that represents your desired target and specify the target in the drop-down menu. 5. Click the Next button. The Step 3 of 3 – Select backup options screen is displayed.
File Backup 6. Click the Schedule button. 7. Enter a name for the backup in the Backup Job Name input field. 8. If you want to schedule this backup or run it on a regular basis: 1. Select the backup schedule type. 2. Select the start date and other time settings that are appropriate to your backup schedule. Update backup During the following backups, all files that have changed in comparison to the last backup will be saved. This type of backup update is called "incremental".
File Backup Select what to restore screen 2. Make the backup available: 1. If the backup is located on a disc, insert the disc in a drive. 2. If the backup has been saved to hard drive, network drive, or removable medium, ensure that your computer has access to the respective drive. 3. Select the desired backup job in the job navigation slider with the help of the arrow buttons. 4. If your selected backup job has several runs, select the version in the upper run navigation slider.
File Backup Restore options 10. If you want to restore the backup to the original path, select the Restore to original path option button. 11. If you want to specify the path on which the backup will be restored yourself, select the Restore to new path option button. 12. Use the Conflict handling option buttons to choose the action to take when a file to be restored is already (or is still) on the computer. 13. Click the Restore Now button.
File Backup Manage Jobs The following setting options are available for a job: Run now Executes the job immediately. Restore Displays the restore view. The latest backup of the selected job is preselected. Only available for a backup job. Edit Show on Home screen Displays the job’s configuration allowing you to change it. Sets the backup job as the default backup plan. The backup is also shown on the start screen, providing fast access.
File Backup About deleting backups in general If you want to delete backups, keep in mind, that the backup file itself is physically stored either on hard drive, on an removable medium, a online storage or a disc – wherever you have stored it. If you want to remove a backup file physically, you have to delete it from your hard drive, destroy the disc – or whatever action seems reasonable to erase the file. In Nero BackItUp, on the other hand, relevant information about the backup is stored.
Syncing 4 Syncing With Nero BackItUp you can synchronize (“sync”) files between two folders. Synchronizing exchanges files between two folders. The folders can be located on the same computer or on different computers and devices. For example, you can synchronize your desktop computer with your laptop to make sure that relevant folders contain the same contents. To sync, proceed as follows: 1. Click the Tools > Sync menu in the header bar. The Sync Jobs screen is displayed. 2.
Syncing 4. Choose your left and your right folder. 5. Click the Next button. 6. Enter a name for the sync job in the Sync Job Name input field. 7. If you want to schedule the sync job or to run it on a regular basis: 1. Select the sync schedule type. 2. Select the start date and other time settings that are appropriate to your backup schedule. 8. Click the Sync Now button. The sync job is started and the final screen is displayed.
Mobile Backup 5 Mobile Backup In addition to the PC-bound Nero BackItUp, Nero offers the Nero BackItUp app, a simplified backup application for use with an Android phone. The Nero BackItUp app can be installed via Google Play and other Android app online stores. The Nero BackItUp app is used to backup the content of your phone (photos, contacts, messages, etc) to either Nero Cloud, your computer or your phone's memory card.
Mobile Backup 5.2 Connect Phone to Computer When backing up your phone's data to your computer or restoring data to your computer, you need to connect your phone with your PC. More precisely, you connect the Nero BackItUp app with Nero BackItUp on the PC. The Nero BackItUp app offers a secure connection via Wi-Fi. A wizard is available helping you with the connection. Note: The connection itself is done by the phone, the Nero BackItUp app just checks, if the connection is established.
Mobile Backup away from your phone.) Click the target button to choose if you want to backup to Nero Cloud, to PC or to SD card. 5.4 Restore Phone Data In case of a lost or broken phone or when you get a new phone you will be glad to have backed up the content of your old phone and will be able to restore the content to your new phone. The new phone has to be an Android phone, too. On your new phone you have to install the Nero BackItUp app.
Erase Rewritable Disc Window 6 Erase Rewritable Disc Window Nero BackItUp can be used to erase rewritable discs, i.e. discs with the RW specification, as long as your recorder supports this feature. Two erase methods are available for this purpose: Quick erasing does not remove the data physically from the disc, but instead only makes it inaccessible by erasing the references to existing content. The data can be restored! Full erasing removes the data from the disc by overwriting it with zeros.
Erase Rewritable Disc Window Button Erase Button Cancel Starts the erase process. Cancels the action and closes the window.
Options Overview 7 Options Overview You can define options for working with Nero BackItUp in the Options window. You can open the window via the Options button. The following options are available: General Proxy Backs up files and folders starting from the shell context menu. The shell context menu offers various pertinent information and is opened by clicking a file or folder with the right mouse button in the Windows Explorer. Enables and configures proxy settings. See also Remote Proxy →22 7.
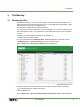
Technical Information 8 Technical Information 8.1 System Requirements Nero BackItUp is part of the Nero product you have installed. Its system requirements are the same. Detailed system requirements of this and all other Nero products can be found in the Support section on our Web site www.nero.com.
Index 9 Index File backup Start Creating new file backup ................................. 8 Default backup on start screen ........................ 6 Deleting a backup ......................................... 14 Scheduling the backup .................................. 10 Show all jobs ............................................. 7, 12 Storing in Nero Cloud ...................................... 8 From context menu ....................................... 22 Start screen .............................
Contact 10 Contact Nero BackItUp is a Nero AG product. Nero AG Im Stoeckmaedle 18 Internet: www.nero.com 76307 Karlsbad Help: http://support.nero.com Germany Fax: +49 724 892 8499 Copyright © 2013 Nero AG and its licensors. All rights reserved.