
User manual
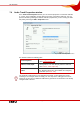

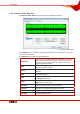
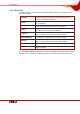
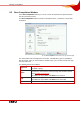
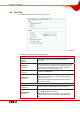
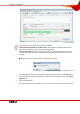
Table Of Contents
- Nero Burning ROM Manual
- 1 General Information
- 2 System Requirements
- 3 Formats Supported
- 4 Launching the Program
- 5 Working with Nero Burning ROM
- 6 New Compilation
- 7 File Selection
- 8 Burning a Compilation
- 9 Bootable Disc
- 10 Image File
- 11 Copying
- 12 Audio Database
- 13 Saving and Converting Audio Files
- 14 LightScribe®
- 15 LabelFlash™
- 16 Erasing a Rewritable Disc
- 17 Advanced Operations
- 18 Configuration
- 19 Glossary
- AIF
- Blue Book
- Blu-ray Disc
- Book Type
- Bootable CD
- Cache
- CD
- CD-DA
- CD-i
- CD Text
- Decoding
- Digitalization
- Disc
- Disc-at-once (DAO)
- DVD
- EDC/ECC
- Emulation
- Encode
- Finalizing
- Firmware
- HD DVD
- HFS CD
- Image file
- Index position
- Table of contents (TOC)
- Jitter Correction
- Cross fade with previous track
- Label
- Lead-in
- Lead-out
- M3U playlists
- MP3
- MP3PRO
- MP4
- MPEG
- NTSC
- OGG
- PAL
- Photo CD
- Plug-in
- Buffer underrun
- Red Book
- SCSI
- Sector
- Session
- Simulation
- Track
- Track-at-once (TAO)
- Transcoding
- VCD
- Volume descriptor
- WAV
- Yellow Book
- 20 Index
- 22 Contact

Burning a Compilation
Nero Burning ROM 40
Fig. 13: Burn progress
During the burn process two check boxes are available:
Automatically shut down the PC when done: Shuts down the computer after the burn
process has finished (as long as this is technically feasible).
Verify written data: Checks the data written to the disc after the burn process. You can
use this option particularly when burning backups to ensure that all data has been written
correctly.
Æ When the burn process has finished, a dialog box is opened.
Fig. 14: "Burn process completed successfully" dialog box
4. If you would like to display the extended area with the event log, click on the Details button.
5. If you would like to start another burn process with the same compilation, click on the Burn
Again button.
6. Click on the OK button.
Î The burning process is complete. You can now remove the burned disc from the burner.