
User manual
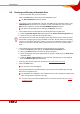

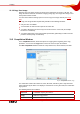
Table Of Contents
- Nero Burning ROM Manual
- 1 General Information
- 2 System Requirements
- 3 Formats Supported
- 4 Launching the Program
- 5 Working with Nero Burning ROM
- 6 New Compilation
- 7 File Selection
- 8 Burning a Compilation
- 9 Bootable Disc
- 10 Image File
- 11 Copying
- 12 Audio Database
- 13 Saving and Converting Audio Files
- 14 LightScribe®
- 15 LabelFlash™
- 16 Erasing a Rewritable Disc
- 17 Advanced Operations
- 18 Configuration
- 19 Glossary
- AIF
- Blue Book
- Blu-ray Disc
- Book Type
- Bootable CD
- Cache
- CD
- CD-DA
- CD-i
- CD Text
- Decoding
- Digitalization
- Disc
- Disc-at-once (DAO)
- DVD
- EDC/ECC
- Emulation
- Encode
- Finalizing
- Firmware
- HD DVD
- HFS CD
- Image file
- Index position
- Table of contents (TOC)
- Jitter Correction
- Cross fade with previous track
- Label
- Lead-in
- Lead-out
- M3U playlists
- MP3
- MP3PRO
- MP4
- MPEG
- NTSC
- OGG
- PAL
- Photo CD
- Plug-in
- Buffer underrun
- Red Book
- SCSI
- Sector
- Session
- Simulation
- Track
- Track-at-once (TAO)
- Transcoding
- VCD
- Volume descriptor
- WAV
- Yellow Book
- 20 Index
- 22 Contact

Copying
Nero Burning ROM 50
5. If you want to copy discs using the on-the-fly method:
1. Check the On the fly box on the Copy Options tab.
2. Select the drive that is to contain the disc to be copied from the Drive drop-down menu.
3. Insert the disc that you want to copy into the selected drive.
4. Insert a blank disc.
5. Click on the Copy button.
Æ The burn or copy process starts.
On the screen a progress bar indicates the progress being made during the burn or
copy process.
6. Proceed with the burn process (see Starting the Burn Process).
Î You have successfully copied a disc.