
User manual
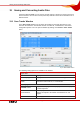

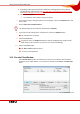

Table Of Contents
- Nero Burning ROM Manual
- 1 General Information
- 2 System Requirements
- 3 Formats Supported
- 4 Launching the Program
- 5 Working with Nero Burning ROM
- 6 New Compilation
- 7 File Selection
- 8 Burning a Compilation
- 9 Bootable Disc
- 10 Image File
- 11 Copying
- 12 Audio Database
- 13 Saving and Converting Audio Files
- 14 LightScribe®
- 15 LabelFlash™
- 16 Erasing a Rewritable Disc
- 17 Advanced Operations
- 18 Configuration
- 19 Glossary
- AIF
- Blue Book
- Blu-ray Disc
- Book Type
- Bootable CD
- Cache
- CD
- CD-DA
- CD-i
- CD Text
- Decoding
- Digitalization
- Disc
- Disc-at-once (DAO)
- DVD
- EDC/ECC
- Emulation
- Encode
- Finalizing
- Firmware
- HD DVD
- HFS CD
- Image file
- Index position
- Table of contents (TOC)
- Jitter Correction
- Cross fade with previous track
- Label
- Lead-in
- Lead-out
- M3U playlists
- MP3
- MP3PRO
- MP4
- MPEG
- NTSC
- OGG
- PAL
- Photo CD
- Plug-in
- Buffer underrun
- Red Book
- SCSI
- Sector
- Session
- Simulation
- Track
- Track-at-once (TAO)
- Transcoding
- VCD
- Volume descriptor
- WAV
- Yellow Book
- 20 Index
- 22 Contact

Saving and Converting Audio Files
Nero Burning ROM 66
2. Depending on the selected output form, define the encoding options such as bit rate,
encoding quality, and frequency (see
AC3, AIF, MP4, OGG and WAV encoding options
and
MP3 and MP3PRO encoding options)
3. Click on the OK button.
Æ The window is closed and the changes accepted.
6. If you want to specify a storage location for the output files, click on the Browse button and
select a path.
7. Select a File name creation method.
The default setting for the method for default names is Manual.
8. If you want to make settings in the extended area, click on the Options button.
Æ The extended area is opened.
9. Click on the GO button.
Æ Conversion starts. The Progress window is opened and displays the progress made
while saving. At the end of the save process, it is closed automatically.
10. Click on the Close button.
Æ The Save Tracks window is closed.
Î You have saved audio files.
13.3 Encode Files Window
In the Encode Files window, the audio files that are to be encoded are selected and the
properties for the output defined. You can open the window via the Extras > Encode Files
menu.
Fig. 21: Encode Files window