
User manual
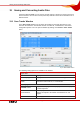

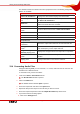

Table Of Contents
- Nero Burning ROM Manual
- 1 General Information
- 2 System Requirements
- 3 Formats Supported
- 4 Launching the Program
- 5 Working with Nero Burning ROM
- 6 New Compilation
- 7 File Selection
- 8 Burning a Compilation
- 9 Bootable Disc
- 10 Image File
- 11 Copying
- 12 Audio Database
- 13 Saving and Converting Audio Files
- 14 LightScribe®
- 15 LabelFlash™
- 16 Erasing a Rewritable Disc
- 17 Advanced Operations
- 18 Configuration
- 19 Glossary
- AIF
- Blue Book
- Blu-ray Disc
- Book Type
- Bootable CD
- Cache
- CD
- CD-DA
- CD-i
- CD Text
- Decoding
- Digitalization
- Disc
- Disc-at-once (DAO)
- DVD
- EDC/ECC
- Emulation
- Encode
- Finalizing
- Firmware
- HD DVD
- HFS CD
- Image file
- Index position
- Table of contents (TOC)
- Jitter Correction
- Cross fade with previous track
- Label
- Lead-in
- Lead-out
- M3U playlists
- MP3
- MP3PRO
- MP4
- MPEG
- NTSC
- OGG
- PAL
- Photo CD
- Plug-in
- Buffer underrun
- Red Book
- SCSI
- Sector
- Session
- Simulation
- Track
- Track-at-once (TAO)
- Transcoding
- VCD
- Volume descriptor
- WAV
- Yellow Book
- 20 Index
- 22 Contact

LightScribe®
Nero Burning ROM 70
The screen offers the following setting options:
Inner radius
Defines the distance between the label and the inner edge.
Outer radius
Defines the distance between the label and the outer edge.
Width
Defines the width of the print area.
Label templates
Contains a selection of different templates for designing the label.
You can continue to edit and customize a selected template.
New
Generates a new label document.
Open
Opens an existing label which was created using Nero
CoverDesigner.
Save As
Saves the label you have created.
OK
Adds the label you created to the compilation and closes the
window.
Preview
Opens the Print Preview window that shows how the label should
appear on the LightScribe
®
disc.
Cancel
Cancels the procedure and closes the window.
14.2 Printing Labels
The process for printing the label is integrated into the usual burn process. First, burn the
compilation, flip the disc over, and then burn the label.
To print a label, proceed as follows:
1. Create a compilation (see Creating a New Compilation) and select the files to burn (see
Selecting Files).
2. Select a LightScribe
®
burner from the drop-down menu in the toolbar.
3. If you want to set the print options for LightScribe
®
:
1. Click on the File > Options menu
Æ The Options window is opened.
2. Click on the LightScribe tab.
Æ The configuration options for LightScribe
®
are displayed.