Manual Nero Express
Copyright and Trademark Information This document, like the software described therein, is provided as a license and may only be used or reproduced in accordance with the licensing agreement. The contents of this document, as well as the associated software, is subject to change without prior notice. Nero AG rejects any responsibility for the correctness of the contents of this document and rejects any claims that transcend the clauses of the guarantee agreement.
Table of contents 1 1.1 1.2 1.3 1.4 Start Successfully About the Manual About Nero Express Versions of Nero Express Working with the Application 5 5 5 6 7 2 Starting the Program 8 3 3.1 Start Screen Extended Area (Start Screen) 9 10 4 Compilation Screen 12 5 5.1 5.2 5.3 Data Disc Compiling Data Disc Compiling SecurDisc disc Saving Data Track 15 15 16 20 6 6.1 6.1.1 6.2 6.3 6.3.1 6.4 6.4.
11 11.1 11.2 11.3 11.4 11.4.1 Burn Compilation Choice of Burner Starting the Burn Process Creating an Image File Final Burn Settings Screen Extended Area (Burn Settings) 53 53 54 54 56 57 12 12.1 12.1.1 12.1.2 12.2 12.3 Copying a Disc Methods of Copying On-the-fly Copying Copy Over Image Copying a Disc Copy Settings 59 59 59 59 60 62 13 Erase Rewritable Disc Window 64 14 Final Screen 66 15 15.1 15.2 15.3 15.
Start Successfully 1 Start Successfully 1.1 About the Manual This manual is intended for all users who want to learn how to use Nero Express. It is process-based and explains how to achieve a specific objective on a step-by-step basis. To make best use of this documentation, please note the following conventions: Indicates warnings, preconditions or instructions that have to be precisely followed. Indicates additional information or advice. 1.
Start Successfully 1.3 Versions of Nero Express Nero Express is available in versions with different features. The full version of Nero Express in Nero Multimedia Suite, or Nero Multimedia Suite Platinum HD, provides the complete range of functions, including multimedia features such as saving audio tracks and burning BD-Videos. Nero Express in Nero BackItUp & Burn provides a limited feature set, based on the most common data burning use cases.
Start Successfully Music title recognition with Gracenote Support of Album art with Gracenote Compiling AVCHD disc Compiling BD-Video Nero Express Essentials in Nero BackItUp & Burn does not offer the following features compared to the full version in Nero BackItUp & Burn: Full SecurDisc functionality Gracenote Plug-in You will need the Gracenote Plug-in to identify single audio files and to display Album art. You can obtain the plug-in at www.nero.com.
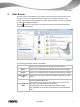
Starting the Program 2 Starting the Program To start Nero Express, proceed as follows: 1. If you use Nero Multimedia Suite or Nero Multimedia Suite Platinum HD and have Nero StartSmart available: 1. Click the Nero StartSmart desktop icon. The Nero StartSmart window is opened. 2. Click the button. The list of Nero applications is displayed. 3. Select the Nero Express entry in the selection list. The Nero Express window is opened. Nero StartSmart window 2. If you use Nero BackItUp & Burn: 1.
Start Screen 3 Start Screen The main screen in Nero Express is the starting point for all actions. Click here on the relevant menu icons to go to the desired screen where you can compile and work on your project. The selection is categorized into two areas: several formats or options are available for the single compilation methods. Click the button in the left margin of the window to display an extended area with addi- tional options and features.
Start Screen The actual entries that are available and the actual disc types (e.g. DVD) to which can be written depend on the selected recorder. You can find more information on Blu-ray support at www.nero.com/link.php?topic_id=416. See also Loading a Disc Image or Saved Project → 43 LightScribe → 44 Data Disc → 15 Music → 22 Video → 38 3.
Start Screen Disc Info Opens the Disc Info window to display information about the inserted disc. The total capacity and available capacity are displayed, in addition to the tracks and sessions. Opens Nero CoverDesigner. Nero CoverDesigner is used to create and print labels and booklets for burned discs. Create Covers and Please see the separate Nero CoverDesigner user manual for full Labels instructions on how to make professional looking covers and labels. Only available with Nero Multimedia Suite.
Compilation Screen 4 Compilation Screen You can access the Nero Express compilation screens by selecting the compilation type you want in the start screen. You can add data to your projects in the compilation screens and customize the directory structure on the disc to suit your requirements. The capacity bar near the bottom of the window indicates how much space is being used by the data on the disc. Essentially, all compilation screens have the same structure.
Compilation Screen Check box Normalize all audio files Enables a filter that brings the volume of the audio files to be burned into line with one another. This is recommended particularly if the files originate from different sources. Available for Audio CDs only. Establishes that the audio files merge into one another without a pause. If the check box is cleared, a pause of two seconds is inserted between the files.
Compilation Screen You can find more information on Blu-ray support at www.nero.com/link.php?topic_id=416.
Data Disc 5 Data Disc 5.1 Compiling Data Disc With Nero Express you can compile and burn all types of files and folders. If a Blu-ray recorder is installed on your computer you can burn data CDs, data DVDs and data Blu-ray Discs. If you have a CD recorder you can only burn data CDs. The procedure for all data compilation methods is identical. A data disc is particularly useful for storing files on a disc and for burning backups. You can find more information on Blu-ray support at www.nero.com/link.
Data Disc The files are added to the compilation and displayed in the compilation screen. 7. Click the Next button. You have successfully compiled a data disc and can now burn this compilation. See also Compilation Screen → 12 5.2 Compiling SecurDisc disc SecurDisc is a technology with which you can create discs with special protection properties. No special hardware is needed. Discs that are created with Nero Express and the SecurDisc compilation type include data integrity and reconstruction.
Data Disc SecurDisc DVD compilation 3. Click the Add button. The Add files and folders window is opened. 4. Select the files that you want to add to the compilation and click the Add button. 5. Repeat the previous step for all files that you want to add. 6. Click the Close button. The files are added to the compilation and displayed in the compilation screen. 7. If you want to enable the password protection for all files: 1.
Data Disc 2. Enter the desired password in the Password input area and then click the OK button. When appropriate, a wizard offers suggestions in an additional Tips dialog box when entering and selecting the password. The wizard estimates the security level, i.e. the quality of the password, during entry. 8. If you want to sign the disc with a digital signature: 1. Select the Digital signature check box in the extended area of the compilation screen. The SecurDisc – Digital Signature window is opened.
Data Disc 2. If you have already created a digital key, click the Browse button and select the key. 3. If you want to create a digital key, click the Start button. The SecurDisc – Create Digital Key window is opened. 4. Read the instructions and click the Next button. The SecurDisc Key Creation Process window is opened. 5. Move your mouse at random until the creation process is complete. You can monitor the status of the creation process using the progress bar.
Data Disc 9. If you want to enhance the burning speed by limiting the data redundancy or to configure the data redundancy: 1. Select the Data redundancy check box in the extended area of the screen.. The option buttons are enabled. 2. Select the desired reliability level. If the Data redundancy check box is cleared, the disc will be filled completely with copies of the chosen data and checksums. A display panel in the compilation screen indicates the current redundancy level. 10. Click the Next button.
Data Disc 3. Select the first data track. 4. Click the Save Track button. The Save As window is opened. 5. Select a file name and a storage location. 6. Select the desired output format (ISO or NRG) for the image file in the Save As drop-down menu. 7. Click the Start button. The Progress window is opened and displays the progress made while saving. When the save process is complete, the window is closed automatically. You have successfully created an image file starting from a data disc.
Music 6 Music 6.1 Compiling Audio CDs Some of the functions mentioned here are restricted or not available in the Essentials version. You can always upgrade your Essentials version at www.nero.com to get the full version with all the functions. With Nero Express you can create an Audio CD that contains music files. It can be played in all standard CD players. To compile an Audio CD, source files with different audio formats are automatically converted into Audio CD format before being burned.
Music My Audio CD compilation screen 3. Click the Add button. The Add files and folders window is opened. 4. Select the audio files that you want to add to the compilation and click the Add button. 5. Repeat the previous step for all audio files that you want to add. 6. Click the Close button. The audio files are added to the compilation and displayed in the compilation screen. 7. Customize the properties of the audio files to suit your requirements.
Music 8. Click the Next button. You have successfully compiled an Audio CD and can now burn this compilation. See also Compilation Screen → 12 Copy Audio CDs to Hard Drive → 34 6.1.1 Customizing Properties of The Audio File You can display and/or make changes to the audio file properties on the Track Properties, Indexes, Limits, Splits and Filters tabs of the Audio Track Properties window.
Music Input field Artist (CD Text) Input field Pause Defines the artist which is saved as CD Text. CD players that support CD Text show the artist's name entered here. Only Latin characters can be displayed as CD Text. CD Text can only be written in disc-at-once mode. Defines the length of the pause in seconds or frames between the selected audio file and the next one. Input field Identifies the CD title using a 12-character digital code.
Music Audio files are displayed graphically in the Oscilloscope area. The following configuration options are available in the Positions area: Selection lists Start/End Button New Index Shows the positions for the beginning and end of the audio file on the CD. Sets a new index position at the selected position. For the CD player this is the position from which a new song starts, and the player can also jump to it directly. However, not all CD players support this feature.
Music Audio Track Properties window, Filters tab The following configuration options are available in the Audio Track Properties window: Check box Normalize Check box Declick Check box Hiss Reduction Check box Fade In Check box Fade Out Check box Stereo Widening Check box Karaoke Sets the volume of an audio file to a preset value. This filter can be useful to bring the volume of files originating from different sources into line with one another.
Music Check box Echo Check box Equalizer Adds an echo to the audio file. Opens an equalizer so you can change the volume, bass, and pitch in different frequency ranges. Plays the audio file and applies the activated filters. During playback, the configuration options for the filters can be changed, alTest Selected Filters lowing the effect to be controlled. Button 6.2 Compiling Jukebox Disc Nero Express can be used to compile discs with audio formats you require (e.g. Nero AAC or WMA).
Music With Gracenote you can have audio files identified out of any sort of audio compilation. This is particularly useful when audio files are not named or are only partially named. The metadata that is made available by Gracenote is used for the compilation and is written into the audio files. In this way your music collection is correctly tagged with all information. During the following actions, original Audio CDs can be automatically identified in Nero Express with Gracenote MusicID.
Music 3. Select one or more audio files in the compilation. 4. Right-click to open the context menu. 5. Select the Get Meta Data entry. The audio files are analyzed and the required information is sent to Gracenote. The Edit Meta Data window is opened. The metadata received by Gracenote is displayed in the New Info area. Edit Meta Data window 6. If necessary, edit the metadata, e.g. track number, title, artist, album title, year, and genre. 7. Click the Apply button.
Music With Nero Express you can save audio files from an Audio CD to the hard drive. In the process, the files are encoded, i.e. converted into a format that the computer can read. The audio file is usually compressed. The Audio CD can be automatically identified with Gracenote MusicID. So called metadata such as title, genre, and track title are accessed by the Gracenote Media Database and associated to the tracks. If available, Album art is also displayed and associated to the tracks.
Music Edit Metadata The Edit Meta Data window also opens if no matching entry is found in the database but you want to enter the metadata and make it available. 5. Edit the audio track metadata (Title and Artist) by clicking in the track list. 6. Edit the Audio CD metadata (Album Title, Artist, Year and Genre as well as Album Art) on the right side. 7. Click the Advanced Options button if you want to add additional information.
Music Save Audio Tracks to Hard Drive 9. Select the tracks that you want to save on the hard drive. 10. Click the Output tab. The Output tab is opened. 11. In the File Format drop-down menu, select the target file's audio format. 12. Choose a method for creating the file name in the Mode for Creating File Names dropdown menu. 13. Define other settings according to your preferences. 14. Click the Copy button. Conversion starts. A folder with the album name is created in the desired folder.
Music 6.4.1 Copy Audio CDs to Hard Drive Define the settings for audio files to be saved on the hard drive in the Save Audio Tracks to Hard Drive window. Open the window in the extended area of the start screen by clicking Save Tracks. Copy Audio CDs to Hard Drive - Source The following setting options are available: Tab Source Tab Output Button Copy Specifies settings for the source of the audio data. Sets output files configuration options. Starts the copy or save process.
Music 6.4.1.1 Source Tab The Source tab displays the audio files on the Audio CD. The functions of the control buttons correspond to the familiar control buttons on CD players. The following setting options are available: Drop-down menu Source drive Title Selection List Button Refresh Button Edit Input fields Album/Artist/Year Selection list Genre Cover area Button Load Cover Selects the drive where the Audio CD is inserted. Displays the tracks on the Audio CD.
Music 6.4.1.2 Output Tab You can define the properties of the audio files to be created on the Output tab. Copy Audio CDs to Hard Drive - Output The following setting options are available: Input window Output directory Button Browse Drop-down menu Mode for creating file name Selects the storage location for the output file. Opens a browser window where you can select a storage location. Selects the method to be used for creating the name of the output file. Creates a playlist of the saved audio files.
Music Drop-down menu Playlist format Drop-down menu File format Drop-down menu Quality Selects a format for the playlist. Selects the output audio format for the selected audio file. The selected file format is available as the first entry the next time it is called up. You can choose between Nero AAC Audio, MP3 Audio, WAVE, AIFF, FLAC and Ogg Vorbis. Selects the bitrate for the selected audio file format. If the bit rate is small, less data is transferred. The file is then small, but quality is lower.
Video 7 Video 7.1 Compiling DVD-Videos With Nero Express you can burn DVDs made up of premastered DVD-Video files from your hard drive. You can show your burned DVDs on almost all DVD players. You can use Nero Express to burn a DVD if the DVD video title, i.e. a complete DVD folder structure, is already available. In Nero Express it is not possible to create a DVD-Video, an AVCHD video, or a BDMV-Video from video files.
Video DVD-Video files compilation screen If the DVD-Video files selected are larger than 4483 MB and if a DVD recorder which can burn DVDs with 2 layers (DVD DL) is installed, you can select the DVD9 (8152MB) option in the drop-down menu. 6. Click the Next button. You have successfully compiled a DVD-Video and can now burn this compilation. See also Compilation Screen → 12 7.2 Compiling AVCHD Video Disc This function is only available in Nero Express that is included in Nero Multimedia Suite.
Video In Nero Express it is not possible to create a DVD-Video, an AVCHD video, or a BDMV-Video from video files. You can convert video files to DVD-Video, to AVCHD video, or BDMV-Video in Nero Vision for example. Nero Vision is included in the full version of Nero Multimedia Suite. More information about Nero Vision is available on the Web site www.nero.com, and more information about video editing is available in the separate Nero Vision manual. To compile an AVCHD video disc, proceed as follows: 1.
Video 7.3 Compiling Blu-ray Video Disc This function is only available in Nero Express that is included in Nero Multimedia Suite. If you use Nero BackItUp & Burn you can always upgrade to Nero Multimedia Suite at www.nero.com to get all the multimedia functions. With Nero Express you can burn a BDMV-Video disc made up of BDMV (= Blu-ray Movie) files from your hard drive. You can play your burned BDMV-Video on almost all Blu-ray players.
Video 3. Click the Add button. The Add files and folders window is opened. 4. Select the BD-Video files that you would like to add to the compilation and click the Add button. 5. Click the Close button. The BD-Video files are added to the compilation and are displayed in the compilation screen. Files and Folders The BDMV-Video contains different folders. Only certain files are allowed in an individual folder.
Loading a Disc Image or Saved Project 8 Loading a Disc Image or Saved Project With Nero Express you can burn a disc from a disc image or compilation that you have previously saved on the hard drive. To load an image file or a saved compilation for the burn process, proceed as follows: 1. Click the Image, Project, Copy menu icon in the Nero Express start screen. The copy and disc image options are displayed. 2. Click the Disc Image or Saved Project option. The Open dialog window is opened. 3.
LightScribe 9 LightScribe Using Nero Express and a LightScribe recorder you can create or load labels that you can burn onto the label side of CDs/DVDs in the LightScribe recorder. The function is available as a separate Print LightScribe Label option in the start screen or can be integrated as an intermediate step into the creation and burn process of a project. This function is only available in the full version of Nero Express that is included in Nero Multimedia Suite.
LightScribe 3. Click the Print LightScribe Label menu icon. The Print LightScribe Label option is displayed. 4. Click the Print LightScribe Label option. The Disc Label screen is displayed. Disc Label screen 5. Create a label according to your requirements. The interface in the Disc Label screen works on the same principle as Nero CoverDesigner. Basically, it is irrelevant whether you print the label on paper or directly onto an appropriate disc.
LightScribe You have successfully created and printed a LightScribe label according to your requirements and can now continue by selecting another option from the final screen or by exiting Nero Express. It is possible to burn the label several times to the same LightScribe disc. The printed labels will be aligned. This darkens the label und often improves the quality. It is also possible to extend the label with new elements in an additional burn process.
LightScribe Check box Shuts down the computer after the label has been printed Automatically shut down the (if possible). PC when done Button Starts printing the label. Print Button Opens the LightScribe Print Preview dialog box. A print preview of the label is displayed here. Preview 9.3 Printing LightScribe Labels (Within The Project) To create and print a corresponding LightScribe label within your project, proceed as follows: 1.
LightScribe The LightScribe Print Properties window opens and the print process starts. You can follow the process status in the status ba. As soon as the printing is finished, the Nero – LightScribe dialog appears and displays a message about the result of the printing process. 11. Click the OK button. 12. If you would like to save a log of the burn process, click the Save button. The log is saved. 13. To print the log, click the Print button. The log is printed. 14. Click the Next button.
Labelflash 10 Labelflash If you have a Labelflash recorder, you can print a label on the label and/or data side of the Labelflash DVD. A Labelflash DVD has a special layer between the top and bottom layers; this layer can be heated by the laser in the recorder so that images and text can be printed on the DVD. This function is only available in the full version of Nero Express that is included in Nero Multimedia Suite.
Labelflash Burn Label Window The following configuration options are available in the Burn Label window: Input field Inner Radius Input field Width Defines the distance between the label and the inner edge. Defines the width of the print area. Opens the Labelflash Print Properties window. Button Edit Button Preview Selection list Label templates This is where you can change the printing quality and the contrast level and display the changes made directly in the print preview.
Labelflash Button Writing Button Cancel Starts the burn process. Cancels the procedure and closes the window. If you are creating a DiscT@2, Nero Express displays only the available print area for creating the label by default, i.e. the area on the data side of your DVD that is not already taken up by data. You cannot increase the radius of the print area. 10.2 Printing Labelflash Labels and DiskT@2 Basically, it is irrelevant whether you print on the label or the data side when creating labels.
Labelflash 2. If you want to change the printing quality, select a quality level from the Print quality profile drop-down menu. 3. If you select the User defined entry from the Print quality profile drop-down menu, you can change the contrast level and the rotation speed. 4. Click the OK button. The Labelflash Print Properties window is closed and the changes are accepted. Labelflash Print Properties 6. Click the Burn button.
Burn Compilation 11 Burn Compilation 11.1 Choice of Burner If multiple recorders are installed, you can select the recorder that you want to use for burning from the Recorder drop-down menu. Immediately before burning a project, you can change the recorder you selected again in the Final Burn Settings window. Labelflash recorder If a Labelflash recorder is installed on your computer, you can select it to create and print Labelflash DVD labels in Nero Express.
Burn Compilation 11.2 Starting the Burn Process To select one of the available recorders, to define the burn settings for your project according to your requirements, and to start the burn process, proceed as follows: 1. Compile a project of your choice. The Final Burn Settings screen is displayed. 2. Insert a suitable blank disc in the selected drive. 3. Select the recorder you want from the Recorder drop-down menu. 4.
Burn Compilation 2. Select the Image Recorder option from the Current Recorder drop-down menu. 3. Add to the required values in the input fields. 4. Add to the required settings in the extended area as necessary. 5. Click the Burn button. The Burning Process screen is displayed and the Save Image File dialog box is opened. 6. Enter a name for your image file in the File Name input field. 7. Select the desired storage location in the navigation tree and click the Save button.
Burn Compilation 11.4 Final Burn Settings Screen In the Final Burn Settings screen, you can define the burn settings to suit your requirements, use Nero Image Recorder to save a project to the hard drive as an image file or start the burn process. Final Burn Settings screen The following configuration options are available in the Final Burn Settings screen: Button Options Opens the Recorder Information window.
Burn Compilation Check box Compares the burned data to the original data. With compilations of multisession discs only the data that was added during the last burn Verify data on disc process is compared. after burning Not available when saving with Nero Image Recorder. Enables the option to write additional files to the disc. The disc is not finalized. Multisession disc do not have to be written in a single burn Allow files to be process.
Burn Compilation feature. Not available when saving with Nero Image Recorder. Performs all steps in the burn process without using the laser beam. We recommend running a simulation if you are decompressing data before burning, e.g. when burning an Audio CD Check box Simulation from MP3 files. You can assume that if simulation is successful, the burn process will also be successful. Not available when saving with Nero Image Recorder. Check box Write Check box Starts the actual physical burn process (e.
Copying a Disc 12 Copying a Disc 12.1 Methods of Copying Nero Express can be used for copying discs. There are two methods for this: On-the-fly Copy Over Image Each method has advantages and disadvantages which will depend on your requirements. 12.1.1 On-the-fly Copying When using the on-the-fly method, insert the original disc into a drive and a recordable disc into the drive. The original disc in the drive is copied immediately without any time delay to the blank disc in the recorder.
Copying a Disc 12.2 Copying a Disc With Nero Express you can copy a disc. That means you make an exact copy of a source disc and burn it to a target disc. If your source disc is an Audio CD, for instance, your copy will be an Audio CD as well. Depending on your installed burner, you can copy CDs, DVDs or Blu-ray Discs. The target disc must be the same disc type as the source disc - you can copy a DVD only to a DVD, for example.
Copying a Disc 4. If you want to copy discs using the Image Copy method: 1. Clear the Quick copy box. 2. Insert the disc that you want to copy into the recorder. 5. If you want to copy discs using the on-the-fly method: 1. Select the Quick copy check box. 2. Select the Source drive and the Destination drive. 3. Insert the disc that you want to copy into the selected drive. 4. Insert a blank disc into the target drive. 6. Click the Copy button. If you are copying via the drive, the copy process starts.
Copying a Disc 12.3 Copy Settings Source and Destination screen The following configuration options are available in the Source and destination screen: Selection list Source drive Selection list Destination drive Defines the drive from which the source information is read. Insert the CD or DVD that you want to copy into the drive. Creates the destination drive. Insert a blank disc into this drive. Opens the Recorder Information window.
Copying a Disc Input field Number of copies Check box Verify data on disc after burning Button Image file Defines the number of copies you require. Verifies whether the burned data is identical to the original data. Not available for Nero Image Recorder. Defines the folder where the image file is stored. You can change the name of the image file and target folder. Not available for Nero Image Recorder.
Erase Rewritable Disc Window 13 Erase Rewritable Disc Window Nero Express can be used to erase rewritable discs, i.e. discs with the RW specification, as long as your recorder supports this feature. Two erase methods are available for this purpose: Quick erasing does not remove the data physically from the disc, but instead only makes it inaccessible by erasing the references to existing content. The data can be restored! Full erasing removes the data from the disc by overwriting it with zeroes.
Erase Rewritable Disc Window between one and two minutes. The Full-erase rewritable disc method physically erases all data from the disc. The contents cannot be restored with conventional methods. Repeated full erasing increases the probability that third parties will not be able to reconstruct the contents. Erasing the disc using this method takes longer than the other method, depending on the type of disc involved. Selection list Erase speed Button Erase Button Cancel Defines the erase speed.
Final Screen 14 Final Screen Once you have successfully concluded the burn or save process with Nero Express, the final screen is displayed with the options Burn same project again, New project, and Save Project. You can select one of these options to continue working with Nero Express or you can click the button to exit the program.
About Nero SecurDisc Viewer 15 About Nero SecurDisc Viewer Nero SecurDisc Viewer is a standalone application that is part of the SecurDisc technology platform. SecurDisc is a technology developed by Nero and HLDS to create discs with special protection properties. No special hardware is needed. Nero SecurDisc Viewer is available as a free download at www.securdisc.net or www.nero.com and is also included automatically in a SecurDisc disc that is burned with Nero Burning ROM or Nero Express.
About Nero SecurDisc Viewer 15.2 Copying data to hard drive With Nero SecurDisc Viewer you can copy the files from the SecurDisc disc to your hard drive. If the files have been protected against unauthorized access, you can insert the password here. Proceed as follows: 1. Select the check boxes of the files you want to copy to the hard drive. 2. Click the Save to button. If data on the SecurDisc disc is password-protected, the Password Protection window is opened. 3.
About Nero SecurDisc Viewer 15.4 Checking signature With Nero SecurDisc Viewer you can verify the authenticity of the SecurDisc disc if it is digitally signed. You need the public key from the distributer of the SecurDisc disc for this purpose. By checking the public key, Nero SecurDisc Viewer is able to confirm that the data is authentic and has not been manipulated. Proceed as follows: 1. Click the Signature button. An explorer window is opened. 2. Select the public key (*.
About Nero SecurDisc Viewer Nero Express 70
Configuration Options 16 Configuration Options You can define options for working with Nero Express in the Options window. Some of the functions mentioned here are only available in the full version. You can always upgrade your Essentials version at www.nero.com to get the full version with all the functions. Options Window The following tabs are available: Compilation Contains options for the compilation and the selection screen.
Configuration Options Cache Font Sounds Expert Features Database Ultrabuffer Misc. LightScribe Contains options for the cache. Contains selection options for the font. Contains selection options for sounds in connection with burn tasks. Contains options for configuring overburning and burning. We recommend that you retain the default settings. Selects the default naming method for audio files to be saved from an Audio CD to the hard drive. Defines the size of the RAM buffer.
Configuration Options 16.2 Cache Settings The following configuration options are available on the Cache tab: Displays the path of the Cache memory. Input field You can enter the path manually or select the path in the browser window. Path for cache Opens a browser window. Button You can select a folder in which data is buffered before and during the burn process. Browse Input field Defines the minimum storage volume on the cache drive Minimum space on hard drive, that is not used by Nero Express.
Configuration Options Check box Enables the option that your disc remains in the recordDo not eject disc after burning er and is not ejected when the burn process is finished. Enables the option that all supported recorder formats for the Image Recorder are available. Check box It is now possible to create compilations that the inEnable all supported recorder stalled recorder cannot burn.
Configuration Options 16.5 LightScribe Settings The following configuration options are available on the LightScribe tab: Area Adjusts the desired print quality. Print contrast Selection list Selects the drive with the LightScribe recorder. Default LightScribe drive Selection list Specifies the genre. Genre Selection list Defines a template for labels. Current template Selection list Default print resolution (DPI) Check box Printing LightScribe labels Adjusts the desired print resolution.
Technical Information 17 Technical Information 17.1 System Requirements Nero Express is part of the Nero product you have installed. Its system requirements are the same. Detailed system requirements of this and all other Nero products can be found in the Support section on our Web site www.nero.com. 17.2 Formats Supported 17.2.1 Disc Types CD DVD Blu-ray - burning only You can find more information on Blu-ray support at www.nero.com/link.php?topic_id=416.
Technical Information 17.2.
Technical Information 17.2.5 Image Formats Bitmap (BMP) Device Independent Bitmaps (DIB) Graphics Interchange Format (GIF) Icon Image File (ICO) JPEG File Interchange Format (JFIF) Joint Photographic Expert Group (JPEG, JPG, JPE) Picture Exchange (PCX) Portable Network Graphics (PNG) Portable Pixel Map (PPM) Targa Image File (TGA) Tagged Image File Format (TIFF, TIF) Windows Media File (WMF) 17.2.
Glossary 18 Glossary AIFF The Audio Interchange File Format is an uncompressed audio file format from Apple® and represents a sort of counterpart to the WAV format from Microsoft. Files are larger than when using a compressed format, but the quality is higher. AIFF compressed is the compressed variation. Archive Bit Archive bits are used to identify files that have been edited. A file is only resaved during the next backup process if it was edited (and an archive bit is thus reset).
Glossary Cache Cache is a faster buffer that is used in various areas of a computer to access larger data volumes faster. Cache ensures a continuous flow of data. CD-R Compact Disc-Recordable is a technology for write-once media. The Orange Book standard defines the storage of audio data and other computer-readable data. Disc-At-Once Disc-At-Once refers to a method in which the laser in your recorder burns straight through in one session without turning off and on between each track.
Glossary MP3 The MPEG-1 Audio Layer 3 audio format is used to reduce the size of audio files to a fraction of their original size (factor 1:10) with little loss of quality. You can estimate about 1 MB per minute as opposed to 10 MB for the original files. This value and the quality can vary depending on the complexity of the audio signal. The bit rate used can be used as a measure of quality. The higher the bit rate, the better the quality, but also the more memory required.
Index 19 Index Data Track ............................................ 20 DiskT@2 .............................................. 49 Audio CD CD Text......................................................... 56 Convert ......................................................... 34 Copy an Audio CD ........................................ 60 Copy tip ........................................................ 59 Creating ........................................................ 22 Cross fade with previous track .
Index Screen AVCHD(TM) Files ......................................... 40 BD-Video Files .............................................. 41 Disc content .............................................15, 16 DVD-Video Files ........................................... 38 My Audio CD ................................................. 22 Source and Destination ............................60, 62 SecurDisc About SecurDisc ........................................... 67 Digital signature .............................
Contact 20 Contact Nero Express is a Nero AG product. Nero AG Im Stoeckmaedle 18 Internet: www.nero.com 76307 Karlsbad Help: http://support.nero.com Germany Fax: +49 724 892 8499 330 N Brand Blvd Suite 800 Internet: www.nero.com Glendale, CA 91203-2335 Help: http://support.nero.com USA Fax: (818) 956 7094 E-mail: US-CustomerSupport@nero.com Rover Center-kita 8F-B, 1-2-2 Nakagawa-chuou Tsuzuki-ku Internet: www.nero.com Yokohama, Kanagawa Help: http://support.nero.com Nero Inc.