
User manual


LightScribe
Nero Express
47
Check box
Automatically shut down the
PC when done
Shuts down the computer after the label has been printed
(if possible).
Button
Print
Starts printing the label.
Button
Preview
Opens the LightScribe Print Preview dialog box. A print
preview of the label is displayed here.
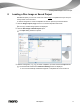
9.3 Printing LightScribe Labels (Within The Project)
To create and print a corresponding LightScribe label within your project, proceed as follows:
1. In the Recorder section of the extended area in the start screen, select the LightScribe
recorder you want to use.
2. Compile a project of your choice.
The Disc Label screen opens.
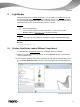
3. Create a label according to your requirements.
The interface in the Disc Label screen works on the same principle as Nero Co-
verDesigner. Basically, it is irrelevant whether you print the label on paper or di-
rectly onto an appropriate disc.
Please see the separate Nero CoverDesigner user manual for full instructions on
how to make professional looking covers and labels.
4. Click the Next button.
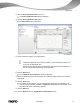
The Final Burn Settings screen opens.
5. Insert a suitable blank disc in the selected drive.
6. Select the recorder you want from the Current Recorder drop-down menu.
7. Add to the desired values in the input fields as necessary and select the required check
boxes.
8. Add to the desired settings in the extended area.
9. Click the Burn button.
The Burn Process screen appears and the burn process starts. You can follow the
process status in the status bar. As soon as the burn process is finished, the CD/DVD is
ejected and a dialog box appears.
10. Turn the blank LightScribe disc around, i.e. insert it in the LightScribe recorder with the label
side facing down.