Manual Nero Recode
Copyright and Trademark Information This document, like the software described therein, is provided as a license and may only be used or reproduced in accordance with the licensing agreement. The contents of this document, as well as the associated software, is subject to change without prior notice. Nero AG rejects any responsibility for the correctness of the contents of this document and rejects any claims that transcend the clauses of the guarantee agreement.
Table of contents 1 1.1 1.2 1.3 1.4 Start Successfully About the Manual About This Application Versions of Nero Recode Working With Nero Recode 5 5 5 6 6 2 Starting the Program 8 3 3.1 3.1.1 3.2 3.2.1 3.2.2 3.2.3 3.2.4 3.2.5 3.3 3.3.1 3.3.2 3.3.3 3.4 3.4.1 3.5 3.5.
7.2.1 7.2.2 7.2.3 7.2.4 7.2.5 7.3 7.3.1 7.3.2 7.3.3 7.3.4 7.4 7.5 7.5.1 7.6 7.7 Deinterlace Tab Frame Rate Tab Crop Tab Resize Tab Plug-ins Tab Encoder Settings General Settings Encoding Tools Visual Enhancements Multithreading Nero Digital Audio Settings Nero Digital Subtitle Settings Subtitle Formats Chapters Window Recoding DVDs And Videos to Nero Digital 45 46 47 47 48 49 50 50 51 52 52 53 56 57 58 8 8.1 8.
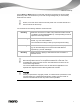
Start Successfully 1 Start Successfully 1.1 About the Manual This manual is intended for all users who want to learn how to use Nero Recode. It is process-based and explains how to achieve a specific objective on a step-by-step basis. To make best use of this documentation, please note the following conventions: Indicates warnings, preconditions or instructions that have to be precisely followed. Indicates additional information or advice. 1.
Start Successfully Thus, Nero Recode lets you copy, recompile, and recode the content of DVs and DVDs and then to burn the results to disc. 1.3 Versions of Nero Recode Nero Recode is also offered in versions different from the full version. These versions differ from the full version in the scope of their features, i.e. they cannot perform all the tasks described in this manual, and the user interface is adapted to the specific version.
Start Successfully Use the Next and Back buttons to move back and forth through the three screens while performing a task. This means that you can also change settings that you have already made and undo actions. Each screen contains tool tips, detailed information and explanations for the buttons, icons and menus. Move the mouse pointer over a control element for a few seconds to see the tool tip.
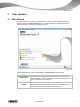
Starting the Program 2 Starting the Program To start Nero Recode via Nero StartSmart, proceed as follows: 1. Click the Nero StartSmart icon. The Nero StartSmart window is opened. 2. Click the button. The list of Nero applications is displayed. Nero StartSmart window 3. Select the Nero Recode entry in the selection list. The Nero Recode window is opened. You have started Nero Recode via Nero StartSmart.
User Interface 3 User Interface 3.1 Main Window The Nero Recode user interface consists of a main window and an extended area. After selecting a task in the Nero Recode screen, complete the task by navigating through the various steps with a new screen displayed for each. Main window The following selection options are available in the Nero Recode main window: Recode an Entire DVD to DVD Imports DVDs including their menus and extras.
User Interface Compile a DVD Imports video titles and compiles an individual DVD from one or more DVDs. Unwanted audio tracks, subtitles or video content can be removed and the structure of the video titles can be changed. Recode DVDs and Imports video titles from one or more DVDs and converts them to Videos to Nero Nero Digital (MPEG-4) files. Unwanted audio tracks, subtitles or Digital video content can be removed and the structure of the video titles can be changed.
User Interface Disc Info Nero CoverDesigner Calls up information about the disc in the drive. Launches Nero CoverDesigner in a new window. Nero CoverDesigner is an application in the Nero Multimedia Suite and is automatically installed during the main installation procedure. Nero CoverDesigner allows you to create and print labels and booklets for burned DVDs and CDs. Please see the separate Nero CoverDesigner user manual for full instructions on how to make professional looking covers and labels.
User Interface See also Extended area - Main window → 10 File I/O Tab → 15 Audio Tab → 14 Nero Digital Tab → 13 DVD Tab → 12 General Tab → 12 3.2.1 General Tab On the General tab, you can define general Nero Recode settings. The following setting options are available: Button This enables all warnings if these have been disabled manually. Enable All If this check box is selected, the disc is not ejected after the burn Do not eject the disc process.
User Interface The following check boxes are available on the Import DVD area: Prompt to include If this check box is selected, content is transferred, i.e. copied as DVD data files when well, when a DVD with data content is imported. importing Relax DVD-Video specification to allow 16-bit Unicode for the volume label If this check box is selected, limitations on the use of character sets are relaxed.
User Interface Check box If this check box is selected, Nero Recode keeps the input resolution of the video file if encoding should be carried out with the interlaced feature. Keep input resolution for interlaced encodings The resolution is not changed and picture edges are not trimmed. Check box Prefer motion adaptive deinterlacing method Drop-down menu Default resizing method If this check box is selected, Nero Recode selects the motionadaptive deinterlacing method as the preferred encoding method.
User Interface See also Basic Settings → 11 3.2.5 File I/O Tab On the File I/O tab you can define the method for accessing a drive for direct conversion. You can choose the SPTI/ASPI or Windows File System entries from the drop-down menu. When read with SPTI/ASPI, non-copy-protected DVD that feature a copyright bit will display a message stating that the DVD cannot be copied due to copy protection. In this case, you should choose the Windows File System option when reading.
User Interface See also Title Import Profiles → 19 Data Files Tab → 18 DVD-Video Files/Nero Digital Titles Tab → 16 3.3.1 DVD-Video Files/Nero Digital Titles Tab You can use the DVD-Video Files and Nero Digital Titles tabs to add your DVD tracks and video files. Both tabs are divided into a content area, a preview area beneath it to the left, and the Audio/Subtitle/Info tabs, which show the audio tracks and subtitles on the original DVD, to the right.
User Interface The following setting options are available: Button Opens a window to import the required DVD and/or video title. Import DVD / Import Titles / Import Files Check box Fit to target If this check box is selected, the content of the imported disc is recoded automatically in such a way that it can fit on the inserted recordable disc. The check box is selected by default. If the check box is deselected, the size of the copy can be defined irrespective of the limitation of a disc.
User Interface You can play a preview of the imported video title in the preview area. The following setting options are available: Button Ends playback. Button Starts playback. Slider Skips to particular points. Button Enlarges/reduces the preview area. The Audio/Subtitle/Info tabs show the audio tracks and subtitles on the original DVD. You can select any desired video title in the content area in order to see the corresponding audio and subtitle tracks.
User Interface The following buttons are available: Add Files Delete Opens a window for adding the desired data files. Removes a selected data file. This is enabled only if at least one data file has been added. Returns to the next higher level in the folder structure. This is only active when the user is located in a subfolder. Opens a window for creating a new folder inside the disc's data area. Opens a menu for changing the way/view in which the files appear in the folders.
User Interface The following setting options are available on the Audio tab: Check box Preselect the following audio tracks Button Add Button If this check box is selected, only audio tracks in the specified languages are imported when the DVD is imported. Opens a window in which the desired languages for importing audio tracks can be selected. This button is enabled only if the Preselect the following audio tracks check box has been selected. Removes languages from the list box.
User Interface Check box Select all tracks if none meets my selection criteria If this check box is selected and none of the subtitles on the corresponding DVD meet the defined criteria, all subtitles are imported as an alternative. See also Import Screen → 15 3.4 Burn Settings screen You can define the desired options for recoding and writing on the Burn Options screen. The screen varies depending on the selected task.
User Interface The following setting options are available in the top area of the screen: Drop-down menu Destination Input field Target folder Button Browse This specifies the destination for the compilation. You can use a CD/DVD recorder to burn the data, store the data on a hard drive or generate an image file. Specifies the target folder in which the compilation is stored and in which the temporary files created during burning are stored. The temporary files are automatically deleted after burning.
User Interface 3.4.1 Extended Area (Burn Settings) The following setting options are available in the extended area of the Burn Settings screen: Check box Shut down computer when finished Drop-down menu DVD Book Type settings If this check box is selected, the computer is automatically shut down after the burn process. Determines the specification of a DVD. Automatic - Automatically selects the most suitable book type for this DVD. DVD-ROM - Sets the book type to DVD-ROM.
User Interface regarding the progress of the recoding and burn process. Additionally, a progress bar shows the progress graphically. Clicking the More button displays the extended area. You can configure certain additional options inside this area, e.g. the burn process priority. Recoding and Burning screen The following buttons are available in the Recoding and Burning screen: Button Interrupts the recoding and burn process. Pause Button Ends the recoding and burn process.
User Interface Button Resumes the recoding and burn process. Resume Button This button is enabled only if the recoding and burn process was interrupted with the Pause button. Returns to the previous screen. Back This button is only active if the recoding and burn process has ended. Displays the What do you want to do now? screen. Button Next This button is only active if the recoding and burn process has ended.
Recoding an Entire DVD 4 Recoding an Entire DVD 4.1 Setting Options For Recoding an Entire DVD In addition to the basic settings that are always displayed on the screen for importing files, you can configure certain additional settings with the Recode an Entire DVD to DVD task.
Recoding an Entire DVD The following buttons are available: Disable Removes video titles on the original DVD from your compilation. This way, you can disable, e.g. unnecessary extras, and create more space on the target DVD. Disabled files are not transferred to the copy during the burn process. This button is only enabled if at least one DVD video title has been imported into the content area and selected there. Activate Enables video titles that were previously disabled.
Recoding an Entire DVD To recode a DVD, proceed as follows: 1. Choose the Recode an Entire DVD to DVD task from the Nero Recode main window. The My DVD Backup screen is displayed. 2. Insert the DVD you want to recode in the disc drive on your PC. Keep in mind that the Fit to target check box is enabled so that the content of the source DVD can be recoded during the subsequent process in such a way that it fits the selected target format.
Recoding an Entire DVD 9. If you want to unlock a locked video title in order to adjust the quality proportionally to the quality of the other titles while recoding: 1. Select the required video title. 2. Click the Unlock Ratio button. The video title is unlocked. In order to adjust the quality of a desired video title individually, you can move the slider in the Video Quality column under the content area.
Recoding a main movie to DVD 5 Recoding a main movie to DVD 5.1 Setting Options For Recoding a Main Movie to DVD In addition to the basic settings that are always displayed on the screen for importing files, you can configure certain other settings with the Recode Main Movie to DVD task. My Movie Backup screen The following buttons are available: Trim Movie Opens the Trim Movie window, where the selected video title can be trimmed.
Recoding a main movie to DVD Default Streams Opens the window Default Streams in which the streams for audio and subtitles can be selected. This button is only enabled if at least one DVD video title has been imported into the content area and selected there. See also Import Screen → 15 Recoding a Main Movie to DVD → 34 Default Streams Window → 33 Trim Movie Window → 31 5.
Recoding a main movie to DVD The following setting options are available: Button Skips forwards a few frames. Button Skips forwards 6 seconds. Button Skips 6 seconds back. Button Skips a few frames back. Slider Manually regulates determination of the desired frames. Drop-down menu Selects the chapter markers of the video title directly. It is only possible if the video title contains chapter markers. Display Indicates the start frame of the video title.
Recoding a main movie to DVD 5.3 Default Streams Window In the Default Streams window you can define the settings for audio and subtitle streams. Default Streams window The following option buttons are available in the Audio area: Let the DVD player Allows the DVD player to choose which audio stream to play. decide which audio Selection occurs automatically when title playback starts. stream to play Play the following audio stream Selects the audio stream to be played when a title is played back, e.g.
Recoding a main movie to DVD See also Setting Options for Compiling a DVD → 36 Setting Options For Recoding a Main Movie to DVD → 30 5.4 Recoding a Main Movie to DVD You can use Nero Recode to copy the main movie of a DVD without additional extras. You have the option of customizing and modifying the main movie's structure so that the data can be written to a conventional recordable disc with perfect video quality.
Recoding a main movie to DVD The video title is trimmed. 7. If you wish to configure the default streams: 1. Select the required video title. 2. Click the Default Streams button. The Default Streams window is opened. 3. Choose the desired option buttons and click the OK button. The video title's streams are adjusted. 8. Select the check boxes for the audio tracks that you want to copy on the Audio tab. Accordingly, deselect the check boxes for the audio tracks that you don't want to copy. 9.
Compiling a DVD 6 Compiling a DVD 6.1 Setting Options for Compiling a DVD In addition to the basic settings that are always displayed on the screen for importing files, you can configure certain other settings with the Compile a DVD task. My Own DVD Compilation screen The following buttons are available: Delete Deletes imported video titles from your compilation. This button is only enabled if at least one DVD video title has been imported into the content area and selected there.
Compiling a DVD Lock Ratio Locks the automatic change of recoding quality for a DVD video title. It is still possible to make manual changes to the quality settings by moving the slider. It could be a good idea to lock individual video titles if you want to improve the quality of other content (and therefore, the quality of the remaining content is lowered proportionately). A locked title is protected from the proportional adjustment in this case.
Compiling a DVD Copyright Unless you possess the copyright yourself, or at least have the permission of the copyright holder, the unauthorized reproduction of discs may be a breach of national or international law and may lead to severe penalties! To compile a DVD, proceed as follows: 1. Choose the Compile a DVD task from the Nero Recode main window. The My Own DVD Compilation screen is displayed. 2. Insert the DVD you want to recode in the disc drive on your PC.
Compiling a DVD In order to adjust the quality of a desired video title individually, you can move the slider in the Video Quality column under the content area. The quality of the remaining DVD content is lowered proportionally to the quality improvement of an individual piece of content. The sliders in the Video Quality area are enabled only when the Fit to target check box is disabled. 9. If you want to trim an individual video title: 1. Select the required video title. 2. Click the Trim Movie button.
Compiling a DVD 18. If you have chosen the disc drive of your computer as the target of the compilation, you will be prompted to insert an empty writable disc in the drive. The burn process is complete when the relevant message appears in the information window. You have compiled a DVD. Clicking the Next button displays the What do you want to do now? screen. You can select further options or exit Nero Recode here.
Recoding a DVD to Nero Digital 7 Recoding a DVD to Nero Digital 7.1 Setting Options for Recoding a DVD to Nero Digital In addition to the basic settings that are always displayed on the screen for importing files, you can configure certain other options with the Recode DVDs and Videos to Nero Digital task. My Nero Digital Disc screen The following buttons are available: Delete Deletes imported video titles from your compilation.
Recoding a DVD to Nero Digital Lock Ratio Locks the automatic change of recoding quality for a DVD-Video title. It is still possible to make manual changes to the quality settings by moving the slider. It could be a good idea to lock individual video titles if you want to improve the quality of other content (and therefore, the quality of the remaining content is lowered proportionately). A locked title is protected from the proportional adjustment in this case.
Recoding a DVD to Nero Digital The Video tab shows the video title's properties. The following information is available: Column Properties Column Shows the video properties stored on the DVD, e.g. resolution, frame rate, pixel format, video structure, and duration. Shows the original size. Source Column Target Button Settings Button Encoder Shows the target sizes depending on the selected Nero Digital profile.
Recoding a DVD to Nero Digital The Subtitle tab displays the available subtitle tracks. The following selection menus are available: Main subtitle track: Used to select a desired subtitle track for the video file. You can also choose not to use subtitles (None) or to create or import your own subtitle track. If you select the Create new subtitle entry, the Nero Digital Subtitle Settings window is opened. Secondary subtitle Chooses a secondary subtitle track in addition to the main one.
Recoding a DVD to Nero Digital Nero Digital Video Settings window See also Deinterlace Tab → 45 Frame Rate Tab → 46 Crop Tab → 47 Resize Tab → 47 Plug-ins Tab → 48 Setting Options for Recoding a DVD to Nero Digital → 41 7.2.1 Deinterlace Tab The following setting options are available on the Deinterlace tab: Option button Automatic (recommended) Option button Automatically selects whether or not the video title should be encoded with deinterlace. Enables the Enable deinterlacing check box.
Recoding a DVD to Nero Digital Check box Enable Deinterlacing Check box Motion-adaptive Enables deinterlacing for the current video title and displays the Motion-adaptive check box. This check box is only available if the Custom Deinterlace option button has been selected. If the check box is selected, improved video quality can be achieved with a motion-adaptive conversion. Even fast motion sequences are reproduced in an extremely sharp manner with full detail accuracy.
Recoding a DVD to Nero Digital 7.2.3 Crop Tab If your DVD-Video features black picture bars on the sides, you can crop them with the Crop tab. This decreases the size of the video and as a result improves its quality. The Nero Recode default settings detect the bars and crop them automatically. The following setting options are available in the Crop area: Option button Detects black picture bars and crops them automatically.
Recoding a DVD to Nero Digital Option button Allows the video to be converted without changing the frame size. Disable Check box Square Pixels / Letterboxing If this check box is selected, a Nero Digital file that consists of square pixels and uses the Letterbox method is created. This increases compatibility with some players. This can, however, result in black bars inside the video file. This option is only available if the Custom resize option button has been selected.
Recoding a DVD to Nero Digital The Nero Recode default settings include the Color Correction and Denoise plug-ins. You can adjust brightness, contrast and saturation of your video files with sliders in the Color Correction plug-in. Noise interference can be removed from video files with the sliders in the Denoise plug-in. See also Nero Digital Video Settings → 44 7.
Recoding a DVD to Nero Digital See also Setting Options for Recoding a DVD to Nero Digital → 41 Multithreading → 52 Visual Enhancements → 51 Encoding Tools → 50 General Settings → 50 7.3.1 General Settings You can configure settings for Encoding precision and Video sequence properties under the General Settings entry. The slider in the Encoding precision area specifies how good the quality of the output file should be in relation to the time used for encoding.
Recoding a DVD to Nero Digital The following setting options are available in the Main profile area: Check box Bidirectional prediction Input field Maximum consecutive Bframes Check box CABAC Check box Weighted prediction Check box Interlaced encoding If this check box is selected, encoding is carried out with the help of B-VOPs. Specifies the maximum number of B-frames that can be used in a GOP. This input field is enabled only when the Bidirectional prediction check box in enabled.
Recoding a DVD to Nero Digital The following check boxes are available in the Psychovisual enhancement area: Picture level If this check box is selected, human perception is taken into account in order to achieve better compression for individual pictures at certain spots in the video. Macroblock level If this check box is selected, human perception is taken into account in order to achieve better compression for macroblocks in certain areas in the picture. See also Encoder Settings → 49 7.3.
Recoding a DVD to Nero Digital Drop-down menu Channels Drop-down menu Mode Selects the audio channels. Depending on the selected Nero Digital profile, Stereo, Mono, and 5.1 are available for selection. Selects the mode with which the audio channels are processed. Depending on the Nero Digital profile selected, Low complexity and High efficiency are available. The selection affects the scan and bit rate. Drop-down menu Sample rate Drop-down menu Bit rate Selects the scan rate.
Recoding a DVD to Nero Digital Nero Digital Subtitle Settings window The following setting options are available: Button Open existing file Button Export Opens a window. You can select subtitle files that are already available in this window. The Save as window is opened. You can save a subtitle file that you created in a folder of your choice. The following setting options are available on the Properties tab: Input field Allocates a name to a subtitle track you have created.
Recoding a DVD to Nero Digital Area Position Drop-down menu Specifies the coordinates of the text box where the subtitle track is displayed. Specifies the subtitle track language to be declared. Language Button / Slider Goes to the end/beginning of the current subtitle line or the beginning/end of the next. Only available if subtitle lines have already been created. Selects the desired frames. The Edit tab shows the individual subtitle lines.
Recoding a DVD to Nero Digital 7.5.1 Subtitle Formats The individual subtitles in files in SUB (preSub) format consist of a single line. The lines are separated from each other by paragraph marks and must have the following form: {0}{50}Sample subtitle text The first and last frame in which the text should be displayed are shown between curly frames. The subtitle text is shown after them, without a space between. The SRT (SubRip) subtitle format consists of 3-line blocks.
Recoding a DVD to Nero Digital 7.6 Chapters Window In the Chapters window, you can add your own chapter markers to those already on the DVD. Chapter markers subdivide the content of a DVD. It is possible to access them, as chapters, with the DVD player. The following setting options are available: Display panel Current frame Display area Chapters Button Shows the current playing time of the video displayed in the preview window.
Recoding a DVD to Nero Digital 7.7 Recoding DVDs And Videos to Nero Digital You can use Nero Recode to encode all video formats supported by Nero into Nero Digital files. The Nero Digital codec is MPEG-4-compliant. These files can be played in Nero MediaHub and in other common programs.
Recoding a DVD to Nero Digital 8. If you want to unlock a locked video title in order to adjust the quality proportionally to the quality of the other titles while recoding: 1. Select the required video title. 2. Click the Unlock Ratio button. The video title is unlocked. In order to adjust the quality of a desired video title individually, you can move the slider in the Video Quality column under the content area.
Recoding a DVD to Nero Digital 21. Click the Burn button. The recoding and burn process is started and the Recording and Burning screen is displayed. You can track the process here. 22. If you have chosen the disc drive of your computer as the target of the compilation, you will be prompted to insert an empty writable disc in the drive. The burn process is complete when the relevant message appears in the information window. You have recoded a DVD or a video into Nero Digital.
Recoding a Main Movie to Nero Digital 8 Recoding a Main Movie to Nero Digital 8.1 Setting Options For Recoding a Main Movie to Nero Digital In addition to the basic settings that are always displayed on the screen for importing files, you can configure certain other settings with the Recode Main Movie to Nero Digital task. My Nero Digital Movie Backup screen The following buttons are available: Trim Movie Opens the Trim Movie window, where the selected video title can be trimmed.
Recoding a Main Movie to Nero Digital This button is only enabled if at least one DVD video title has been imported into the content area and selected there. The following drop-down menus are available: Profile Category Profile Encoding Method Changes the Nero Digital category. This setting refers to the respective target media for which encoding takes place. The result has different sizes depending on the selection; the entries in the Profile drop-down menu are adjusted accordingly.
Recoding a Main Movie to Nero Digital In order to recode the main movie of a DVD to Nero Digital, proceed as follows: 1. Choose the Recode Main Movie to Nero Digital task in the Nero Recode main window. The My Nero Digital Movie Backup screen is displayed. 2. Insert the DVD you want to recode in the disc drive on your PC.
Recoding a Main Movie to Nero Digital 8. Choose the desired Nero Digital category in the Profile Category drop-down menu. 9. Select the required Nero Digital profile in the Profile drop-down menu. 10. Select the desired encoding method from the Encoding Method drop-down menu. 11. If you want to change the video settings for a video title, click the Settings button under the Video tab and configure the settings according to your preferences. 12.
Technical Information 9 Technical Information 9.1 System Requirements Nero Recode is part of the Nero product you have installed. Its system requirements are the same. Detailed system requirements of this and all other Nero products can be found in the Support section on our Web site www.nero.com. 9.2 Key Combinations The following shortcuts for entering keyboard commands are available in Nero Recode. The following general key combinations are available: [F1] Displays the help file.
Index 10 Index 1:1 copy.................................................. 7 Abbreviation ......................................... 65 Activate ................................................ 27 Audio channels..................................... 53 Audio codec ......................................... 43 Audio encoder ...................................... 43 Audio preview....................................... 14 Audio Settings ...................................... 52 Audio streams .....................
Index High quality mode ................................ 22 Image file................................................ 5 Import DVD .................................... 13, 17 Import files ........ 18, 19, 26, 30, 36, 41, 61 Import Files ...................................... 6, 16 Import Files screen . 6, 15, 16, 18, 19, 26, 30, 36, 41, 61 Import Title ........................................... 17 Info tab ................................................. 18 Interlaced ...................................
Index Quick info ................................... 7, 10, 11 Recoding ........................ 7, 21, 23, 23, 25 Recoding a main movie to DVD . 9, 30, 34 Recoding an entire DVD to DVD 9, 26, 27 Recoding and burn process ................... 6 Recoding and Burning screen.... 6, 23, 25 Recoding DVDs and videos to Nero Digital ............................................. 10, 41 Recoding DVD's and videos to Nero Digital ................................................... 58 Recoding process ..............
Contact 11 Contact Nero Recode is a Nero AG product. Nero AG Im Stoeckmaedle 18 Internet: www.nero.com 76307 Karlsbad Help: http://support.nero.com Germany Fax: +49 724 892 8499 330 N Brand Blvd Suite 800 Internet: www.nero.com Glendale, CA 91203-2335 Help: http://support.nero.com USA Fax: (818) 956 7094 E-mail: US-CustomerSupport@nero.com Rover Center-kita 8F-B, 1-2-2 Nakagawa-chuou Tsuzuki-ku Internet: www.nero.com Yokohama, Kanagawa Help: http://support.nero.com Nero Inc.