
User manual


Recoding an Entire DVD
Nero Recode
28
To recode a DVD, proceed as follows:
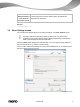
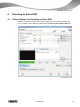
1. Choose the Recode an Entire DVD to DVD task from the Nero Recode main window.
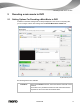
The My DVD Backup screen is displayed.
2. Insert the DVD you want to recode in the disc drive on your PC.
Keep in mind that the Fit to target check box is enabled so that the content of the
source DVD can be recoded during the subsequent process in such a way that it
fits the selected target format.
If the check box is disabled, the DVD-Video will be imported in its original size. In
this case, it is possible that the data volume will be so large that you will only be
able to store it on a double-layer DVD or on the hard drive.
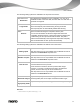
3. If you created your own import profile and want to select it:
1. Click the More button.
The extended area is displayed.
2. Select the required import profile in the Title import profile area.
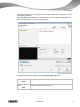
4. Click the Import DVD button.
The Browse Folder window is opened.
5. Select the drive or hard drive folder containing the DVD that you want to recode and click
the OK button.
The DVD's individual video titles are imported and shown in the content area. If the
source DVD is larger than the target media, you can also use this area to see how the
DVD is recoded according to the selected profile.
Underneath, the capacity bar shows how much disk space is occupied by the imported
files on the disc graphically.
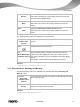
6. If there is an individual video title you do not want to copy:
1. Select the required video title.
2. Click the Disable button.
The Disable Item window is opened.
3. Select the desired deletion method from the drop-down menu and click the OK button.
The video title is disabled.
7. If you want to re-enable an disabled video title:
1. Select the required video title.
2. Click the Enable button.
The video title is re-enabled.
8. If you want to lock an individual video title to protect it from loss of quality during recoding:
1. Select the required video title.
2. Click the Lock Ratio button.
The video title is locked.