
User manual


Recoding a Main Movie to Nero Digital
Nero Recode
64
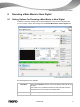
8. Choose the desired Nero Digital category in the Profile Category drop-down menu.
9. Select the required Nero Digital profile in the Profile drop-down menu.
10. Select the desired encoding method from the Encoding Method drop-down menu.
11. If you want to change the video settings for a video title, click the Settings button under the
Video tab and configure the settings according to your preferences.
12. If you want to change the encoder settings for a video title, click the Encoder button under
the Video tab and configure the settings according to your preferences.
13. Select the audio tracks of a video title that you want to copy on the Audio #1 and #2 tabs.
14. If you want to change the audio settings for an audio track, click the Settings button under
the Audio tab and configure the settings according to your preferences.
15. Select the subtitle tracks (of a video title) that you want to copy under the Subtitle tab.
16. Click the Next button to define the burn settings.
The Burn Settings screen is displayed.
17. Make the required settings for the burn process.
18. Click the Burn button.
The recoding and burn process is started and the Recording and Burning screen is
displayed. You can track the process here.
19. If you have chosen the disc drive of your computer as the target of the compilation, you will
be prompted to insert an empty writable disc in the drive.
The burn process is complete when the relevant message appears in the information
window.
You have recorded a DVD's main movie to Nero Digital. Clicking the Next button
displays the What do you want to do now? screen, where you can select other
options or exit Nero Recode.
See also
Setting Options For Recoding a Main Movie to Nero Digital → 61
Trim Movie Window → 31
Chapters Window → 57
Import Screen → 15
Burn Settings screen → 21
Recoding And Burning Screen → 23