Nero Recode Manual Nero AG
Copyright and Trademark Information The Nero Recode manual and all its contents are protected by copyright and are the property of Nero AG. All rights reserved. This manual contains material that is protected by internationally valid copyright. No part of this manual may be reproduced, transmitted or transcribed without the express written permission of Nero AG. All trade names and trademarks are the property of their respective owners.
Contents Contents 1 General information 5 1.1 About the manual 5 1.2 About Nero Recode 5 1.3 Versions with different ranges of functions 6 1.4 Terminology 6 2 Technical information 7 2.1 System requirements 7 3 Launching the program 8 3.1 Launching Nero Recode via Nero StartSmart 8 4 Nero Recode start screen 9 5 Nero Recode wizards 11 5.1 5.1.1 5.1.2 5.1.3 5.1.4 5.1.
Contents 7.2.2 Default Streams 29 8 Compiling a DVD 30 8.1 Task-specific input options 30 8.2 Recoding 31 9 Recoding DVDs and Videos to Nero Digital™ 34 9.1 Task-specific input options 34 9.2 9.2.1 9.2.2 9.2.3 9.2.4 9.2.5 Recoding Defining video settings Defining Encoder Settings Defining audio settings Creating your own subtitle track Setting chapter markers 35 37 40 43 44 46 10 Recoding a main movie to Nero Digital™ 48 10.1 Task-specific input options 48 10.
General information 1 General information 1.1 About the manual This manual is designed for all users who want to become acquainted with the proper use of Nero Recode. It is task-based and explains how to achieve a particular objective on a stepby-step basis. In order to make best use of this manual, please note the following conventions: Symbol Meaning Indicates warnings, preconditions or instructions that have to be followed strictly. Indicates additional information or advice. 1.
General information 1.3 Versions with different ranges of functions Nero Recode is not just available in the full version. The versions differ from the full version in terms of the range of functions, i.e. they cannot perform all the tasks described in this manual and the user interface is adapted to the specific version.
Technical information 2 Technical information 2.
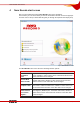
Launching the program 3 Launching the program 3.1 Launching Nero Recode via Nero StartSmart To launch Nero Recode via Nero StartSmart, proceed as follows: 1. Click the Nero StartSmart icon. Æ The Nero StartSmart window opens. 2. Click the button . Æ The list of Nero applications appears. Fig. 1: Nero StartSmart 3. Choose Nero Recode from the selection list. Æ The Nero Recode window opens. Î You have launched Nero Recode via Nero StartSmart.
Nero Recode start screen 4 Nero Recode start screen After you launch Nero Recode the Nero Recode start screen will appear. This is where you can choose what you want to do with Nero Recode. Choose the appropriate menu icon to call up a wizard that will guide you through the required task step-by-step. Fig. 2: Nero Recode start screen The Nero Recode start screen offers the following selection options: Menu icons Recode an Entire DVD to DVD Imports DVDs including their menus and extras.
Nero Recode start screen main movie to Nero Digital™ converts it to Nero Digital™ (MPEG-4) files. Unwanted audio tracks, subtitles or video content can be removed and the structure of the video titles can be changed. Buttons More Opens and closes the extended area in which the basic Nero Recode settings can be made. ? Displays the online help as well as the version and manufacturer information. Exit Closes Nero Recode.
Nero Recode wizards 5 Nero Recode wizards All the tasks you can perform with Nero Recode can be divided into four steps: Define the basic settings Import the files you want to recode Set the options for Nero Digital™ and for the burn process Burn the disc The wizards also follow this four-step structure, so that a separate screen appears for each step. You can use the Next and Back buttons to move back and forth through the three screens while performing a task.
Nero Recode wizards The following input options are available: Enable All button This enables all warnings if these have been disabled manually. If minimize, minimize to tray check box Specifies that the program should appear in the status bar when minimized. Do not eject the disc after encoding/burning is complete check box Prevents the disc from being ejected after burning.
Nero Recode wizards 5.1.3 Nero Digital™ tab On the Nero Digital™ tab, you can define the settings for conversion to the Nero Digital™ format. The following input options are available: Import preferences area Analyze files while importing check box Analyzes the video file while importing it. Retain interlaced content if possible check box Retains the interlaced content of a video file to the extent that it is possible. However, modern TVs can no longer display interlaced images.
Nero Recode wizards When reading non-copyright DVDs that have a copyright bit with SPTI/ASPI, a message occasionally appears in Nero Recode indicating that the DVD cannot be copied. In this case, select the Windows® File System when reading. 5.2 Import Files screen The screen for importing files changes depending on the task chosen. The standard input options available in this screen are explained below.
Nero Recode wizards area Capacity bar area Shows graphically how much space on the disc is used. Provided the bar is green, the entire content will fit on the disc. If a red bar appears, the volume of data is greater than the capacity of the disc. 5.2.
Nero Recode wizards 5.2.3 Title import profile area The Title import profile area allows you to switch to the Nero Recode profile window via the button Profiles. You can then create a new profile (see Creating a new profile). The following input options are available in the Nero Recode profile window. Current Profile drop-down menu Indicates the current profile. New button Calls up a dialog box where a new profile can be created.
Nero Recode wizards of selected subtitle tracks. Select all tracks if none meets my selection criteria check box This selects all subtitle tracks if the tracks on the DVD are not to have any subtitles with the set criteria. 5.2.4 Creating a new profile To create a new profile for the Nero Digital™ settings, proceed as follows: 1. Click the New button. Æ The New Profile dialog box opens. 2. Enter the name for the new profile. 3.
Nero Recode wizards The following input options are standard in the Burn Settings screen and are available in the context of every task: Destination drop-down menu This specifies the destination for the compilation. You can use a CD/DVD recorder to burn the data, store the data on a hard drive or generate an image file. Target folder text box Specifies the target folder in which the compilation is stored and in which the temporary files created during burning are stored.
Nero Recode wizards the burner. This drop-down menu is only enabled if you have selected the CD/DVD drive of your computer as the target. 5.4 Priority drop-down menu Defines how the resources available on the computer are to be used when burning the disc. Use VIDEO_TS subfolder for DVD Video files check box Creates a subfolder VIDEO_TS in your target folder in which the DVD-Video files are saved. Recoding and Burning screen The Recoding and Burning screen changes depending on the task selected.
Nero Recode wizards Status area Indicates the progress of the burn process. Progress bar area Shows the progress of the burn process in graphical form. Pause button Pauses the burn process. Stop button Stops the burn process. Resume button Resumes the burn process. This button is only displayed if the burn process has been paused using the Pause button. Back button Displays the previous screen. More button Displays the What do you want to do now? screen.
Recoding an entire DVD to DVD 6 Recoding an entire DVD to DVD Nero Recode allows you to adapt and change the structure of a DVD while copying it so that the data can be burned onto a commercial blank disc.
Recoding an entire DVD to DVD The button is only active if a DVD-Video title has been imported. Enable Enables video titles that were previously disabled. These titles are then transferred when burning the copy. This button is only active if a DVD-Video title already imported has been disabled. Lock Ratio Locks the automatic change of recoding quality for a DVD-Video title. It is still possible to make manual changes to the quality settings by moving the slider.
Recoding an entire DVD to DVD the DVD-Video Files tab shows how the DVD will be recoded in line with the selected profile. 8. Select the audio tracks you want to copy on the Audio tab. 9. Select the subtitle tracks you want to copy on the Subtitle tab. 10. If there is an individual video title you do not want to copy: 1. Select the required video title on the DVD-Video Files tab. 2. Click on the Disable button. Æ The Disable item dialog box appears. 3.
Recoding an entire DVD to DVD 19. If you have chosen the CD/DVD drive of your computer as the target of the compilation, you will be prompted to insert an empty writable disc in the drive. Î The burn process is complete when the relevant message appears in the information window. You can now return to the burn settings and burn the compilation again. The Next button takes you to the What do you want to do now? screen, where you can select the other options or close Nero Recode.
Recoding a main movie to DVD 7 Recoding a main movie to DVD Nero Recode allows you to copy the main movie on a DVD without the extras. You can adapt and change the structure of the main movie so that the data can be burned onto a commercial blank disc.
Recoding a main movie to DVD been imported (see Trimming titles). Default Streams Opens a window in which the streams for audio and subpicture can be selected. The button is only enabled if a DVDVideo title has been imported (see Default Streams). The following information is listed in the columns in the upper section of the DVD-Video Files tab. 7.2 Content Shows the structure contained on the DVD. Duration Shows the length of the relevant area. Size Shows the size of the relevant area.
Recoding a main movie to DVD 2. Click the Trim Movie button. Æ The Trim Movie window opens. 3. Trim the video title by defining the start and end frame (see Trimming titles). 4. Click the OK button. Æ You have trimmed the video title. 11. If you wish to configure the default streams: 1. Select the video title on the DVD-Video Files tab. 2. Click the Default streams button. Æ The Default streams window opens. 3. Configure the default streams by defining the desired settings (see Default Streams). 4.
Recoding a main movie to DVD 7.2.1 Trimming titles If you do not want to use the whole of a video title in the imported main movie, you can just use a specific clip by trimming the video title. The Trim Movie window where video titles can be trimmed is divided into two areas, the first showing the start frame where the video title is to begin and the second showing the end frame where the video title is to end. Fig.
Recoding a main movie to DVD 7.2.2 Default Streams In the Default Streams window you can define the settings for audio and subpicture streams. Fig. 10: Default-Streams window The following input options are available: Audio section Let the DVD player decide which audio stream to play radio button Allows the DVD player to choose which audio stream to play. Selection occurs automatically when title playback begins.
Compiling a DVD 8 Compiling a DVD Nero Recode allows you to compile your own DVDs from imported video titles and data files. 8.1 Task-specific input options Fig. 11: My Own DVD Compilation screen with files already imported In addition to the input options described in the chapter Import Files screen, the following buttons are available in the My Own DVD Compilation screen for the Compile a DVD task: Delete Removes video titles. This button is only active if a DVDVideo title has been imported.
Compiling a DVD least two DVD-Video titles have been selected. Split Titles Splits merged video titles. This button is only active if at least two DVD-Video titles have been merged to produce a single title. Default Streams Opens a window in which the streams for audio and subpicture can be selected. The button is only enabled if a DVD-Video title has been imported (see Default Streams). The following information is listed in the columns in the upper section of the DVD-Video Files tab. 8.
Compiling a DVD 10. If you want to delete a video title: 1. Select the video title you want on the DVD-Video Files tab. 2. Click on the Delete button. Æ The video title is removed from the compilation. 11. If you want to lock an individual video title to protect it from loss of quality when recoding: 1. Select the video title on the DVD-Video Files tab. 2. Click the Lock Ratio button. Æ The selected video title is locked. 12.
Compiling a DVD 17. Move the slider for an area in the Video Quality column until the required video title quality is reached. The quality of the rest of the content of the DVD will deteriorate proportionately to the improvement in the quality of an individual video title. The slider in the Video quality area works only when the Fit to target check box is disabled. 18. Click the Next button to define the burn settings. Æ The Burn Settings screen appears. 19.
Recoding DVDs and Videos to Nero Digital™ 9 Recoding DVDs and Videos to Nero Digital™ Nero Recode allows you to encode all video formats supported by Nero in Nero Digital™ files. The Nero Digital™ codec is MPEG-4-compatible. These files can be played back in Nero ShowTime and other commonly available programs. 9.1 Task-specific input options Fig.
Recoding DVDs and Videos to Nero Digital™ been imported. Opens a window where chapter markers can be set (see Setting chapter markers). This button is only enabled if a DVD-Video title has been imported and selected. Chapters Nero Digital™ Category Changes the Nero Digital™ category. The setting relates to the target medium for which encoding is being carried out. The size of the result varies, depending on the selection. Nero Digital™ Profile Changes the Nero Digital™ profile.
Recoding DVDs and Videos to Nero Digital™ 7. Select the drive or hard drive folder containing the DVD or the individual video titles that you want to recode and click the Add title button. Æ You have imported the selected video titles. The capacity bar at the bottom of the screen shows how much memory the imported files use. If the imported files are larger than the target medium, the central area of the DVD-Video Files tab shows how the files will be recoded in line with the selected profile. 8.
Recoding DVDs and Videos to Nero Digital™ 2. Add more chapters to the video title (see Setting chapter markers). 3. Click the OK button. Æ The video title now contains new chapters. 18. Select the required Nero Digital™ category in the Nero Digital™ category drop-down menu. 19. Select the required Nero Digital™ profile in the Nero Digital™ profile drop-down menu. 20. Select the desired encoding method in the Encoding method drop-down menu. 21.
Recoding DVDs and Videos to Nero Digital™ Fig. 13: Nero Digital™ settings window 9.2.1.1 Deinterlace tab The following input options are available: Deinterlace area: Automatic (recommended) radio button Automatically selects whether or not the video title should be encoded with deinterlace. User-defined deinterlace radio button Activates the Enable deinterlacing check box.
Recoding DVDs and Videos to Nero Digital™ 9.2.1.2 Frames per second tab Determines the rate for the selected Nero Digital™ file. Nero Recode uses the source frame rate as the default when the selected Nero Digital™ profile permits. The following input options are available: Frames per second area: Automatic (recommended) radio button Automatically selects how many frames per minute to show. User-defined rate radio button Enables the Target rate drop-down menu.
Recoding DVDs and Videos to Nero Digital™ pixels for height. Disable option button Allows the video to be converted without changing the frame size. Square pixel / letterboxing check box Creates a Nero Digital™ file consisting of square pixels. This makes the file more compatible with some players. However, black bars may appear in the video file. Resizing method drop-down menu Selects the desired resizing method, e.g. bilinear, bicubic and Lanczos. 9.2.1.
Recoding DVDs and Videos to Nero Digital™ The following input options are available: Load settings button Loads existing encoder settings. Save settings button Saves newly created encoder settings. Fig. 14: Properties of Nero Digital™ Video window 9.2.2.1 General settings Under General settings, you can adjust the Decision quality and the Properties for video sequences.
Recoding DVDs and Videos to Nero Digital™ 9.2.2.2 Encoding Tools You can define settings for the encoding process under Encoding tools. The following input options are available: Baseline profile area Deblocking check box Operates like a soft focus on the sharp edges of the macroblocks. You can use the slider Deblocking strength to change the intensity of this effect. Main profile area Bidirectional prediction check box Enables encoding with the aid of B-VOPs.
Recoding DVDs and Videos to Nero Digital™ check box compression for individual images at particular points in the video. Macroblock level check box Takes into account the human perception so as to achieve better compression for macroblocks in particular areas of the picture. 9.2.2.4 Encoding method options Under Encoding method options you can define settings for quantization and bit rate.
Recoding DVDs and Videos to Nero Digital™ Audio channels drop-down menu Selects the audio channels. Depending on the Nero Digital™ profile selected, Stereo, Mono and 5.1 are available. Mode drop-down menu Selects the mode with which the audio channels are processed. Depending on the Nero Digital™ profile selected, Low complexity and High efficiency are available. The selection affects the scan and bit rate. Scan rate drop-down menu Selects the scan rate.
Recoding DVDs and Videos to Nero Digital™ tles. SMI can be played back only with Windows® Media Player® and other Microsoft® products. The subtitle format SSA (Sub Station Alpha) has the widest range of functionality. The syntax consists of sections and the included code lines. The sections begin with a bracket (e.g. "[Script Info]“), followed by predefined code lines (e.g. Title, Original timing), containing the respective information. This allows the use of colors, fonts, font sizes and similar.
Recoding DVDs and Videos to Nero Digital™ Track name text box Allocates a name to a subtitle track you have created. Font text box Displays the settings from the Font dialog box. Browse button Opens the Font dialog box. Make the settings for the font of your subtitle track here. Text color drop-down menu Specifies the color of your subtitle track. Position area Specifies the coordinates of the text box where the subtitle track is displayed.
Recoding DVDs and Videos to Nero Digital™ Starts playback. Pauses playback. Skips 6 seconds back. Skips a few frames back. Skips forwards a few frames. Skips forwards 6 frames.
Recoding a main movie to Nero Digital™ 10 Recoding a main movie to Nero Digital™ Nero Recode allows you to encode DVD-Video files as Nero Digital™ files. The Nero Digital™ codec is MPEG-4-compatible. This option allows you to encode just the main movie on a DVD without the extras. You can then play this back, for example in Nero ShowTime. 10.1 Task-specific input options Fig.
Recoding a main movie to Nero Digital™ Encoding method Selects the method to be used to encode the MPEG-4 file. With Fast (1-pass) Nero Recode performs one conversion step. This method takes less time, but the quality is lower than 2-step encoding. With High quality (2-pass) Nero Recode performs two conversion steps. The quality is better, but the process takes longer. The following information is listed in the columns in the upper section of the Nero Digital™ Titles tab.
Recoding a main movie to Nero Digital™ If you wish to modify the encoder settings, click the Encoder button on the Video tab (see Defining Encoder Settings). 9. Select the audio tracks in Dolby Digital format that you want to copy on the Audio #1 and #2 tabs and specify the format to which the audio files are to be converted. 10. If you want to change the audio settings, click the Settings button (see Defining audio settings). 11. Select the subtitle tracks you want to copy on the Subtitle tab. 12.
Recoding a main movie to Nero Digital™ 22. To cancel burning, click the Stop button. To pause/resume burning, click the Pause/Resume button. 23. If you have chosen the CD/DVD drive of your computer as the target of the compilation, you will be prompted to insert an empty writable disc in the drive. Î The burn process is complete when the relevant message appears in the information window. You can now return to the burn settings and burn the compilation again.
Glossary 11 Glossary 1-pass With the 1-pass method, only one conversion run is performed. The movie is analyzed and, at the same time, converted with the available bit rate. 2-pass With the 2-pass method, the file goes through several conversion runs. The first step analyzes the movie and creates a temporary file (*log). The second step converts the file. The bit rate data stored on the temporary files is used.
Glossary Book type The Book type defines the specification (e.g. DVD-, DVD+, DVD-ROM) of a DVD. Selfburned DVDs are sometimes not played back by DVD players. This may be due to the fact that the players either cannot read or have difficulty in reading DVD-, DVD+ or DVD-RW. With Nero Recode you can set the book type of the self-burned DVD to DVD-ROM to guarantee playback. CABAC Context Adaptive Binary Arithmetic Coding is a method for arithmetic encoding of digital video files.
Glossary existing pixels is converted to a smaller or greater quantity, depending on the magnification ratio. Suitable median values are formed from the color transitions between the original pixels. The quality of the interpolation process determines the resulting image quality. Lanczos interpolation Lanczos interpolation is an alternative to bicubic interpolation, but it is very similar.
Glossary Recoding Recoding means the conversion of an existing video with certain properties (e.g. bit rate 2500 kbps) into the same format with different properties (e.g. bit rate 1990 kbps). Stream or Streaming Continuous transmission of data, whereby with media streaming the audio and video data is played back directly upon reception. In computer science streams are continuous sequences of data records for which the end can not be determined in advance.
List of figures 12 List of figures Fig. 1: Nero StartSmart .....................................................................................................................................8 Fig. 2: Nero Recode start screen ......................................................................................................................9 Fig. 3: Nero Recode Options window.............................................................................................................11 Fig.
Index 13 Index A AAC AC3 Audio settings AVC G 52 52 36, 43, 50 52 10, 11 52 52 18, 53 17 18 19 C CABAC Capacity Bar Chapter markers Contact Conventions Converting video files Custom Crop 53 15 35, 37, 46, 48, 50 59 5 34 39 D Decoding Default streams Default Streams Defining video settings Deinterlace 6, 53 26, 31 26, 29 36, 37, 49 38, 53 36, 40, 50 43 43 6, 53 35, 49 52 52 42 42 41 F Fitting To Target Focal plane Frames per second 52 18 I I-Frame Image file Import Profile Audio Subtitles Video
Subtitle track Create own System Requirements O Options 36, 44, 50 7 11 T P P-Frame Plug-ins Preview Profile Program start Progress Bar P-UOPs 54 40, 54 13 16, 22, 26, 31, 35, 49 8 20 12 Q Quantization 54 R Recoding Resizing method Resolution Target Group Title Disabling Enabling Lock Locking Unlocking Titles Merging Separate Trimming Tooltips Transcoding 5 21 22 34 22, 30 22, 30, 34 30 31 25, 27, 28, 30, 32, 36, 50 10 6 V 6, 19, 22, 26, 31, 35, 49, 55 40 39 Versions Video files Converting 6 48
Contact 14 Contact Nero Recode is a product of Nero AG. www.nero.com Nero AG Im Stoeckmaedle 13-15 Web: www.nero.com 76307 Karlsbad Help: http://support.nero.com Germany Fax: +49 724 892 8499 Web: www.nero.com Glendale, CA 91203-2335 Help: http://support.nero.com USA Fax: (818) 956 7094 Email: US-CustomerSupport@nero.com Rover Center-kita 8F-B, 1-2-2 Nakagawa-chuou, Web: www.nero.com Tsuzuki-ku, Yokohama, Kanagawa Help: http://support.nero.com Nero Inc. 330 N. Brand Blvd.