Manual Nero RescueAgent
Copyright and Trademark Information This document, like the software described therein, is provided as a license and may only be used or reproduced in accordance with the licensing agreement. The contents of this document, as well as the associated software, is subject to change without prior notice. Nero AG rejects any responsibility for the correctness of the contents of this document and rejects any claims that transcend the clauses of the guarantee agreement.
Table of contents Table of contents 1 1.1 1.2 1.3 Start Successfully About the Manual About Nero RescueAgent Working with Nero RescueAgent 4 4 4 4 2 Starting The Program 6 3 3.1 Start Screen Select Storage Media And Scan Level 7 8 4 4.1 4.2 Files Found Screen Select Specific Files / Show Only Specific Files Window Select Files to Recover 9 10 12 5 5.1 Process Completed Screen Save Log File 14 14 6 End Screen 16 7 7.1 7.2 7.3 7.
Start Successfully 1 Start Successfully 1.1 About the Manual This manual is intended for all users who want to learn how to use Nero RescueAgent. It is process-based and explains how to achieve a specific objective on a step-by-step basis. To make best use of this documentation, please note the following conventions: Indicates warnings, preconditions or instructions that have to be precisely followed. Indicates additional information or advice. 1.
Start Successfully 1.3 Working with Nero RescueAgent The Nero RescueAgent Assistant helps you to restore files in just a few steps. The following individual steps are necessary. Select storage medium and scan level. Search storage medium for files that can be restored. Select files to be restored and define storage location for files. Start Restore. Save log file. (optional) Then you can either start a new scan, scan the storage medium again, restore files or end Nero RescueAgent.
Starting The Program 2 Starting The Program To start Nero RescueAgent, proceed as follows: 1. If you use the Nero Multimedia Suite and have Nero StartSmart available: 1. Click the Nero StartSmart icon. The Nero StartSmart window is opened. 2. Click the button. The list of Nero applications is displayed. 3. Select the Toolbox > Nero RescueAgent entry in this selection list. The Nero RescueAgent window is opened. 2. If you use Nero BackItUp & Burn: 1. Click the Nero BackItUp icon.
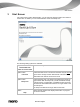
Start Screen 3 Start Screen In the start screen of Nero RescueAgent, you can select the storage medium from which to restore data. In addition you can choose between a fast and a deep scan. Start screen The following setting options are available: Drop-down menu Selects the storage medium from which data is to be restored. Drive/media from which to recover data: Option button Fast scan Selects the faster scan. The fast scan searches only the FAT file system of the storage medium.
Start Screen Button Starts the search for files that can be recovered. Next 3.1 Select Storage Media And Scan Level To select the storage medium and the scan level, proceed as follows: 1. Insert the desired disc into the drive or connect the desired storage medium to your computer. 2. Select the storage media from the Drive / media to recover data from drop-down menu. 3. Select the desired scan level. The fast scan only searches the FAT file system of the storage medium.
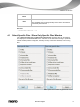
Files Found Screen 4 Files Found Screen The Files Found screen lists all files that can be restored. If files can only to be partly restored, they are marked in yellow. If there is only a small probability that files can be restored, they are marked in red. Files Found screen The following setting options are available: Button Find Select Opens the Select specific files window. Here files can be selected according to particular criteria and problem categories can be chosen for restoring.
Files Found Screen Button Returns to the start screen. Back Button Starts the recovery of the selected files. Next Only available when a storage locality for the files to be restored has already been defined. See also Select Files to Recover → 12 4.1 Select Specific Files / Show Only Specific Files Window In the Select specific files and Show only specific files windows, files can be selected and displayed in the Files Found screen.
Files Found Screen The following setting options are available: Check Box Selects all files or shows them All files Check Box Selects all files from all problem categories or shows them. All problems Check Box Selects all files or shows files in which no faults have been found. All normal files Check Box Selects all deleted files or shows them. All deleted files Check Box All corrupted files Check Box Selects all corrupted files or shows them.
Files Found Screen Button Cancel 4.2 Closes the Select specific files or the Show only specific files window. Select Files to Recover The Files Found screen lists all files and folders that can be restored. As the list can be very long, it is possible to show files according to certain criteria and problem categories. The files can also be selected from the folder tree. The following requirements must be fulfilled: ► You have searched the desired storage medium for files to be restored.
Files Found Screen 2. Select the check boxes of the criteria and problem categories or enter a search term in the All or part of a file name input field and click the Show button. The Show only specific files window is closed. The Show button is now highlighted. 4. Click the button in order to define the target folder of the files to be restored. The Browse For Folder window is opened.
Process Completed Screen 5 Process Completed Screen All recovered files are displayed in the Process Completed screen. The screen also indicates how many files could not be recovered. You can save a log file as a summary of the recovery performed. Process Completed Screen The following setting options are available: The Save as dialog appears. Button Save log file Link You can specify the storage location for the log file here. The log file is saved in TXT format.
Process Completed Screen 5.1 Save Log File The following requirements must be fulfilled: ► You have restored files with Nero RescueAgent. ► The Process Completed screen is displayed. To save a log file, proceed as follows: 1. Click the Save log file button. The Save As window is opened. 2. Select the folder to which the log file is to be saved and click the OK button. The Save As dialog is closed. 3. Click the Next button. The end screen of Nero RescueAgent is displayed.
End Screen 6 End Screen In the end screen you can either start a new scan, scan the same storage medium again, or restore further files. End screen The following menu icons are available: New scan Scan the same drive Returns to the start screen. Restarts a scan on the same drive with the same scan options. Recover more files Changes to the Files Found screen. Here you can select further files to restore, or simply restart restoring with the files that are already selected.
Technical Information 7 Technical Information 7.1 System Requirements Nero RescueAgent is part of the Nero product you have installed. Its system requirements are the same. Detailed system requirements of this and all other Nero products can be found in the Support section on our Web site www.nero.com. 7.2 7.3 Supported File Systems UFD (Version 1.0 to 2.6) CDFS (ISO 9660, including Joliet).
Technical Information [Ctrl+L] The Save as window appears. Here you can store a log file and specify the storage location. Only available in the Recovery completed screen. Ctrl+Pos 1 Returns to the start screen. Only available in the Recovery completed screen. Alt+Plus button Expands all entries in the folder tree starting from the selected entry or from the root if no entry is selected. Only available in the Files to Recover screen.
Glossary 8 Glossary Bridge Disc A Bridge Disc is a variant of a CD-ROM that can be read from CD drives but also from CD-I devices such as a Photo CD for example. It is defined in the White Book Standard and contains extra information in an XA (Standard Architecture) track on the CD-ROM. FAT FAT (File Allocation Table) is a file system developed by Microsoft. The FAT 12, FAT 16 and FAT 32 file systems are used on all types of mobile storage media (e.g. USB sticks, memory cards).
Index 9 Index Conventions, manual ............................. 4 Guide .............................................................. 7 Help ................................................................ 7 Process completed........................................ 14 Start screen..................................................... 7 Select Find file ................................................. 12 Key Combinations [Ctrl+A].......................................................... 17 [Ctrl+B].....
Contact 10 Contact Nero RescueAgent is a Nero AG product. Nero AG Im Stoeckmaedle 18 Internet: www.nero.com 76307 Karlsbad Help: http://support.nero.com Germany Fax: +49 724 892 8499 330 N Brand Blvd Suite 800 Internet: www.nero.com Glendale, CA 91203-2335 Help: http://support.nero.com USA Fax: (818) 956 7094 E-mail: US-CustomerSupport@nero.com Rover Center-kita 8F-B, 1-2-2 Nakagawa-chuou Tsuzuki-ku Internet: www.nero.com Yokohama, Kanagawa Help: http://support.nero.