Manual Nero StartSmart
Copyright and Trademark Information Copyright and Trademark Information This document, like the software described therein, is provided as a license and may only be used or reproduced in accordance with the licensing agreement. The contents of this document, as well as the associated software, is subject to change without prior notice. Nero AG rejects any responsibility for the correctness of the contents of this document and rejects any claims that transcend the clauses of the guarantee agreement.
Table of contents Table of contents 1 1.1 1.2 Start Successfully About the manual About Nero StartSmart 4 4 4 2 Launching the Program 5 3 3.1 3.2 3.3 User interface Nero StartSmart start screen Updating Nero Suite Defining the Currently Used Language 6 6 8 10 4 4.1 Setting Options Setting Up Newsfeeds 11 12 5 5.1 5.2 5.2.1 5.2.2 5.3 5.3.1 5.4 5.4.1 5.5 5.5.1 5.5.2 5.
Start Successfully 1 Start Successfully 1.1 About the manual This manual is intended for all users who want to learn how to use Nero StartSmart. It is process-based and explains how to achieve a specific objective on a step-by-step basis. To make best use of this documentation, please note the following conventions: Indicates warnings, preconditions or instructions that have to be precisely followed. Indicates additional information or advice. 1.
Launching the Program 2 Launching the Program The Nero StartSmart icon appears on your computer's desktop after installing Nero Suite. Nero StartSmart provides easy access to all Nero Suite applications and, when installed, to Nero BackItUp and Nero MediaHome. Double-click the Nero StartSmart icon to open the Nero StartSmart start window.
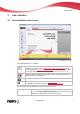
User interface 3 User interface 3.1 Nero StartSmart start screen Nero StartSmart start window The following buttons are available: Displays a menu in which you can specify the settings for the inline functions, the options for news feeds (see Setting inline function options 11), the desired language (see Nero Suite Language 10) or check if updates are available for your Nero Suite at www.nero.com (see Updating Nero Suite 8).
User interface Rip and Burn Offers you a choice of frequently occurring ripping and burning projects. These are pre-configured and therefore can be easily and quickly executed. Create and Edit Offers pre-configured projects for quickly and easily creating slide shows and disc labels, editing videos, converting audio files, and much more. Home Entertainment Offers pre-configured projects for playing and recording videos, playing audio files, viewing and recording live television programs, and much more.
User interface The following button is available in the Launch Applications area: Add/Remove Displays a list of all available Nero Suite applications and, if installed, other Nero products such as Nero MediaHome and Nero BackItUp. From the list, you can choose the application you want by selecting or clearing the appropriate check boxes. The selected applications are displayed in the Launch Applications area.
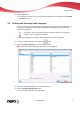
User interface Update screen 2. Click the Search for updates button. 3. Click the OK button in the active window to confirm. The search for available updates begins and a progress window provides information on the progress of the search. The Update/Install Now button is activated. 4. Click the OK button. The Update & Setup screen shows if updates are available for each of the installed applications.
User interface 8. Click the OK button. The update is executed. The relevant version designations are displayed in the Installed Versions column. 3.3 Defining the Currently Used Language From Nero StartSmart, you can define the language to be used by all Nero applications. You can choose a language that was installed during the installation process and is therefore available on the system. If you want to choose a language that has not been installed, you have to first install it.
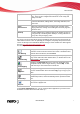
Setting Options 4 Setting Options In the Options window, you can define settings for the inline functions and Nero StartSmart. Use the button > Options to open the window. Options window The following entries are available: Data Burning Displays the Data Disc Burning Options screen. You can select the burn speed here and choose whether the data should be checked after burning. Audio Burning Displays the Burning Options screen.
Setting Options Play File Displays the Play File Options screen. You can specify a folder from which pictures are displayed in a type of slide show during music playback. You can define the fade and display times in milliseconds. Newsfeed Displays the Newsfeed Options screen. You can specify the interval after which the next newsfeed headline is displayed in the News area and decide which newsfeeds you would like to subscribe to (see Setting Up Newsfeeds 12). Misc Displays the More Options screen.
Setting Options 6. To cancel a newsfeed subscription, select the respective entry from the list in the Newsfeed Options window. 7. Click the Unsubscribe button. 8. Confirm your choice in the displayed dialog box. You have unsubscribed from the newsfeed and it is removed from the Newsfeed Options window.
Nero StartSmart Inline Functions 5 Nero StartSmart Inline Functions Inline functions are pre-configured, frequently-used processes that can be run directly in Nero StartSmart without having to launch another Nero Suite application. You can quickly and easily burn data discs or Audio CDs, save audio files from audio CDs to a hard drive, and copy discs. You can also set up the Autobackup feature, which automatically backs up monitored folders. The following inline functions are availabe: 5.
Nero StartSmart Inline Functions Drop-down menu Destination drive Allows you to select the drive you would like to use for burning. The Image Recorder entry creates an image file that is initially stored on the computer under the path shown in the adjacent text box. The image file can be burned to a disc later. The drop-down menu is available if there is more than one drive and the Image Recorder is enabled. Displays the contents of the higher-level folder for the selected file in the contents area.
Nero StartSmart Inline Functions Burn Jukebox Disc screen The following setting options are available: Input field Title (CD-Text) Input field Artist (CD-Text) Input field Disc name Drop-down menu Destination drive Button Add Enter the desired name for the audio CD to be burned. This text appears in the display of the playback device during playback. Only available when creating an Audio CD. Enter the artist name for the audio CD to be burned.
Nero StartSmart Inline Functions Button Removes the selected entries from the contents list. Delete Button Starts the burn process or the creation of an image file. Burn Opens the Options screen for the Audio Burning inline function (see Setting inline function options 11). 5.2.1 Burning an Audio CD In Nero StartSmart, you have the option of selecting audio files from your hard drive to burn an Audio CD that can be played on all standard playback devices.
Nero StartSmart Inline Functions 3. Click the Add button. The Add files and folders window is opened. 4. Choose the audio files that you want to burn to CD. You can choose audio files from CDs or from your hard drive. 5. Click the Add button. The audio files selected are listed in the Burn Audio CD screen. A capacity bar displays the total length of the music files to be burned to CD in minutes. The Add Files and Folders window stays in the foreground until you close it.
Nero StartSmart Inline Functions 11. Insert a blank recordable CD into the recorder and click the Load button. A progress bar is displayed at the bottom left of the screen. When the burn process is finished, a dialog box opens. 12. Click the OK button. You have burned an Audio CD that contains the selected audio files. 5.2.2 Automatic Music Recognition With Gracenote MusicID Nero StartSmart can identify music files.
Nero StartSmart Inline Functions Edit Metadata window 6. If necessary, edit the metadata, e.g. track number, title, artist, album title, year, and genre. 7. Click the Apply button. The Edit Metadata window closes. The metadata is written into the audio file and accordingly shown in Nero StartSmart. 5.3 Audio Ripping Screen The Rip Audio CD screen displays the audio files available on the Audio CD. You can save the audio files from an Audio CD to the hard drive. The files are encoded, i.e.
Nero StartSmart Inline Functions Rip Audio CD screen The following setting options are available: Drop-down menu Source drive Drop-down menu Output file format You can choose the drive in which the CD containing the tracks to convert was inserted. You can choose the format in which the tracks should be saved. The following formats are available: Nero Digital™ Audio (*.mp4): Format with an especially small file size and high sound quality MP3 Audio (*.
Nero StartSmart Inline Functions Button Edit Metadata Button Opens the Edit meta data window. Here, you can edit the Audio CD metadata sent by Gracenote. You can enter the metadata if no entry for your Audio CD exists in the Gracenote Media Database. This metadata is sent to Gracenote, and added to the Gracenote Media Database.
Nero StartSmart Inline Functions 5.3.1 Converting Audio CDs to MP3s To save the audio files from an Audio CD to the hard drive, proceed as follows: 1. Click the Audio Ripping menu icon. The Rip Audio CD screen is displayed and a dialog box asks you to insert an Audio CD into a drive. Rip Audio CD screen 2. Insert an Audio CD into a drive and click the OK button. 3. In the Source drive drop-down menu, choose the drive in which your Audio CD is located.
Nero StartSmart Inline Functions Edit Metadata The Edit MetaData window also opens if no matching entry is found in the database but you want to enter the metadata and make it available. 7. If necessary, edit the metadata, e.g. title, artist, album title, year, and genre. 8. Click the Advanced Options button if you want to add additional information. The Gracenote MusicID Information window, which originates from Gracenote, opens.
Nero StartSmart Inline Functions Rip Audio CD screen with audio files 10. Select the tracks that you want to save on the hard drive. 1. If you want to copy all files on the disc to your hard drive, click the Select All button. 2. If you want to deselect the files, click the Unselect All button. 3. If you only want to select individual audio files, enable the check box in front of the respective audio files. 11. Choose a file format in the Output file format drop-down menu. 12.
Nero StartSmart Inline Functions If you want to save audio files from several Audio CDs, enable the Enable ripping of each entire Audio CD in a row check box. The copy process then runs automatically for the other Audio CDs as described here. The settings that you defined at the beginning are used. A dialog box is displayed at the end of the copy process and prompts you to insert another Audio CD or to cancel the operation.
Nero StartSmart Inline Functions Text box Destination drive Button You can choose the drive with the recordable disc to which you want to burn the copy. All drives connected to your computer are listed. You can also select the Image Recorder entry to create an image of the disc to be copied, which can then be burnt to a disc at a later point in time. In this case, click the Browse... button to choose the path in which to save the image file. Triggers the copying process or the process to create an image.
Nero StartSmart Inline Functions 5.4.1.2 Copy image With the copy over image method, an image of the original disc is saved to a file first. The image file is then burned to a blank disc. Copying using copy over image takes longer, but it often produces better results. You must have sufficient storage space to use the copy over image method. The copy over image method is particularly suitable in the following situations: 5.5 Only one drive is available.
Nero StartSmart Inline Functions The following buttons are available: Backup Sets up Autobackup. Restore Restores the data backed up with Autobackup. Delete Content Deletes individual content from the backup. 5.5.1 Configuring Autobackup In order for Autobackup to be able to carry out the automatic backup process according to your preferences, configure which file types should be automatically backed up in which folders and define the backup target.
Nero StartSmart Inline Functions 2. If you already have an account, enter your user name and password in the corresponding fields. 3. Click the Log on button. 4. If you do not have an account, click theSet up account button. A window that will guide you through the registration process opens. 9. Click the Backup button. The first full backup for the folders that you have specified is carried out. Autobackup has been set up and is now monitoring the specified folders.
Nero StartSmart Inline Functions You can choose the aspect ration for playing back the movie in the drop-down menu (Automatic) in the top right. Source (1:1) Plays the movie back in its original size. Automatic Adjusts the movie to the size of the window. The aspect ratio of the movie remains unchanged and black bars may appear. Fit to window Fits the movie into the window exactly. The movie may be distorted. 4:3 Plays the movie back in 4:3 aspect ratio.
Nero StartSmart Inline Functions Adjusts the volume. Switches between full-screen mode and normal view. You can also double-click in the playback area to switch between modes.
Tabs 6 Tabs Frequently occurring tasks have been assembled on four tabs in the Nero StartSmart categories. Rip and Burn tab Includes, especially, tasks for burning all sorts of discs, as well as the option of ripping audio tracks, i.e. saving them to a hard drive. Create and Edit tab Contains a range of tasks for creating disc labels and your own tracks or video files; for editing photographs, sound files, and videos; and the option of converting audio files to other file formats.
Tabs Burn Jukebox Disc Opens the Nero Express splash screen with a Juxebox Audio CD project already enabled - You can compile music files for a jukebox disc here. Burn Data Disc Opens the Nero Express start screen. The Data category is already selected and you can decide whether to burn a CD or a DVD. Nero Burning ROM can also be also be used for this task as an additional Nero application.
Tabs Music recognition technology and related data are provided by Gracenote®. Gracenote is the industry standard in music recognition technology and related content delivery. For more information, please visit www.gracenote.com. 6.2 Create and Edit Tab Many different tasks can be performed here. You can create disc labels or your own tracks or video files; edit photos, sound files and videos; and convert audio files into other file formats.
Tabs Convert Audio Files 6.3 Opens the Nero Burning ROM Encode Files window. You can choose the audio files you want for encoding and specify the properties for the output. Home Entertainment Tab You can view videos, photos or slide shows, watch television, and record and stream television programs. The following tasks are available: Play Audio Opens Nero ShowTime. You can play music files here. Play Video and Slide Shows Opens Nero ShowTime. You can play video files and pictures here.
Tabs 6.4 Back Up tab On this tab you can schedule, restore, and perform backups, or you can create a disaster recovery disc. The following tasks are available: Back Up Opens the Nero BackItUp Backup screen. You can choose files you want to back up and then initiate the backup process. A wizard guides you step by step through the data backup process. Restore Backups Opens the Nero BackItUp Restore screen.
Tabs Nero BackItUp is a tool for backing up and restoring data. Nero BackItUp is a stand-alone product from Nero and can purchased on the Internet at www.nero.com. More information is available in the Nero BackItUp user manual available for download from www.nero.com free of charge. 6.5 Selecting Default Applications for Tasks All tasks are linked to Nero applications. Click the task symbol with the right mouse button to see the applications.
Technical Information 7 Technical Information 7.1 System requirements Nero StartSmart is installed along with the Nero Suite. Its system requirements are the same. You can find more detailed information on the system requirements under www.nero.com. 7.2 Nero StartSmart Versions Nero StartSmart is available with the full range of features in all Nero Suite versions.
Glossary 8 Glossary Buffer Underrun A buffer underrun is an interruption in the data flow in the internal memory (e.g. of the recorder). A buffer underrun results from an interruption in the data flow to the internal buffer. The buffer continues to deliver data until it is finally empty. When recording, data is fed continuously to the recorder's buffer in order to keep a steady flow of data. If the steady flow of data is interrupted, the media becomes unusable.
Index 9 Index 1 16:9 ....................................................... 31 4 4:3 ......................................................... 31 A Application Selecting.......................................................... 38 Audio CD Burning ............................................................ 17 Copy ................................................................ 27 Identify ............................................................. 19 Obtain Metadata .................................
Index Playlist................................................... 31 R Restore Autobackup...................................................... 30 Restore volume ..................................... 31 Rewind .................................................. 31 Ripping .................................................. 23 T Tab Back Up ..................................................... 33, 37 Create and Edit .......................................... 33, 35 Home Entertainment ........................
Contact 10 Contact Nero StartSmart is a Nero AG product. Nero AG Im Stoeckmaedle 13-15 Internet: www.nero.com 76307 Karlsbad Help: http://support.nero.com Germany Fax: +49 724 892 8499 330 N Brand Blvd Suite 800 Internet: www.nero.com Glendale, CA 91203-2335 Help: http://support.nero.com USA Fax: (818) 956 7094 E-mail: US-CustomerSupport@nero.com Rover Center-kita 8F-B, 1-2-2 Nakagawa-chuou Tsuzuki-ku Internet: www.nero.com Yokohama, Kanagawa Help: http://support.nero.