NESCAFÉ Solution 8/60 Beverage System Operations Manual
1 INDEX & WARNINGS INDEX SECTION: 1 INDEX & WARNINGS SECTION: 2 BASIC PARTS OF THE MACHINE SECTION: 3 LOADING PRODUCTS SECTION: 4 DISPENSING A DRINK SECTION: 5 RINSE SECTION: 6 CLEANING & HYGIENE PROCEDURES SECTION: 7 Warnings DANGER Hot water DANGER Electric shock Always switch OFF the machine before performing any cleaning activity. Follow the cleaning and disinfection, and maintenance schedule in this user manual. When in doubt, always consult this manual.
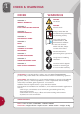
2 BASIC PARTS OF THE MACHINE 1 2 3 4 5 6 7 8 B) A) 11 12 13 14 15 1. 2. 3. 4. 5. 6. 7. 8. 9. 10. 11. 12. 13. 14. 15. 18 17 16 16. 17. 18.
2 BASIC PARTS OF THE MACHINE Mixing bowl and detailed parts 19 20 21 22 23 24 19. Mixing bowl, whipper housing (in one piece) and clamp 20. Water inlet (separate piece) 21. Impeller 22. Nozzle 23. Steam trap 24. Dispensing tube Key clip 25 25. Key clip RHEA Programming panel 26 27 4 26. Programming button 27.
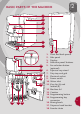
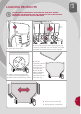
3 LOADING PRODUCTS WASH HANDS THOROUGHLY WITH WATER AND SOAP BEFORE HANDLING THE MACHINE AND THE PRODUCTS. ONLY USE POTABLE WATER TO CLEAN AND FILL THE MACHINE. 1. Open the front door. 3. Before opening agitate the canister to force all remaining powder down the delivery screw. 2. Close the powder chute and remove the canister, if desired you can lift the lid of the machine for easier access to the canister. 4. Fill the selected canister with powder until about 1cm from the top. 5.
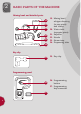
3 LOADING PRODUCTS WASH HANDS THOROUGHLY WITH WATER AND SOAP BEFORE HANDLING THE MACHINE AND THE PRODUCTS. ONLY USE POTABLE WATER TO CLEAN AND FILL THE MACHINE. 8. Put the canister back in the correct place (ensure correct connection with the powder motor). 6 9. Open the powder chute. 10. Close the front door. Check your machine is ready by dispensing test beverage(s).
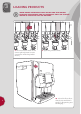
4 DISPENSING A DRINK THIS MACHINE SHOULD ONLY BE USED WITH POTABLE WATER OR BOTTLED WATER TO ENSURE CONSISTENCY AND BEVERAGE QUALITY. 1. Place a cup exactly in the centre of the grid or on the espresso cup stand for espresso. 2. Select a drink by pushing a selection button. 3. The desired selection button will remain ON and all other buttons will switch OFF. 4. The dispensing area will be illuminated by a flashing light and the display will show the name of your chosen drink.
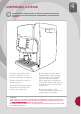
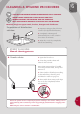
5 RINSE CAREFUL HOT WATER! MORNING, AFTERNOON, EVENING (3x / DAY) Semi automatic rinse process. + 1. Place a bucket (min 0.5 litre) on the drip tray grid to collect the rinsing water. 2. Push and hold buttons 4 and 8 simultaneously for a few seconds. 3. The automatic rinse process will start by rinsing mixing bowl 1, followed by mixing bowl 2 etc. (check display). 4. Discard the dirty water. 8 NOTE: Every time you carry out a rinse, take the opportunity to empty the drip tray.
CLEANING & HYGIENE PROCEDURES 6 TURN OFF THE MACHINE BEFORE UNDERTAKING DAILY CLEANING. WASH HANDS THOROUGHLY WITH WATER AND SOAP BEFORE HANDLING THE MACHINE AND THE PRODUCTS. ONLY USE POTABLE WATER TO CLEAN AND FILL THE MACHINE. Materials: Single use paper towels, brushes, detergent and disinfectant. Preparation of disinfection solution: 1. Prepare a 100 ppm free chlorine solution (foodgrade disinfectant). 2. Completely submerge all dismantled parts in the solution for at least 15 minutes. 3.
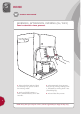
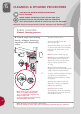
6 CLEANING & HYGIENE PROCEDURES TURN OFF THE MACHINE BEFORE UNDERTAKING DAILY CLEANING. WASH HANDS THOROUGHLY WITH WATER AND SOAP BEFORE HANDLING THE MACHINE AND THE PRODUCTS. ONLY USE POTABLE WATER TO CLEAN AND FILL THE MACHINE. Materials: Single use paper towels, brushes, detergent and disinfectant. EVERY 24 HOURS Manual cleaning process. B. Steam traps and mixing bowls, whipper housings, impellers and dispensing tubes D) 1. Open the front door. 2. Close powder chute and remove canister. 3.
CLEANING & HYGIENE PROCEDURES 6 TURN OFF THE MACHINE BEFORE UNDERTAKING DAILY CLEANING. WASH HANDS THOROUGHLY WITH WATER AND SOAP BEFORE HANDLING THE MACHINE AND THE PRODUCTS. ONLY USE POTABLE WATER TO CLEAN AND FILL THE MACHINE. Materials: Single use paper towels, brushes, detergent and disinfectant. EVERY 24 HOURS Manual cleaning process. C. Drink delivery area and exterior of the machine D. Drain drip tray grid and espresso cup stand 1. Open the door. 2.
7 HYGIENE PROCEDURES TURN OFF THE MACHINE BEFORE UNDERTAKING DAILY CLEANING. WASH HANDS THOROUGHLY WITH WATER AND SOAP BEFORE HANDLING THE MACHINE AND THE PRODUCTS. ONLY USE POTABLE WATER TO CLEAN AND FILL THE MACHINE. Materials: Single use paper towels, brushes, detergent and disinfectant. WEEKLY / MONTHLY For various items, see the Mandatory Cleaning and Disinfection Table on page 14. TWICE A YEAR Ingredient canister. 1.
8 TROUBLESHOOTING GUIDE WARNINGS & ALERTS ALERTS 1. Machine floods ACTIONS DIAGNOSTICS - Dispense pipes - Reposition pipes incorrectly fitted to dispense head or mixing bowls outlet - Mixing bowls - Reposition mixing bowls incorrectly fitted - Whipper seals - Check seals missing - Overflow pipe - Refit overflow pipe incorrectly fitted 2. Out of Service OFF 03 displayed - Drip tray full - Empty drip tray 3.
9 FOOD SAFETY REMINDERS CLEANING AND DISINFECTION SCHEDULE ITEM Daily Weekly Powder chute C Steam trap and mixing bowls / whipper housing / impeller and dispensing tubes C Drink delivery area and exterior of the machine C Monthly 2 x per year D D D Espresso cup stand, C D drip tray and grid Ingredient canister D C: CLEANING D: DISINFECTION NOTE: Parts MUST be cleaned and rinsed before disinfection.
NOTES 15
CONTACT DETAILS: www.NestleProfessional.