
Instructions / Assembly


4
English
Operating Instructions
MAKING A BAG WITH THE ROLL
1. Pull the bag material from the roll to the suitable length you want and cut (Pull out
enough of the bag roll to hold items to be vacuum packed plus an additional 3”
inch (allow another 1 inch for each time the bag will be resealed.) then close the
rear lid.
2. Open the lid and place either open end of bag material on Sealing Strip, close it.
Press down on the lid until two “click” sounds are heard.
3. Press the “Seal Only” Button to start sealing.
4. When the Seal Indicator Light turns off, sealing is completed. Press the two
Unlock Buttons, lift lid and remove the bag.
5. Open the lid and take out the bag.
6. Now the bag is ready, you can vacuum package
with it.
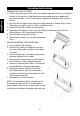
VACUUM PACKAGING YOUR FILLED BAG:
1. Put the items inside the bag.
2. Open the lid, clean and straighten the open
end of the bag, make sure there no wrinkles
or ripples.
3. Place the open end of the bag in the vacuum
chamber beneath the air intake.
4. Close the lid and then press on both sides of
the lid until two “click” sounds are heard.
5. Press the “Vacuum/Seal” Button. The bag will
be automatically vacuumed and sealed.
6. When the Indicator Lights of “Seal Only”
and “Seal/Vacuum” turn off, the process is
completed. Press the two Unlock Buttons, lift
lid and remove the bag.
7. Refrigerate or freeze if needed.
NOTE: For best sealing effect, it is better to let
the appliance cool down for 2 minutes before
using it again. Wipe out any excess liquid or food
residue from the vacuum chamber after each use.