
Installation Manual


General Information
Nest Thermostat E Installation Features
No jumper wires needed
The Nest Thermostat does not use jumper wires, it will automatically jump terminals for you. Do not connect
jumper wires to the Nest Thermostat. Before removing any wires from the old thermostat, including jumper
wires, take a picture of the existing wiring configuration in case you or the homeowner need to reinstall it.
System Match
When you first install the Nest Thermostat, it checks to see what wires you’ve inserted into the base’s
connectors and prompts you for additional information where needed.
Pro Setup
Pro Setup lets Nest Pros configure advanced settings in order to set up complex systems including heat
pumps and dual-fuel systems. Pro Setup also activates a customer’s extended warranty if the Nest
Thermostat is purchased from and installed by a Pro.
Silent relays
Nest Thermostats use solid state switching instead of relays so there’s no noise when it switches on or off.
You will not hear any “clicking” during system testing and activation.
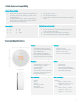
Press connectors
Connecting the HVAC system wiring to the Nest Thermostat base is easy using the press connectors. Simply
insert the wire into the connector as far as it will go until the press connector stays in the down position.
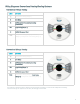
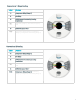
Multifunctional Star / OB connector
The */OB connector on the Nest Thermostat can control a number of different applications. If you insert a wire
into this terminal, the Nest Thermostat will ask you to select the application and will control it based on your
selection. For a list of compatible applications that can be inserted into the */OB connector, see the wiring
diagrams below.
2