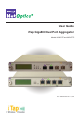
User Guide iTap GigaBit Dual Port Aggregator Models 96542iTP and 96547iTP Doc. PUB542iTPU Rev.
PLEASE READ THESE LEGAL NOTICES CAREFULLY. By using a Net Optics iTap GigaBit Dual Port Aggregator you agree to the terms and conditions of usage set forth by Net Optics, Inc. No licenses, express or implied, are granted with respect to any of the technology described in this manual. Net Optics retains all intellectual property rights associated with the technology described in this manual. This manual is intended to assist with installing Net Optics products into your network.
iTap GigaBit Dual Port Aggregator Contents Chapter 1 Introduction Overview . . . . . . . . . . . . . . . . . . . . . . . . . . . . . . . . . . . . . . . . . . . . . . . . . . . . . . . . . .1 Memory . . . . . . . . . . . . . . . . . . . . . . . . . . . . . . . . . . . . . . . . . . . . . . . . . . . . . . . . . .4 Unpacking and Inspection. . . . . . . . . . . . . . . . . . . . . . . . . . . . . . . . . . . . . . . . . . . . .6 About this Guide . . . . . . . . . . . . . . . . . . . . . . . . . . . . . . . .
iTap GigaBit Dual Port Aggregator Chapter 4 Using Web Manager Overview . . . . . . . . . . . . . . . . . . . . . . . . . . . . . . . . . . . . . . . . . . . . . . . . . . . . . . . . .21 Accessing Web Manager . . . . . . . . . . . . . . . . . . . . . . . . . . . . . . . . . . . . . . . . . . . . .21 Viewing System Status . . . . . . . . . . . . . . . . . . . . . . . . . . . . . . . . . . . . . . . . . . . . . .23 Viewing Statistics . . . . . . . . . . . . . . . . . . . . . . . . . . . . . . . . . . . . . .
iTap GigaBit Dual Port Aggregator Chapter 1 Introduction Overview Thank you for purchasing the latest innovation in Tap technology – the iTap GigaBit Dual Port Aggregator. Net Optics' GigaBit Dual Port Aggregator Taps provide ultra-efficient access to critical GigaBit links using only one NIC on the monitoring device. Net Optics’ iTap is a port aggregator Tap that gives you a quick visual reference of link performance.
iTap GigaBit Dual Port Aggregator cally when the traffic volume falls below the receiving capacity of the NIC. These buffers allow the iTap Port Aggregator to absorb traffic bursts without dropping packets. Traffic Monitoring The iTap Port Aggregator monitors the utilization levels of both sides of the fullduplex link. This information is displayed on the front panel and is available from the remote interfaces.
iTap GigaBit Dual Port Aggregator System Manager iTap Port Aggregators can be used as a system managed via Simple Network Management Protocol (SNMP) from a single interface. Net Optics' System Manager is an SNMP management tool that offers central management of all Net Optics iTap devices in the network. You can organize iTaps into groups according to workgroup, location, or any other criteria.
iTap GigaBit Dual Port Aggregator Memory All traffic that passes through the iTap is sent to the monitoring device NIC on a first-in-first-out basis, including traffic that is temporarily stored in memory. If two packets enter at the same time then one packet is processed while the other is stored briefly in memory, preventing collisions. When there is a burst of data, traffic in excess of the NIC’s capacity is sent to the iTap’s memory.
iTap GigaBit Dual Port Aggregator The NIC receives 800 Mbps (80% utilization), so no memory is required for the monitoring device's NIC to process all full-duplex traffic. If there is burst of traffic on Side A of 900 Mbps and Side B remains at 500 Mbps, the aggregated traffic equals 1400 Mbps, 400 Mbps over the capacity of the NIC. The excess traffic is put in memory on a first-in-first-out basis until either the buffer is full or the burst passes.
iTap GigaBit Dual Port Aggregator Unpacking and Inspection Carefully unpack the iTap GigaBit Dual Port Aggregator and check for damaged or missing parts.
iTap GigaBit Dual Port Aggregator Chapter 2 Installing the iTap Overview This chapter describes how to install and connect the iTap GigaBit Dual Port Aggregator.
iTap GigaBit Dual Port Aggregator Power Status Reset Button Monitor Ports Network Ports TM A ® 2 A 1 B Network B 1 ACT LINK ACT LINK 2 Dual Port Aggregator GigaBit Copper RESET ACT LINK www.netoptics.
iTap GigaBit Dual Port Aggregator Planning the Installation Before you begin the installation of your iTap, you should determine the following information: • IP address of the iTap or, if you are deploying multiple iTaps, a range of IP addresses. • Net Mask for the iTaps. • IP address of the remote management console, if deployed over a WAN. • Gateway to the remote management console, if deployed over a WAN. Also make sure you have a suitable location to install the iTap(s).
iTap GigaBit Dual Port Aggregator For security reasons, some parameters can only be set with the CLI. Use these commands to: • Set CLI username and password • Enable or disable the remote interfaces and display • Turn character echo to the terminal emulation software on or off You will find a complete list of CLI commands in Appendix B. If you wish to disable the Management Port and remote interfaces, you can do so from the CLI using the Display command. To access the iTap CLI: 1.
iTap GigaBit Dual Port Aggregator To change the username and password: 1. Change the username by typing the following command: set username where is your new username. 2. Change the password by typing the following command: set password where is your new password. 3. Record the username and password in a secure location. To set the iTap IP address: 1. Type set ip where is the IP address you are assigning to the iTap and press Enter.
iTap GigaBit Dual Port Aggregator To set the current date and time: 1. Type set time where mm is the month, dd is the day of the month, yyyy is the year, hh is the hour, mm is minutes of the hour, and ss is seconds. Press Enter. Time is based on the 24-hour clock. To display current settings: 1. Type show set and press Enter. The CLI displays the current setting similar to the example in Figure 7. Figure 7: Show Set Command Example To disable the display and remote interfaces: 1.
iTap GigaBit Dual Port Aggregator To use the Help command: 1. Type Help at the NetOptics prompt. The list of help topics is displayed. Figure 8: iTap CLI Help Menu 5. To view the syntax for changing the iTap’s configuration parameters, type help set and press Enter. 6. Repeat with the variable of interest to view the syntax for all commands available from the CLI. For more information on CLI commands, see Appendix B. Mounting the iTap The iTap is designed for rack mounting in a two-slot, 19-inch panel.
iTap GigaBit Dual Port Aggregator Connecting the Management Port To use the remote interfaces you must connect the Management Port to the network. To connect the iTap Management Port: 1. Connect a CAT5 cable to the Manangement Port as shown in Figure 9. 2. Connect the other end to a network switch or hub. Management Port RS232 To network switch or hub Figure 9: Connecting the Management Port Connecting to the Network The iTap comes with two network cables ready for iTap installation.
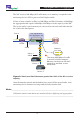
iTap GigaBit Dual Port Aggregator TM ® LINK A A B A 2 1 2 B 1 Network 1 B Dual Port Aggregator GigaBit Fiber 2 RESET OUT www.netoptics.com IN OUT IN OUT Rx Tx B A OUT Monitor To Switch, Server, or Router (DCE) To Switch, Server, or Router (DTE) Figure 10: 96542iTP Network Connections TM A ® 2 A 1 B Network B 1 ACT LINK ACT LINK 2 Dual Port Aggregator GigaBit Copper RESET ACT LINK www.netoptics.
iTap GigaBit Dual Port Aggregator Connecting to the Monitoring Devices The iTap comes with two monitor cables ready for iTap installation. To connect the iTap to your monitoring device: 1. Connect Monitor Port 1 to the appropriate monitor using the cables supplied with your iTap. 2. Connect Monitor Port 2 to the appropriate monitor using the cables supplied with your iTap.
iTap GigaBit Dual Port Aggregator TM A ® 2 A 1 B Network B 1 ACT LINK ACT LINK 2 Dual Port Aggregator GigaBit Copper RESET ACT LINK www.netoptics.com ACT LINK Monitor To monitoring device 1 To monitoring device 2 Figure 13: 96547iTP Monitor Connections Connecting Power For power fault protection, the iTap has redundant power supplies.
iTap GigaBit Dual Port Aggregator Management Port RS232 Figure 14: Connecting Power Checking the Installation After you have connected the iTap to the network, monitoring device and power, verify that the iTap is functioning correctly. • Check that at least one power LED is illuminated. • Check the link status LEDs located on the front panel to verify that traffic is passing through the iTap. • Check the display for utilization and peak information.
iTap GigaBit Dual Port Aggregator Chapter 3 Using the Front Panel Interface Overview This chapter describes how to interpret and work with the front panel features of the iTap GigaBit Dual Port Aggregator. The following topics are covered: • Display • LED indicators • Reset Button The iTap front panel provides information in two ways. The displays shows utilization and peak information and the LEDs show link status and alarm conditions.
iTap GigaBit Dual Port Aggregator The percentage utilization data on the display is refreshed every second. Network peaks are given as a percent of utilization and reflect the highest peak recorded since the last reset. The day and time information reflects the highest peak event since reset. You can set the iTap's 24-hour clock through the CLI or remote interfaces.
iTap GigaBit Copper Port Aggregator Chapter 4 Using Web Manager Overview This chapter describes how to monitor and control individual iTap GigaBit Port Aggregators using Web Manager. The following topics are covered: • • • • Accessing Web Manager Status Statistics Configuration The iTap GigaBit Port Aggregator has built-in support for remote control from any computer with an Internet browser and access to the iTap’s IP address.
iTap GigaBit Copper Port Aggregator Figure 15: Web Manager Page The following table explains the fields in Web Manager. To save any changes to the iTap, you must click Submit Changes.
iTap GigaBit Copper Port Aggregator Viewing System Status You can view status information of the iTap and ports. System Status indicates if the iTap is functioning correctly. If the System Status is DOWN, there is an internal error. For more information, contact Net Optics' Technical Support. In addition to the System Status, you can view the status of each iTap port and power supply as shown in Figure 16. Figure 16: iTap System, Link, and Power Status The following table explains the status fields.
iTap GigaBit Copper Port Aggregator Viewing Statistics Web Manager lists incoming traffic statistics for both Port A and Port B as shown in Figure 17. Figure 17: iTap Statistics The following table explains the traffic statistics available from Web Manager. The iTap updates statistics every 15 seconds. All counters reflect counts since the last statistics reset.
iTap GigaBit Copper Port Aggregator Configuring the iTap Web Manager has both read-only and read/write fields. Use the read/write fields in the iTap Configuration section of the Web Manager page to set configuration parameters (see Figure 18). Figure 18: iTap Configuration The following table explains each available option. To make your changes take effect, click Submit Changes at the bottom of the page. Field Name Function/Value Description IP Address 0.0.0.0 IP address of the iTap.
iTap GigaBit Copper Port Aggregator Field Name Function/Value Description Port A Parameters Gigabit Auto-negotiation 100BT Full Duplex 100BT Half Duplex 10BT Full Duplex 10BT Half Duplex Disable The iTap GigaBit Port Aggregator is a single-speed device. Leave parameter at the default GigaBit setting. You have the option of disabling Port A, however all incoming traffic to Port A will be lost.
iTap GigaBit Dual Port Aggregator Chapter 5 Using System Manager Overview This chapter describes how to install and use Net Optics' System Manager, which allows you to change settings, view status, and retrieve data remotely from multiple Net Optics iTap devices.
iTap GigaBit Dual Port Aggregator 3. After reading the agreement, select I Agree and click Next to install System Manager. The Welcome dialog box appears as shown in Figure 20. Figure 20: Welcome Dialog Box 2. Click Next. The Select Installation Folder dialog box shown in appears. Figure 21: Select Installation Folder 3. To install in the default folder, make no changes to the path in the Folder: text box.
iTap GigaBit Dual Port Aggregator 4. To limit access to System Manager to the current user of the PC, select Just Me. To allow access to any user logged into the PC, select Everyone. 5. Click Next. The Confirm Installation dialog box shown in Figure 22 appears. To continue the installation, click Next. The Progress dialog box appears as shown in Figure 23.
iTap GigaBit Dual Port Aggregator 6. If you want to stop the installation, click Cancel. When the installation is complete, the Installation Complete dialog box appears as shown in Figure 24. Figure 24: Installation Complete 7. Click Close. System Manager is now installed on your computer and there is a Net Optics shortcut icon on your desktop.
iTap GigaBit Dual Port Aggregator Exploring System Manager This section explains the features and functions of System Manager. With System Manager you can: • • • • • Create iTap groups Add and delete iTaps from the system Remotely configure iTaps View traffic utilization and peaks View traffic statistics NOTE ___________________________________________________________________ To access the iTap with System Manager, the Display option in the CLI must be set to ON.
iTap GigaBit Dual Port Aggregator Tip! _____________________________________________________________________ To use pop-up menu shortcuts, click your right mouse button in the System Frame. __________________________________________________________________________ Using the Toolbar Figure 26 shows the System Manager toolbar. Figure 26: Toolbar The table below describes the icons found on the toolbar.
iTap GigaBit Dual Port Aggregator Figure 28: Group Bar 2. Type the name of the new group and press Enter. Deleting a Group You can delete a group however, all iTaps in that group will also be deleted. To delete a Group: 1. Right click on the group bar of the group you want to delete. 2. Select Delete from the pop-up menu. The Group and all associated iTaps are deleted from the system. Adding iTaps To create a system in System Manager, you must add iTaps to System Manager.
iTap GigaBit Dual Port Aggregator Figure 30: New iTap 2. Enter a name for the iTap you are adding in the iTap Name text box. Each iTap Name in the system must be unique. 3. Enter the IP address of the iTap in the IP Address text box. Make sure the IP address is unique on the network. 4. Select your model of the iTap from the Product drop-down list. 5. Enter any relevant information about the iTap in the Notes text box. 6. Check your settings and click Create.
iTap GigaBit Dual Port Aggregator Figure 31: Net Optics System Manager with iTap The indicator to the right of the iTap picture blinks green when System Manager is communicating with the iTap. If the indicator blinks red, check that the iTap is connected to the network and verify the configuration information. 7. Repeat Steps 1-6 for each iTap you are adding.
iTap GigaBit Dual Port Aggregator Deleting an iTap You can delete an iTap from System Manager when you remove an iTap from your network. If you have removed an iTap from the network, System Manager continues to poll the iTap’s IP address for data until you delete the iTap from System Manager. To delete an iTap from System Manager: 1. Select the iTap you want to delete by clicking its icon. 2. Click Delete in the toolbar. A confirmation dialog box appears. Figure 32: Delete Confirmation 3.
iTap GigaBit Dual Port Aggregator Configuring an iTap You can set configuration parameters of an iTap in the system from the Configure tab. To configure the iTap: 1. Click on the icon of the iTap you want to configure and click the Configure tab as shown in Figure 33. Figure 33: iTap Configure Tab 2. For the parameter you wish to configure, click on the corresponding value field. 3. Select an option from the drop-down list or enter a new value from your keyboard. 4.
iTap GigaBit Dual Port Aggregator Viewing iTap Information System Manager allows you to view the status of the iTap, traffic statistics collected by the iTap, and the current iTap configuration information. To view iTap information: 1. Click the image of the iTap you want to view in the System Frame. A window similar to Figure 34 appears.
iTap GigaBit Dual Port Aggregator The Status tab is a read-only list of information from the iTap. Use the scroll bar and arrows to view the entire list. TIP! _____________________________________________________________________ Fields that have been updated since the last refresh appear with a circle and arrow just to the left of the value field.
iTap GigaBit Dual Port Aggregator Modifying an iTap You can change the IP address and other basic iTap configuration parameters from the Modify iTap dialog box. To modify the iTap configuration: 1. Click on the image of the iTap you want to change in the System Frame. 2. Click Modify in the toolbar. The Modify iTap dialog box appears as shown in Figure 36. Figure 36: Modify iTap 3. Make the desired changes and click Save Change.
iTap GigaBit Dual Port Aggregator Appendix A Specifications and Models Specifications Electrical Power Supply Input 100-240VAC, 0.5A, 47-63Hz Power Supply Output 12V, 1.5A Environmental Operating Temperature 0˚C to 55˚C Storage Temperature -10˚C to 70˚C Relative Humidity 10% min, 95% max, non-condensing Mechanical Dimensions 1.3125” high x 12” deep x 8.
iTap GigaBit Dual Port Aggregator Optical Interface (96542iTP) Fiber Type Corning Multimode 62.5/125μm, wavelength 850nm Split Ratio Network Port Insertion Loss Monitor Port Insertion Loss 70/30 ≤ 2.4 dB ≤ 6.3 dB 60/40 ≤ 3.1 dB ≤ 5.1 dB 50/50 ≤ 4.5 dB ≤ 4.5 dB Transceiver Specifications GigaBit SX 850nm, VCSEL, supports 62.5/125μm Monitor Port Output Power -9.
iTap GigaBit Dual Port Aggregator Available Models Models 96542iTP iTap GigaBit Fiber Dual Port Aggregator 96547iTP iTap GigaBit Copper Dual Port Aggregator Wireless Option Accessories RK-iTP2 Two slot rack-mount panel 43
iTap GigaBit Dual Port Aggregator Appendix B Command Line Interface Command Sub-Command Syntax Description Help Set help set Displays the set command options. Reset help reset Displays the reset command options. Show help show Displays the show command options. Echo help echo Displays the echo command options. Display help display Displays the display command options. IP set ip
Where is the ip address of the iTap.iTap GigaBit Dual Port Aggregator Command Sub-Command Syntax Description Reset Peak reset peak Where is A or B. Statistics reset statistics port Where is A or B. Storage reset storage Resets configuation to factory defaults. Set show set Displays currents settings. Status show status Displays iTap status. Statistics show statistics Where is A or B. Show Power show power Displays power status.
iTap GigaBit Dual Port Aggregator Notes: 46
www.netoptics.com © 2006 by Net Optics, Inc. All Rights Reserved.