Legal & Regulatory Information This manual is copyright. Apart from any fair dealing for the purposes of private study, research, criticism or review, as permitted under the Copyright Act, no part may be reproduced, stored in a retrieval system or transmitted in any form, by any means, be it electronic, mechanical, recording or otherwise, without the prior written permission of NetComm Limited. NetComm Limited accepts no liability or responsibility, for consequences arising from the use of this product.
■ Heed Warnings- Comply with all warning messages on the product and within operating instructions. ■ Check Power Sources- Operate this product only from the type of power source indicated on the product's marking label. If you are not sure of the type of power supplied to your home, consult your dealer or local power company. ■ Be Careful of Overloading- Do not overload wall outlets or extension cords, as this can result in a risk of fire or electric shock.
Contents Chapter 1 Introduction ................................................................................................................ 5 1.1 Product Overview ........................................................................................................... 5 1.2 Features and benefits ..................................................................................................... 6 1.3 What's in the package? .............................................................................
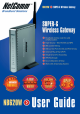
Chapter 1 Introduction 1.1 Product Overview Thank you for purchasing the NetComm NB620W Super-G Wireless Gateway. The NB620W is a state-of-the-art Wireless Gateway with the latest in advanced broadband wireless connectivity. Now it's simple and cost-effective to build a local network with Internet access using wired or wireless technology. The NB620W features the latest 802.
1.2 Features and benefits The NetComm NB620W Super-G Wireless Gateway ■ Four 10/100M Base TX ports for PC or LAN connection and one 10/100M Base TX WAN port for broadband connection ■ 802.11g Wireless Access Point supports up to 54Mbps ■ Atheros’ Super G wireless mode – turbocharge your transfer rates.
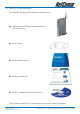
1.3 What's in the package? Your NB620W Package should contain the following items: ■ NB620W Super-G Wireless Broadband Gateway with 4-port Switch ■ Power Adapter ■ Quick Installation Guide ■ Package Contents Note ■ CRS813 - Manuals and On-Line Tutorial CD Please contact your dealer if any of the above listed items are missing or damaged. YML725 Rev1 www.netcomm.com.
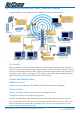
1.4 Connecting the NetComm Super-G Wireless Gateway A typical Internet access application of the NB620W Gateway is shown below: Connecting your Gateway Site Selection Before installation, select the Wireless Gateway location. Proper placement of the Gateway is critical to ensure optimum radio range and performance. You can use the Site Survey Utility to help you to determine the best location. Typically, the best location to place your Gateway is at the center of your wireless coverage area.
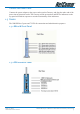
Connect the Power Cable Connect the power adapter to the power socket on the Gateway, and plug the other end of the power into an electrical outlet. The Gateway will be powered on and all five indicators on the top panel will flash in sequence to test the functionality of the indicators. 1.5 Device The NB620W has 5 ports and 7 LEDs for connection and administrative purposes. 1.5.1 NB620W Front Panel 1.5.2 NB620W Back Panel YML725 Rev1 www.netcomm.com.
1.6 Factory Default Reset Button. Press and hold the reset button for more than 7 seconds; the gateway will be restored to factory default values. All of your saved configurations will be gone, so please backup your current configuration before using the Reset Button.. 1.6.1 Log-in User Name The default username of the NB620W is "admin". Password The default password of the NB620W is "admin".
1.6.3 Default Values The default values are: User Name: admin Password: admin WAN/Internet Port: DHCP client enabled Local IP address: 192.168.1.1 Subnet mask: 255.255.255.0 DHCP server: Enable DHCP start address: 192.168.1.2 Number of DHCP clients: 128 Wireless: Enabled SSID: NB620W Channel: 11 Operation Mode: 802.11b/g mixed WEP security: No Remote Management: Disable UPnP: Disable YML725 Rev1 www.netcomm.com.
Chapter 2 Configuring your Computers 2.1 Overview The instructions in this chapter will help you configure each of your computers to be able to communicate with the NB620W Gateway. To do this, you need to configure your PC's network settings to obtain an address automatically, so your PC can function as a DHCP client. Computers use IP address to communicate with the Gateway and each other across a network, such as the Internet. First, find out which Windows operating system your computer is running.
2.2 Configuring Windows 98 and Millennium PCs 1. Click the Start button. Select Settings and click the Control Panel icon. Double-click the Network icon. 2. On the Configuration tab, select the TCP/IP line for the applicable Ethernet adapter. Do not choose a TCP/IP entry whose name mentions DUN, PPPoE, VPN or AOL. If the word TCP/IP appears by itself, select that line. Click the Properties button. YML725 Rev1 www.netcomm.com.
3. Click the IP Address tab. Select “Obtain an IP address automatically”. 4. Now click the Gateway tab, and verify that the Installed Gateway field is blank. Click the OK button. 5. Click the OK button again. Windows may ask you for the original Windows installation disk or additional files. Check for the files at c:\windows\options\cabs, or insert your Windows CD-ROM into your CD-ROM drive and check the correct file location, e.g., D:\win98, D:\win9x, etc. (If "D" is the letter of your CD-ROM drive). 6.
2.3 Configuring Windows 2000 PCs 1. Click the Start button. Select Settings and click the Control Panel icon. Double-click Network and Dial-up Connections icon. 2. Select the Local Area Connection icon for the applicable Ethernet adapter (usually it is the first Local Area Connection listed). Double-click the Local Area Connection. Click the Properties button. 3. Make sure the box next to Internet Protocol (TCP/IP) is checked. Highlight Internet Protocol (TCP/IP), and click the Properties button.
4. Select Obtain an IP address automatically. Once the new window appears, click the OK button. Click the OK button again to complete the PC configuration. 5. Restart your computer. NB620W Super-G Wireless Broadband Gateway User Guide 16 YML725 Rev1 www.netcomm.com.
2.4 Configuring Windows XP PCs The following instructions assume you are running Windows XP with the default interface. If you are using the Classic interface (where the icons and menus look like previous Windows versions), please follow the instructions for Windows 2000. 1. Click the Start button and then the Control Panel icon. Click the Network and Internet Connections icon. Then click the Network Connections icon. 2.
3. Make sure the box next to Internet Protocol (TCP/IP) is checked. Highlight Internet Protocol (TCP/IP), and click the Properties button. 4. Select Obtain an IP address automatically. Once the new window appears, click the OK button. Click the OK button again to complete the PC configuration. After you have obtained an IP address, please access the Gateway by typing http://192.168.1.1 to configure the Gateway.
Chapter 3 Configuring the Wireless Gateway The NB620W Wireless Gateway includes a pre-installed web-based configuration tool, which provides an interface to manage and configure the device to meet the requirements of your network. You can access the Configuration Manager through your web browser from any computer, which has a network connection with the NB620W Wireless Gateway.
3.1 Basic Configuration The basic configuration contains Internet Port, Local Port and the Wireless LAN configurations. After you have finished setting up the basic items, the gateway will work for most scenarios. 3.1.1 Internet Port The Internet Port section contains information to allow your modem to connect to the Internet. You will need to configure this section with the settings that have been assigned and provided by your ISP.
PPPoE Configuration Most DSL-based ISPs use PPPoE (Point-to-Point Protocol over Ethernet) to establish an Internet connection. If you are connected to the Internet through a DSL line, check with your ISP to see what protocol they use. Host Name/Domain Name. Some ISPs require the host name and domain name as identification. If it is not specified, assign on your own or leave it as blank. User Name, Password, Confirm Password.
Packet Size (MTU). The Maximum Transmission Unit of an IP packet. The default value is 1492 Bytes. If your ISP requires a special value, please select from the pull down menu. The default value will work for most cases. Otherwise, contact your ISP for the MTU value. Disconnect after idle time. The PPPoE connection will be disconnected by the gateway automatically when there is no Internet traffic for the idle time specified. The idle time of “0” means an always-on connection.
Static IP Configuration If you connect to the Internet using a permanent IP address, please select Static IP Configuration from the pull down menu and fill the ISP specified values in the fields. Note: If your ISP requires a PPPoE type connection, you should NOT use " Static IP Config". Host Name/Domain Name. Some ISPs require the host name and domain name as identification. If it is not specified, assign on your own or leave it as blank. IP Address. Enter the IP address of the gateway's Internet port.
PPTP Configuration Some older modems use a PPTP connection instead of PPPoE. This connection uses a PPP session to connect to your ISP. After the connection between the ISP and your modem is established, you are able to use your modem to connect to the Internet. Host Name/Domain Name. Some ISPs required the host name and domain name as identification. If this has not been specified, assign on your own or leave it as blank. User Name, Password, Confirm Password.
Packet Size (MTU). The Maximum Transmission Unit of an IP packet. The default value is 1492 Bytes. If your ISP requires a special value, select this from the pull down menu. The default value will work for most cases. Alternatively, contact your ISP for a specified value. Disconnect after idle time. The PPPoE connection will be disconnected by the gateway automatically when there is no Internet traffic for the idle time specified. An idle time of “0” means an always-on connection.
3.1.2 Local Port Configure your gateway's Local Port IP address here. The Local Port must be a private IP address. (10.x.x.x, 192.x.x.x are reserved for LAN use). Subnet Mask. The subnet mask determines the number of computers that are allowed in this network. A class C network with the subnet mask 255.255.255.0 allows maximum 253 users (the gateway is already using the 192.168.1.1) in your local area network. Usually a class C network is satisfactory for a local network. DHCP server.
WINS Server. The Windows Internet Naming Service (WINS) manages each PC's interaction with the Internet. If you use a WINS server, enter the WINS server's IP Address here. Otherwise, leave it as blank. Static DHCP IP & MAC Address. Click Setup in the Local port configuration page to setup the Static DHCP IP. You can assign a fixed IP address to a DHCP client. Put the PC's IP address and MAC address in the fields and click Add to add it to the list. Use Delete or Delete all to manage the list.
3.1.3 Wireless LAN Click Enable Wireless Access to enable the wireless function of the gateway. SSID. (Service Set Identifier.) The SSID is the network name shared among all points in the wireless network. The SSID must be identical for all points in the wireless network. It is casesensitive and must not exceed 32 characters (use any characters on the keyboard). Hide SSID. The gateway will not broadcast its SSID or the SSID of any device connecting to it.
The gateway supports four different types of security modes for your network: WEP (Wire Equivalence Protection) encryption, WPA (Wi-Fi Protected Access) Pre-Shared key, WPA RADIUS (Remote Access Dial In User Service) and 802.1x RADIUS. To enable Security Settings, choose one of the security modes you desired. WEP: There are three levels of WEP encryption, 64-bit, 128-bit and 152-bit. The higher the encryption bit, the more secure your network, however, speed is sacrificed at higher bit levels.
WPA RADIUS: WPA RADIUS uses an external RADIUS server to perform user authentication. To use WPA RADIUS, choose Auto, TKIP or AES for the WPA algorism, enter the IP address of the RADIUS server, the RADIUS Port (default is 1812) and the shared secret from the RADIUS server. 802.1x RADIUS: The 802.1x RADIUS utilizes a RADIUS server for authentication. To utilize RADIUS, enter the IP address of the RADIUS server, the RADIUS Port (default is 1812) and the shared secret from the RADIUS server.
3.2 Advanced Items The gateway's advanced configuration allows you to manage your gateway. 3.2.1 Advanced Setup >> Access Control List The Access Control List allows you to define Internet access rules for LAN users. User Group. All LAN users can be defined and divided into several groups; each group can have different Internet access behavior depending on your configuration. To define the user group, click Define Group. (Define Group options are introduced below.) Service.
Define Group - Options Group Name. Define a group name for each group such as 'sales', 'R&D' or 'accounting'. Click the radio button to choose which IP addresses you want to include in this group. Every IP address. Selecting this will include all the IP addresses in your network. This IP address. To specify the IP addresses one at a time, simply type in the IP address you want to add into the fields. IP Address Range.
Define Application - Options Application name. Define the name of the application you want to define. Protocol. Select TCP or UDP for the protocol of the application. Port Range. Define the port range, either Single or a Range, and then put the port number into the fields. Click Add to finish the setting. You can check the applications you have already defined in the list. Use the Delete or Delete all tabs to manage the list.
3.2.2 Advanced Setup >>Content filtering The content filtering feature allows you to block users from browsing certain web-sites or downloading specific file types. Block URLs By Keyword. Type the key words in the field Keyword then click add. Check the box to active the URL blocking function. Use delete or delete all to manage the list of keywords. NB620W Super-G Wireless Broadband Gateway User Guide 34 YML725 Rev1 www.netcomm.com.
Block URLs With IP Address. Check this box to block users typing IP addresses in the URL field. Block Java Applets. This setting will block all Java applets sent from the web site you are visiting or external web sites. Block ActiveX Controls. This setting will block all ActiveX controls sent from the web site you are visiting or external web sites. Block Cookies. This setting will block all cookies sent from the web site you are visiting or external web sites. Block Downloading Files with Extension.
3.2.3 Advanced Setup >> Dynamic DNS The gateway offers a Dynamic Domain Name System (DDNS) feature. The DDNS lets you assign a fixed host and domain name to a dynamic Internet IP address. It is useful when you are hosting your own website, FTP server, or other servers behind the gateway. Before you can use this feature, you need to sign up for DDNS service at www.dyndns.org or other DDNS service providers. Enable Dynamic DNS. Check the box to enable the DDNS service. DDNS Account.
3.2.4 Advanced Setup >> Firewall DoS Attack Threshold. When the gateway suffers a continuous attack from the Internet (Which is considered an abnormal connection that makes many connection requests in a limited time to consume or exhaust the memory of the gateway.), the gateway will drop this traffic from the attack sources instead of responding to them like normal internet traffic.
Email Alarm - Options The E-mail alarm feature enables you to receive the gateway access log through emails regularly. Click the checkbox, if you want to receive these e-mails from the gateway. Mail Server. This is the e-mail server address on your network or on the Internet. The mail server specified should relay your mails without user name and password login, otherwise the mail cannot be sent. The standard SMTP port for sending e-mails is 110.
3.2.5 Advanced Setup >> Remote Management User Name, Password, Confirm Password. You can change the user name and password of the gateway here. Type in your new user name, then your password and confirm it. Click save to change the username and password. To increase protection, please use passwords of more than 6 characters and no simple phrases. After you changed the user name and password, the gateway will require you to login with the new user name and password immediately.
3.2.6 Advanced Setup >> Static Routes When you have more than one network on your LAN, and you want to route certain IP addresses of the network to another network, add them into the static routing table. Destination Network / Host. The destination network is the address of the remote network or host, which you want to assign a static route to. Subnet Mask. The Subnet Mask determines which portion of a destination IP address is the network portion, and which portion is the host portion. Gateway.
3.2.7 Advanced Setup >> UPnP Enable UPnP. To enable UPnP click the checkbox. UPnP is a function that allows the gateway to self-discover, self-configure and communicate easily with other devices on the network. YML725 Rev1 www.netcomm.com.
3.2.8 Advanced Setup >> Virtual Server The virtual server allows you to set up public services on your network, such as web servers, ftp servers, e-mail servers, or other specialized Internet applications. (Specialized Internet applications are applications that use Internet access to perform functions such as videoconferencing or online gaming. Some Internet applications may not require any forwarding.) Application.
Some applications need specified ports opened for Internet connection, such as games, Instant Messengers and so on. Application. Type in the application name that is easy to remember and identify. Protocol. Select TCP or UDP. If you are not sure which one to use, check the application manual. Port Range. Choose Single if there is one port to be opened, or choose Range for a range of port numbers. Port Number. Type in the Port number or Port range.
3.2.9 Advanced Setup >> Print Server In NB620W's advanced menu, you will see the Print Server and USB Storage option. When there is no Printer connected to the Gateway's USB port, or if the power to that printer is off, the printer status shows Model name: None and Status: Off-Line. To install a printer, use a USB cable and connect the printer to either one of the USB ports. Power on the printer. You will see the Printer Status change in the printer status field.
3.2.10 Advanced Setup >> USB Storage When there is no USB storage device hooked up to the NB620W Gateway, you will see the status all shown with Not Available or Not Attached. The Super User can create and delete files or directories, while a regular User can only upload or download files. After you finished the configurations, click Save. To hook up a USB storage device, you just need to connect the USB cable to either one of the USB host ports available on the NB620W Gateway.
To remove the USB storage device, please click Remove Disk button. Wait until the Disk Status changes to Disconnected. You can then unplug the cable from USB host ports of the Gateway. If you click Remove Disk while there are users still accessing the storage device, you will be advised that it cannot be removed. Wait until noone is accessing the storage device and you can then you can click Remove Disk again to remove the USB storage.
After logged in, you will see the listed files and directories on the storage device. When you login with Super User, you can create and delete files or directories, while a regular User can only upload or download files. Max User Login. The Gateway allows a total of 8 users (including super user, regular user, and anonymous user) to access the storage device simultaneously. Connection Timeout. The amount of time that a user can be connected before it wil timeout.. Anonymous Account Login.
3.3 Management These management features are provided to allow you to effectively manage your gateway. 3.3.1 Management >> Access Log The Access Log allows you to browse the gateway's traffic after a period of time and then log the records to files for future reference. (Need access log software? Please look though APPENDIX F SYSLOG SOFTWARE). Click the Refresh button to renew the list for the most current records. 3.3.
3.3.3 Management >> Firmware Upgrade Firmware can be upgraded by clicking the Upgrade button after browsing for the firmware, which you can download from the NetComm website when available. Do not upgrade your firmware unless you are experiencing problems with the gateway. After a successful upgrade, the modem will reboot by itself, you current page will be reloaded to the first page of the configuration. YML725 Rev1 www.netcomm.com.
3.3.4 Management >> Network Status The network status shows the Service Type, IP address, Subnet mask, Gateway, DNS and MAC address of your WAN. Refresh. Click this button to display the latest information. Connect/Renew. When using PPPoE or PPTP, you can click this button to establish a connection to the Internet port. Disconnect/Release. Click here to break the Internet port connection.
Session List List the sessions currently established. By watching the session list, you will be able to observe who is using the Internet service, what type of services are used and other information for you to monitor your network. The session list also helps you to debug Internet connection problems. Click Previous or Next to browse for the whole list. YML725 Rev1 www.netcomm.com.
3.3.5 Management >> Save Configuration To save your current configuration in a file on your PC, click the Save button. The system will then prompt you to choose the path for the configuration file being saved. Click Save to proceed. To load a saved configuration file from the PC, click Browse then choose the path and the file. Click Load to proceed. After a successful load, please power cycle the gateway (unplug the power core then plug back in.). 3.3.
Chapter 4 Configuring Printer Sharing 4.1 Configuring Printer Sharing on Windows98 SE or Millennium PCs 1. After you have installed the third party print monitor system, run the Add Printer Wizard from Start -> Setup -> Printers -> Add a Printer. Select Local Printer and then click Next. 2. Select the printer manufacturer and type that you want to hook up with the NB620W to install the driver or click Have Disk for the drivers on your disk or a CD-ROM.
3. When you see this page, click LPT1 ECP Printer Port and then Next 4. Type the name for the printer and then click Finish. 5. After completing the above steps, go to Start->Settings->Printer and right click on the printer you just added. Select Properties. NB620W Super-G Wireless Broadband Gateway User Guide 54 YML725 Rev1 www.netcomm.com.
6. Click on Details Tab and then click the Add Port button. 7. Click on Other, select NB620W Port and then click OK. YML725 Rev1 www.netcomm.com.
8. Select LPR (TCP/IP) and then click OK. 9. Type in the NB620W's IP address or host name (print server's IP address) in the Host name or IP address of the print server field and give it a name in the field Logical printer name. Click OK. 10. After you have added a new printer with a new port, select the printer name and port from the “Print to the following port” pull down menu. Finally, click OK to finish the configuration on Windows98 or ME. Now you can use the printer via the NB620W Gateway.
4.2 Configuring Printer Sharing on Windows 2000 1. Please go to Start -> Setup -> Printers -> Add Printer, and click Next. 2. Choose Local printer and uncheck the box “Automatically detect and install my Plug and Play printer” and then click next. YML725 Rev1 www.netcomm.com.
3. Click “Create a new port” and select Standard TCP/IP Port from the list then. Click Next. 4. Click Next. 5. Type in the IP address or NETBIOS name of the NB620W Gateway in the Printer Name or IP Address field. The Port Name will be generated itself. Click Next. NB620W Super-G Wireless Broadband Gateway User Guide 58 YML725 Rev1 www.netcomm.com.
6. Choose Custom and click the Settings button. 7. In the Protocol field, click on LPR protocol, and give it a queue name such as “lp1” (can be any). Check the LPR Byte Counting Enabled box. Click OK. YML725 Rev1 www.netcomm.com.
8. Click Finish. 9. You have selected your printer port and protocol, and now you need to install the printer driver on your PC. Click Have Disk if you can not find your printer model listed and use the driver CD that came with the printer. NB620W Super-G Wireless Broadband Gateway User Guide 60 YML725 Rev1 www.netcomm.com.
10. You can click Yes to print out a test page or click No to save paper and ink. 11. Then click Next. 12. Click Finish. The Setup is completed. You can use the printer that is hooked up to the NB620W Gateway's USB port. YML725 Rev1 www.netcomm.com.
4.3 Configuring NB620W Printer Sharing on Windows XP PCs 1. Please go to Start -> Setup -> Printers -> Add Printer, and click Next. 2. Choose Local printer and uncheck the box “Automatically detect and install my Plug and Play printer” and then click next. NB620W Super-G Wireless Broadband Gateway User Guide 62 YML725 Rev1 www.netcomm.com.
3. Click Create a new port and select Standard TCP/IP Port from the list and then click Next. 4. Click Finish. 5. Type in the IP address or NETBIOS name of the NB620W Gateway in the Printer Name or IP Address field. The Port Name will be generated itself. Click Next. YML725 Rev1 www.netcomm.com.
6. Choose Custom and Click the Settings button. 7. In the Protocol field, click on LPR protocol and give it a queue name lp1 (can be any). Check the LPR Byte Counting Enabled box. Click OK. NB620W Super-G Wireless Broadband Gateway User Guide 64 YML725 Rev1 www.netcomm.com.
8. Click Finish. 9. You have selected your printer port and protocol. Now you need to install the printer driver on your PC. Click Have Disk if you can not find your printer model listed and use the driver CD that came with the printer. YML725 Rev1 www.netcomm.com.
10. Give the printer a name, and then click Next. 11. You can click Yes to print out a test page or click No to save paper and ink. Then click Next. 12. Click Finish. The Setup is completed. You can use the printer via the NB620W Gateway's USB port. NB620W Super-G Wireless Broadband Gateway User Guide 66 YML725 Rev1 www.netcomm.com.
Appendix A: Technical Specifications Standard: IEEE 802.3, 802.3u, 802.11g and 802.11b Channels: 11 Channels: US, Canada 13 Channels: Europe, Australia 14 Channels: Japan Access Interface WAN: One 10/100 Base TX port, Auto sensing, Auto MDIX, RJ-45 connector LAN: Four 10/100 Base TX ports, Auto sensing, Auto MDIX, RJ-45 connector Wireless: External Antenna, Frequency: 2.412~2.
Hardware Access Interface ■ WAN: One 10/100 Base TX port, Auto sensing, Auto MDIX, RJ-45 connector ■ LAN: Four 10/100 Base TX ports, Auto sensing, Auto MDIX, RJ-45 connector ■ Wireless: External Antenna, Frequency: 2.412~2.484 GHz, support 13 channels, data rates supports 6, 9, 12, 18, 24, 36, 48 and 54 Mbps auto fallback function, Super-G Wireless Mode.
Software Networking /Transport layer protocol ■ 802.1D Bridge for LAN and Wireless bridging ■ DHCP server ■ PPPoE, Telstra BigPond, DHCP client and Fixed IP for broadband DSL/ Cable ISP connection (eg Optus Cable) ■ MAC address spoofing ■ Static routes ■ DNS proxy ■ Dynamic DNS for dynamic IP based domain name service ■ NTP client for network time synchronization ■ 802.
Management ■ Web-based configuration wizard ■ Web-based firmware upgrade, configuration profile backup/restore ■ Remote Management ■ Supports Windows-based syslog viewer ■ Supports UPnP File sharing support ■ Supported OS: USB support needed - Windows 98se, Me, 2000 and XP ■ Management Tool: Web-Based Printing supported features ■ Supported OS: Native Windows 2000 & XP LPR Protocol, Win95, 98 & Me with 3rd Party LPR Client, (Not supplied) ■ Supported Networks: LPR Print Server ■ Management Tool: Web-Based
Appendix B: Frequent Asked Questions Q: What is a "dynamic IP address"? A: An IP address from your ISP which is assigned via DHCP and is therefore not guaranteed to remain the same. Some cable modem Internet providers provide IP address assignments which rarely change, but the addresses assigned are still considered to be dynamic, not static. Q: When should I modify the MAC address for global port settings? A: Some ISPs identify their clients by their MAC address and host names.
Q: What's MX (Mail Exchanger)? And why MX? A: The Internet email system for both machines and network connections are prone to error. With this, a chain of email hubs into the email architecture is built. If the "primary" mail host goes down, instead of queuing up the mails in the unreliable host on the Internet, they get sent to the "secondary" or "backup" mail exchanger for delivery, until the primary mail server becomes functional again. In technical terms, such service is called a Backup Mail Exchanger.
Appendix C: Troubleshooting This chapter is intended to help you troubleshoot problems you may encounter while setting up and using the NetComm NB620W. It also describes some common hardware and software problems and gives some suggestions to troubleshoot them. Refresh your IP address (MS Windows) There is a tool which comes with Windows which will allow you to refresh your current IP Address. For Windows 95/98/98se/ME, click Start > Run, enter winipcfg and click OK.
Appendix D: DDNS Update Status Messages (1) When starting the DDNS service. Updating dynamic DNS server, please wait. (2) When DHCP Client or PPPOE cannot get IP on the Internet Port. Could not resolve IP address for the device. (3) When DDNS update successful. Update dynamic DNS server successful IP: (eg. 211.21.190.99) Update dynamic DNS server successful IP: (eg. 211.21.190.99) again.
Appendix E: Cable Connections This cable information is provided for your reference only. Please ensure you only connect the appropriate cable into the correct socket on either this product or your computer. If you are unsure about which cable to use or which socket to connect it to, please refer to the hardware installation section in this manual. If you are still not sure about cable connections, please contact a professional computer technician or NetComm for further advice.
Straight and crossover cable configuration Figure 3 Figure 4 RJ11 connector and cable An RJ-11 connector is the small, modular plug used for most analog telephones. It has six pin slots in the head, but usually only two or four of them are used. RJ-11 Connector Pin Assignment 1 2 3 4 5 6 Normal Assignment Signal Ground CTS RXD TXD +5 Volts In Signal Ground Figure 5 NB620W Super-G Wireless Broadband Gateway User Guide 76 YML725 Rev1 www.netcomm.com.
605 to RJ-11 adapter The 605 to RJ-11 adaptor is provided to comply with the older 610 Telstra wall socket. The 605 to RJ-11 adapter may be used to convert the supplied RJ-11 cable, if the older connection is required. USB cable A typical USB cord has an "A" connection (“upstream” to plug into the computer) and a “B” connection (“downstream” to plug into the device). By using different connectors on the upstream and downstream ends, cable connection is simplified.
Appendix F: Registering your NetComm Product All NetComm Limited (“NetComm”) products have a standard 12 month warranty from date of purchase against defects in manufacturing and that the products will operate in accordance with the specifications outlined in the User Guide. However some products have an extended warranty option (please refer to packaging).
Customer Information ACA (Australian Communications Authority) requires you to be aware of the following information and warnings: (1) This unit shall be connected to the Telecommunication Network through a line cord which neets the requirements of the ACA TS008 Standard. (2) This equipment has been tested and found to comply with the Standards for C-Tick and or A-Tick as set by the ACA .
Product Warranty The warranty is granted on the following conditions: 1. This warranty extends to the original purchaser (you) and is not transferable; 2. This warranty shall not apply to software programs, batteries, power supplies, cables or other accessories supplied in or with the product; 3. The customer complies with all of the terms of any relevant agreement with NetComm and any other reasonable requirements of NetComm including producing such evidence of purchase as NetComm may require; 4.
Limitations of Warranty The Trade Practices Act 1974 and corresponding State and Territory Fair Trading Acts or legalisation of another Government ("the relevant acts") in certain circumstances imply mandatory conditions and warranties which cannot be excluded. This warranty is in addition to and not in replacement for such conditions and warranties.