Contents Introduction .................................................................................................................................... 3 About the NetComm NP6800 - Wireless LAN Access Point .................................................. 4 Wireless LAN Basics .............................................................................................................. 5 Installation .......................................................................................................
Introduction The NetComm NP6800 - Wireless LAN Access Point is a Direct-Sequence Spread Spectrum (DSSS) product. DSSS is a spread spectrum network operating between 2.4 and 2.5 GHz. This provides a high-capacity network within either large or small environments using multiple access points. Based on IEEE 802.11b, Wireless LAN (WLAN) products can perform at speeds of up to 11 Mbps. This technology works by using multiple frequencies in the 2.
About the NetComm NP6800 - Wireless LAN Access Point The NetComm NP6800 - Wireless LAN Access Point allows USB equipped host systems to configure, connect to and link a wireless network. Features Include: ■ IEEE 802.11b compatibility providing wireless Ethernet connectivity at speeds of up to 11 Mbps. ■ Dynamic scaling of the connection speed between 11, 5.5, 2, and 1 Mbps to match the wireless network conditions. ■ Wireless security with 64-bit and 128-bit WEP data encryption.
Wireless LAN Basics In order to set up and use your NetComm NP6800 - Wireless LAN Access Point you should have some basic understanding of both wired and wireless network technology and the various functions of the device. WLAN devices use electromagnetic waves within a broad, unlicensed range of the radio spectrum to transmit and receive Frequency Modulation (FM) radio signals. WLAN devices generate a carrier wave and modulate this signal using various techniques.
11 Mbps Operation The NetComm NP6800 - Wireless LAN Access Point supports a maximum 11 Mbps data transfer rate. When the adaptors transmit (TX) rate is set to Auto, the adaptor automatically shifts to a 5.5, 2 or 1 Mbps data rate when unable to maintain a high quality connection at 11 Mbps. When the adaptor detects improved signal strength, it shifts to an increased data rate, up to the maximum 11 Mbps.
■ Antenna Position: Where possible, keep your adaptors and access points at least 1 or 2 metres away from devices that generate strong radio-frequency or electromagnetic signals, such as microwaves, computer monitors, cellular telephones and electric motors. Use the utilities included with your product to measure the best reception (signal quality/strength) achieved when repositioning the antenna.
Installation Before beginning the installation, verify the hardware package contains the NetComm NP6800 Wireless LAN Access Point and ensure that you have the requirements listed below. Keep the serial number in a safe place. The Support Centre uses this information to reference warranty and service contract information. Note: The MAC Address of the Access Point is indicated on the bottom of the case.
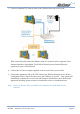
3. Connect a standard UTP ethernet cable to the Wireless Network Access Point. Then, connect the other end of the Ethernet cable to a switch or hub or computer with a Network Interface Card installed. The Wireless Network Access Point will then be connected to your 10/100 Network. 4. Connect the AC Power Adapter supplied to the Access Point’s power socket. 5. Connect the appropriate end of the USB Cable to the Wireless Network Access Point’s Configuration Port.
Driver Installation & Configuration The NetComm NP6800 - Wireless LAN Access Point is supplied with a Windows driver and a USB and Ethernet Access Point Utility. The utility should be installed at the same time as the Windows USB driver and is used to view and edit NetComm NP6800 - Wireless LAN Access Point settings. After following the driver installation instructions for your operating system, refer to the section on Access Point Utility for installation instructions.
Installing the Driver in Windows XP To install the Wireless LAN driver in Windows XP: 1. After inserting the Access Point into an available USB port on the computer, Windows XP recognizes the adaptor and the Add New Hardware Wizard dialog box appears. 2. Insert the NetComm Driver CD. 3. Select the Install the software automatically (recommended) checkbox. Click Next. 4. The drivers will be found on the CD ROM in the location of D:\Drivers\WinXP, where D:\ is the letter of your CD ROM drive.
Installing the Access Point Utility The Access Point Utility is used to configure and monitor the NetComm NP6800 - Wireless LAN Access Point for all Windows operating systems. The procedure described in this section can be used in order to install the Access Point Utility under Microsoft® Windows®. ■ In this section it is assumed that you have a basic working knowledge of Microsoft Windows and networking principles.
Uninstallation Procedure To uninstall the application from Windows, follow the procedure described bellow: 1. Open the Add/Remove Programs icon under the Control Panel. 2. Select the Acess Point Utility option and click the Change/Remove... button under the Control Panel to begin the uninstallation procedure. 3. Click OK in order to finish the removal of the Access Point Utility. Rev.1 - YML655 NP6800 - Wireless LAN Access Point www.netcomm.com.
Configuring the Access Point The Access Point Utility consists of two programs, an AP Utility and an SNMP Manager, which are used for the configuration of the NetComm NP6800 - Wireless LAN Access Point. We recommend using the AP Utility for initial setup and configuration, with further customisation available within the SNMP Manager to fine tune your Access Point settings.
2. Click on the Configuration button to display the values stored within the Access Point. It is important to configure the following settings before continuing: ■ IP Address and Subnet Mask ■ Community (Password) ■ WEP Note: Refer to the table on Page 40 and write down the changes you make to your Access Point configuration for future reference. Other settings may also be changed at this point, however, the following settings are covered in detail to make the necessary changes to install your Access Point.
Community (password) The AP Utility and the SNMP Manager use a Community setting to password protect the Access Point. We recommend that you change this setting from the default of “public”. A table is provided on page 40 for you to record the amended setting. 1. Double-click on the Community to display the following window: 2. Type in the new password string and click the OK button. 3. Click on the Set button to configure the Access Point.
2. Double-click on WEP Key and select the identification number of the WEP key you wish to use. 3. Double-click on the Key you will be using and enter the encryption key that you will be using. Note: You must use the same WEP key identification number and encryption key in the Access Point that you will be using in all accessing wireless stations, i.e. other Access Points, PCMCIA cards or USB adaptors. 4. Click the Set button to complete the changes. Rev.
Configuring the Access Point via Ethernet The SNMP Manager provides a GUI custsomisation tool which can be accessed by your ethernet or wireless connection. Before using the SNMP Manager you will need to assign a temporary IP address. Assigning a Temporary IPAddress If you wish to use the SNMP Manager utility to configure the Access Point, you must assign a temporary IP address to your computer. 1. Click on Start->Settings->Control Panel, and then double-click on the Network icon. 2.
Connecting to the Access Point using the SNMP Manager 1. Open Start->Programs->802.11 Wireless LAN->Acess Point Utility and click on SNMP Manager. There are two ways to connect to the NetComm NP6800 - Wireless LAN Access Point with the AP Utility: ■ Select File -> Connect to Access Point option and enter the IP and the Community. ■ Select File -> Find Access Point option. After a while a window will display any Access Point devices that the Utilty has found.
3. If the IP address and Community are correct the following window will be displayed. The SNMP Manager will display the following menus, which can be used to configure the Access Point. ■ File menu ■ Setup Menu ■ Commands Menu ■ Info Menu ■ Traps Menu ■ Network Menu ■ Window Menu ■ About Menu Refer to the following sections for more information on the above menus. www.netcomm.com.au Page 20 Rev.
File Menu Under this menu you can find the following options: ■ Connect to Access Point - Using this option you can directly connect with the AP. First, type its IP Address in the panel which appears (Figure 4-2). Then, type the appropriate password in the Community field (The default password is “public”). ■ Find Access Point - This option allows you to find and connect with an AP without the necessity of knowing its IP Address. Choose this option in order to find the Aps available for connection .
Setup Menu As soon as the connection has been established, you are able to start viewing or setting the AP parameters. Bridge Under the “Bridge” submenu, there are two options: ■ IP Configuration ■ Filtering IP Configuration Under this window you see and change the followings: ■ The Mac Address, IP Address, and IP Mask of the AP. Note: The Mac Address can not be altered. This is a unique number that is assigned by the manufacturer to an Ethernet network device to allow easy identification.
Wireless LAN Under this submenu the following Operational Settings are available: Operational Settings Using this option you can either view or modify the following parameters of the Wireless LAN AP: Access Point Name - The name of the AP. SSID - It is an ASCII string, up to 32 characters, used to identify a WLAN that prevents the unintentional merging of two colocated WLANs. The ESSID value must be the same in all stations and AP in the extended WLAN.
Authentication Type - Select Open System, Shared Key, or Both: Open System: With this setting any station in the WLAN can associate with an AP and receive and transmit data (null authentication). Shared Key: With this setting only stations using a shared key encryption identified by the AP are allowed to associate with it. Both: With this setting stations communicate with the AP either with or without data encryption.
Authorized MAC Address (MAC Address Filter) For security reasons the AP can use the Authorization Table option. The AP allows only authorized stations to get associated to it . Under the Authorized MAC Address option you may press the following buttons: Load file: Use this button in order to load a txt file with the MAC Addresses that can be associated with the AP (Authorized MAC Addresses).
Operation Mode The NetComm NP6800 Wireless LAN Access Point can be configured to three different modes of operation: ■ Access Point, ■ Access Point Client ■ Wireless Bridge (Point to Point or Point to Multipoint). For each mode you can either view or modify the Wireless LAN parameters of the Wireless Operational Settings window. Access Point Mode The NP6800 Wireless LAN Access Point is set to Access Point by default and will connect your wireless computer to a wired network (LAN).
Access Point Client Mode When set to Access Point Client Mode, the NetComm NP6800 Wireless LAN Access Point is able to talk to one main Access Point and wireless clients within its range. This mode allows your Access Point to act as a client of a main Access Point. A LAN attached to your Access Point client can then be wirelessly bridged to the main Access Point. 1. Select Access Point Client and check the Preferred BSS box.
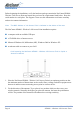
Point to Point This mode connects two physically separated LAN segments using two Wireless Access Points. To configure a Point to Point bridged environment: 1. Click Point to Point. 2. Set the Remote MAC Address of the Access Point in LAN 1 to look for the MAC Address of the Access Point in LAN 2. 3. The remote Access Point also needs to be set up as a Wireless Bridge..
Point to MultiPoint This mode allows you to construct a network that has multiple Wireless Access Point units bridging LANs. To configure a Point to MultiPoint bridged environment: 1. Click Point to MultiPoint for the NetComm NP6800 Wireless LAN Access Point used in LAN 1. No MAC Address binding is needed. 2. Set the Access Points in LAN 2 and LAN 3 to Point to Point, and have them look for the MAC Address of the Access Point in LAN 1.
Enable SNMP traps Using this option you can either enable or disable SNMP traps, which are messages displayed in the right bottom corner of the main window indicating that an action related to the AP took place. Permitted messages are: Trap Reassociation: This trap message is sent when a Station’s reassociation request is received from the AP - Bridge. Trap Association: Indicates the reception of an association request packet.
Authorization Using this option the Administrator can change the passwords used in the community field of the Connect to AP window. A table is provided on page 40 to record the updated setting. Commands Menu Under this menu there are two options. ■ Reset Device - You can reset the AP. ■ Restore Defaults - You can restore the factory default values of the AP.
Info Menu This menu lets you view Wireless and Ethernet statistics. ■ Wireless statistics: This option reports the statistics concerning the unit’s Wireless activity. Field name Description Unicast Transmitted Packets The number of Unicast packets successfully transmitted. Broadcast Transmitted Packets The number of broadcast packets transmitted. Multicast Transmitted Packets The number of multicast packets transmitted.
Traps Menu Provides information for trap messages ■ View Record displays additional information for every Trap Message. Network Menu The Network menu provides information about the devices connected to your network. ■ Associated stations - Using this option you can view the MAC Addresses of the Associated stations with the AP. Rev.1 - YML655 NP6800 - Wireless LAN Access Point www.netcomm.com.
■ Known BSSs - This option allows you to view all Wireless devices currently connected to the network, including the SSID, BSSID, RSSI, Channel, WEP, Type and Preamble of each device. Click Get/Refresh to update the listing. Window Menu The Window menu there are the following options ■ Cascade - All opened windows are arranged on the desktop in a cascade fashion. ■ Tile - All open windows are visible on the desktop.
Advanced Topics Network Topology The IEEE 802.11 standard supports three basic topologies for WLANs - the Independent Basic Service Set (IBSS), the Basic Service Set (BSS), and the Extended Service Set (ESS). WLAN components can be used to extend, enhance or entirely replace existing Ethernet infrastructure. The NetComm NP6800 - Wireless LAN Access Point can accommodate any of these WLAN topologies.
How to Make Your Wireless Network More Secure Wireless networks can be vulnerable to an outsider gaining access if the encryption settings are not set adequately. Some of the default security settings on some wireless hardware, and in Microsoft Windows, may allow access to your wireless network from other wireless devices. The concepts that are presented here are offered only as a guide, and may help make your wireless network more difficult for an outsider to gain access.
Glossary A E Ad-Hoc Mode - A client setting that provides independent peer to peer connectivity in a wireless LAN. An alterative setup is where PCs communicate with each other through an access point. Encryption - A security method that applies a specific algorithm to data in order to alter the data's appearance and prevent other devices from reading the information.
N Network - A system that transmits any combination of voice, video and/or data between users. Static IP Address - A permanent IP address that is assigned to a node in an IP or a TCP/IP network. Node - A network junction or connection point, typically a computer or work station. Subnet - A subnet is a logical sub-division of a Local Area Network that has been divided by means of routers or gateways. A subnet may include multiple LAN segments. Each subnet is identified by the Subnet Mask.
Troubleshooting Windows Troubleshooting Tips Many problems can easily be diagnosed using the tools provided by Microsoft Windows, such as the PING utility, Network Monitors, TELNET and FTP. Other more elaborate tools, such as LAN analysers, for example NETXRAY or Novell's LAN analyser, may also be used. Some common problems exhibited when the Access Point has not been properly installed include: ■ Windows 95/98 does not recognize the Access Point when installed.
Registering your NetComm Product To ensure that the conditions of your warranty are complied with, please go to the NetComm web site for quick and easy registration of your product at www.netcomm.com.au Alternatively, you can fill in the Warranty Registration Form and mail it to NetComm Limited, PO Box 1200, Lane Cove NSW 2066. Contact Information If you have any technical difficulties with your product, please do not hesitate to contact NetComm’s Customer Support Department. Email: support@netcomm.com.
Warranty Registration Form Cut along the line Date of Purchase …….......………………...........………................................. Name …….......………………...........………................................. Company …….......………………...........………................................. Address …….......………………...........………................................. …………………….........……........... Tel No ( Post Code .....………...………. ) ..............………....……. Fax No ( E-mail ) .....………...………. …….......………………...........………......
Product Warranty The warranty is granted on the following conditions: 1. This warranty extends to the original purchaser (you) and is not transferable; 2. This warranty shall not apply to software programs, batteries, power supplies, cables or other accessories supplied in or with the product; 3. The customer complies with all of the terms of any relevant agreement with NetComm and any other reasonable requirements of NetComm including producing such evidence of purchase as NetComm may require; 4.