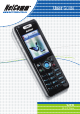
User Guide V24W Wi-Fi IP Phone
NetComm VoIP WiFi Phone V24W User Guide Chapter 1: What’s in This User Guide ..........................................................................................3 Chapter 2: Getting to know your NetComm V24W WiFi VoIP Phone ........................................4 The V24W Buttons...................................................................................................................5 Chapter 3: Installing and Using the NetComm V24W WiFi VoIP Phone ...................................
NetComm VoIP WiFi Phone V24W User Guide How to Use This Guide This V24W WiFi IP Phone User Guide has been designed to make configuring and operating the V24W WiFi IP Phone easier than ever. Please look for the following items when reading this User Guide: This question mark provides you with a reminder about something you might need to do while using the IP Phone. This checkmark means there is a note of interest you should pay special attention to while using the IP Phone.
NetComm VoIP WiFi Phone V24W User Guide Chapter 1: What’s in This User Guide Thank you for choosing the NetComm V24W WiFi VoIP Phone. It will allow you to make phone calls using your broadband connection, whether you are at home, in your office, or at a public hotspot. How does the V24W Phone do this? It connects to your wireless router or gateway, so telephone service is delivered through your cable or DSL Internet connection.
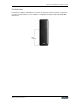
NetComm VoIP WiFi Phone V24W User Guide Chapter 2: Getting to know your NetComm V24W WiFi VoIP Phone The Bottom Panel The V24W Phone’s headset jack and USB port are located on the bottom panel. Headset Port USB Port Headset Port This port allows you to connect a headset to the V24W. USB Port The USB port allows you to attach the included power adapter. The Front and Side Panel 1. Power LED 2. Volume up/down 3. Soft Key 4. Navigation Pad 5. Center Selection Key 6. Call 7. Power/End Call 8.
NetComm VoIP WiFi Phone V24W User Guide The V24W Buttons Button Name Function Soft Key Press the Soft Keys to use the menu items on the screen directly above the Soft Keys. Navigation Pad and Center Selection Key Navigation Pad lets you navigate menus and settings. Push the Center Selection Key to select the highlighted menu or setting. Controls the cursor when in web browser mode Call Press to make or receive calls. Power or End Call Ends the call or exits the current menu.
NetComm VoIP WiFi Phone V24W User Guide The Back Panel The IP Phone’s battery compartment is located on the back panel of the IP Phone. For directions on how to insert the battery, refer to “Chapter 3: Installing and Using the NetComm V24W WiFi VoIP Phone.
NetComm VoIP WiFi Phone V24W User Guide Chapter 3: Installing and Using the NetComm V24W WiFi VoIP Phone This chapter provides instructions for first-time installation and use of the NetComm V24W Phone. Firstly, you need to insert the battery into the V24W Phone and then configure it for your wireless network and VoIP service. After that, you will be able to make and receive Internet phone calls. Inserting the Battery into the V24W Phone To insert the battery, follow these instructions: 1.
NetComm VoIP WiFi Phone V24W User Guide 2 The phone will boot up and automatically scan the wireless network. Notes: This might take a few minutes to complete. 3 A list of wireless network will be displayed. You can see the wireless name (SSID), security status (a lock means wireless security is enable) and the signal strength for each wireless network. 4 Use the Navigation Pad to highlight your wireless network SSID and then press the Center Selection Key.
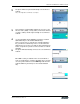
NetComm VoIP WiFi Phone V24W User Guide 5b. If WPA security is enabled on the selected network, a new screen will appear. Enter the network’s WPA key. Then press the Center Selection Key. 6 You will be notified when the IP Phone has connected to the network, and a checkmark will appear next to the name of the network. Press the Exit soft key to go back to the standby screen. 7 The standby screen will appear. 8 Press the Menu soft key. Then select Phone Settings.
NetComm VoIP WiFi Phone V24W User Guide 9 Select Phone Password. 10 By default the phone password is disabled. Enable it by pressing the Edit soft key. 11 Now highlight the User Password and press Edit soft key to change the key. At the prompt, enter your new password and press the Center Selection Key. Note: please remember the new password. Press the * (star) key to switch between the different modes (Capital letters, small letters and numbers). Note: this step is optional.
NetComm VoIP WiFi Phone V24W User Guide 13 Power down the device by pressing the Power button for 3 seconds. Then turn it back on. You will see the prompt for Phone Password. Enter the user password and then press the OK soft key. Note: Default user password is 0000 14 Now you can access the SIP settings page. Press Menu soft key and then select SIP Settings. 15 A list of SIP settings will be displayed. Select Proxy IP and press Edit soft key. Note: not all settings are necessary.
NetComm VoIP WiFi Phone V24W User Guide 17 Move down to Proxy Port and press Edit soft key. Enter the Proxy Port number in the prompt window, and press the Center Selection Key. 18 Move down to Register Proxy IP and press Edit soft key. Enter the Register Proxy IP address in the prompt window and press the Center Selection Key. Note: Press the * (star) key to switch between the different modes (Capital letters, small letters and numbers). 19 Move down to Register Proxy Port and press Edit soft key.
NetComm VoIP WiFi Phone V24W User Guide 21 Move down to Outbound Proxy Port and press Edit soft key. Enter the Outbound Proxy Port number in the prompt window, and press the Center Selection Key. Notes: this step is optional. 22 If your Voice Service Provider did not provide an Expire Time setting, then leave the default setting 60 seconds. If your Voice Service Provider provided an Expire Time setting, then Move down to Expire Time and press Edit soft key.
NetComm VoIP WiFi Phone V24W User Guide 25 Move down to Password and press Edit soft key. Enter the Password in the prompt window and press the Center Selection Key. Note: Press the * (star) key to switch between the different modes (Capital letters, small letters and numbers). 26 On the SIP Settings screen, select “Return”. 27 On the main menu, select Return. 28 The standby screen will indicate that the IP Phone is ready for phone calls (Ready message at the top of the screen).
NetComm VoIP WiFi Phone V24W User Guide 29 The basic installation of the V24W Phone is now complete. Using the V24W Phone To make a call, enter the phone number you want to call. Then press the Call button. When you are on a phone call, select Option to see a list of menu choices. Press the HangUp soft key or press the End button to end the call. To change the volume, use the + and - buttons on the side panel of the Phone while on a call.
NetComm VoIP WiFi Phone V24W User Guide number to which you want to transfer the call, and then press the Call button. When the second call is answered, speak to the answering party and select Transfer. Then hang up. Blind TFR. For a blind transfer, select Blind TFR. Dial the number to which you want to transfer the call. Select Blind TFR again. Then hang up. When you are on your call, select Blind TFR. A new prompt window will appear.
NetComm VoIP WiFi Phone V24W User Guide Chapter 4: Configuring the V24W WiFi VoIP Phone Home Screen The Home screen displays a variety of information about the IP Phone. Wireless Signal Strength At the top of the screen, the icon on the left indicates wireless signal strength. Date and Time Display The current date and time are shown. To change the date, time and its format, analog or digital, use the main menu. Status of the IP Phone The IP Phone has three status messages.
NetComm VoIP WiFi Phone V24W User Guide Overview For your convenience, you can configure your V24W WiFi VoIP Phone either via the phone interface or you can use the build in Web-based utility. How to Access the Web-based Utility First, you need the VoIP Phone’s IP address. Use your V24W Phone to check the IP address. From the main Menu on the IP Phone, select Information and press the center selection key. The IP address is listed here.
NetComm VoIP WiFi Phone V24W User Guide Main Menu Press the Menu soft key to access the V24W main menu. Use the navigation pad to highlight each menu and the center selection key to select it. Call Log The V24W Phone keeps a list of all recent calls including the time and date of each call. Use the navigation pad to navigate through the list and the center selection key to select. Missed calls A list of missed calls will be displayed. Received A list of received calls will be displayed.
NetComm VoIP WiFi Phone V24W User Guide Phone Book The V24W Phone can store up to 250 contacts. Each contact can have the following information; Name, Home Number, Office Number, Mobile Number, Home-2 Number, Office-2 Number, Mobile-2 Number, Speed-Dial Number, Ring Tone and E-mail address. To view the contact information, highlight the contact name and press the center selection key. To search for a contact, enter the contact’s name in the field provided and the results will be automatically displayed.
NetComm VoIP WiFi Phone V24W User Guide Network Settings The V24W Phone has two types of network modes, DHCP and Fixed IP. In most cases, you should keep the default setting, DHCP, if your network has a DHCP server enable to assign IP addresses to the IP Phone. To assign a static IP address to the IP Phone, press Edit soft key to change the IP Mode to Fixed IP. And the setting for fixed IP will be available. Edit the settings according to your network and press Return soft key to return to previous menu.
NetComm VoIP WiFi Phone V24W User Guide Wireless The Wireless menu allows you to configure the wireless settings on the V24W Phone. The options are as follow: Options Set Wi-Fi Profiles Hotspot Description To scan for wireless networks in your area To configure profiles for different networks To view the list of the V24W Phone’s default hotspots. To save your username and password for these default hotspots, select Hotspot, Settings and enter your username and password.
NetComm VoIP WiFi Phone V24W User Guide Connection to a Default Hotspot Before you begin, please make sure that you have saved your User Name and Password for the default hotspot you want to use. These login settings can be configured through the Hotspot screen. 1. Select Set Wi-Fi in Wireless menu. Highlight the wireless hotspot that you want to use and press the center selection key to select it. If the hotspot that you want is not shown, select Rescan soft key to scan again. 2.
NetComm VoIP WiFi Phone V24W User Guide Option Refer to the table below for each option.
NetComm VoIP WiFi Phone V24W User Guide • • selection key to save the new WPA Key. Press the Exit to return to the previous menu. EAP Type. To change the EAP Type setting, press the Edit soft key. You have a choice of TLS, MD5, and PEAP. Press the Save soft key to save the new EAP Type, or press the Exit soft key to return to the Edit Profile menu without changing the EAP Type. Hotspot. If you have default hotspots configured, then this setting will be available.
NetComm VoIP WiFi Phone V24W User Guide Phone Settings This menu gives you option to customize the various settings of the V24W such as Ring Option, Wallpaper, Date & Time and Language. Ring Option Scroll through the list and press the left soft key to make a selection. Press the Return soft key to return to the Phone Settings screen. Ring Types There are five different ring types. The selected ring type is indicated by the <*> symbol. Scroll through these choices to hear the actual ring type.
NetComm VoIP WiFi Phone V24W User Guide Clock Type. There are two types available, Analog and Digital. To change the format, highlight Clock Type, and press the left soft key. Time Zones. Press the left soft key to select the Time Zone setting. A list of multiple time zones will be displayed. The selected time zone is indicated by the <*> symbol. Scroll through the choices, and highlight the time zone. Then press Settings soft key to save your change.
NetComm VoIP WiFi Phone V24W User Guide Auto KeyLock Settings If you want to automatically lock your keys after 10 seconds of inactivity, select Auto KeyLock Settings. Press the Edit soft key until Enable is displayed. To unlock your phone, press the left soft key (Unlock) and the asterisk (*) key. TIP: To key lock your phone, press and hold the (#) key at the stand by screen. Factory Default Factory default will removes all configurations on the V24W phone.
NetComm VoIP WiFi Phone V24W User Guide SIP Settings The necessary setup information is supplied by your VoIP Service Provider. If you do not have this information, contact your VoIP Service Provider before making any changes. Press the Return soft key to return to the previous menu. Refer to the table below for all SIP options.
NetComm VoIP WiFi Phone V24W User Guide Web Cam This feature will let you use the V24W Phone to view video from a web camera. On the Web Cam screen, a list of web cameras (when you have web cam already configured) will be shown. Scroll through these choices and press the center selection key to view the video. To save the settings for your web camera(s), press Option soft key to see the menu choices, which will be described in further detail below. Press Return soft key to return to the previous menu.
NetComm VoIP WiFi Phone V24W User Guide Name. To enter the Name, select Edit. Enter the new Name in the new window. Press the center selection key to save the new information, or select Exit to return to the previous menu. URL. To enter the URL, select Edit. Enter the new URL in the new window. Press the center selection key to save the new information, or select Exit to return to the previous menu. Port Number. To enter the Port Number, select Edit. Enter the new Port Number in the new window.
NetComm VoIP WiFi Phone V24W User Guide MSN You can use MSN Messenger to send and receive instant messages, see who is online, and edit your MSN contact information. To get started, select MSN from the Main Menu, and select MSN. The wizard will guide you through the setup process. If the wizard is not successful or does not connect you can use the Settings window to input your information manually.
NetComm VoIP WiFi Phone V24W User Guide Web Site A list of web sites (if saved) will be shown. Scroll through these choices and press the center selection key to visit the web site you want. To save frequently visited web sites, select Option to see menu choices, which will be described in further detail below. Select Return to return to the previous menu.
NetComm VoIP WiFi Phone V24W User Guide Option Refer to the table below for each option. Option Edit Description To edit a web site entry (available when you have at least one web camera saved). To add a web site entry. To delete the highlighted entry Add Delete The Edit and Add options configure the same settings. The Edit option is used for changing existing web site entries, while the Add option is used for saving new web site entries. Select Return soft key to return to the previous menu. Edit.
NetComm VoIP WiFi Phone V24W User Guide Information This menu provides the status information and software of the V24W Phone. It is a read only screen. Scroll through the settings to view them. Select Return to return to the previous menu. Refer to the table below for information on each option.
NetComm VoIP WiFi Phone V24W User Guide Appendix A: Common Problem And Solutions This appendix provides solutions to problems that may occur during the installation and operation of the V24W IP Phone. Read the description below to solve your problems. 1. When I make a telephone call, the call doesn’t go through; instead, I hear a fast busy signal. Go through this checklist until your problem is solved: • Follow these instructions to reboot your cable or DSL modem, IP Phone, and router: 1.
NetComm VoIP WiFi Phone V24W User Guide 9. Check the Enable option for the port services you want to use. 10. When you have completed the configuration, click the Save Settings button. 2. When I’m on a telephone call, words are dropped intermittently. Go through this checklist until your problem is solved: • Are you using a wireless router and cordless phone? If so, the router and cordless phone may be using the same frequency and interfere with each other.
NetComm VoIP WiFi Phone V24W User Guide 2. Access the Router’s Web-based Utility by going to http://192.168.1.1 or the IP address of the Router. 3. A login screen will appear. Leave the User Name field blank. Enter the Router’s password (the default is admin) in the Password field. Then click the OK button. 4. Click the Applications & Gaming tab, and then click the Port Range Forwarding tab. 5. For each port range you must specify, enter a different name in the Application field.
NetComm VoIP WiFi Phone V24W User Guide Frequently Asked Questions Can I make calls if my Internet connection is down? No. Your high-speed Internet connection must be active when you make Internet phone calls. Can I use the IP Phone to make a call and browse the Internet at the same time? No. The V24W Phone supports either calling or web browsing, not both at the same time. However, you can receive a call while web browsing with the IP Phone.
NetComm VoIP WiFi Phone V24W User Guide Appendix B: Glossary This glossary contains some basic networking terms you may come across when using this product. Access Point - A device that allows wireless-equipped computers and other devices to communicate with a wired network. Also used to expand the range of a wireless network. Ad-hoc - A group of wireless devices communicating directly with each other (peer-to-peer) without the use of an access point.
NetComm VoIP WiFi Phone V24W User Guide Full Duplex - The ability of a networking device to receive and transmit data simultaneously. Gateway - A device that interconnects networks with different, incompatible communications protocols. Half Duplex - Data transmission that can occur in two directions over a single line, but only one direction at a time. HTTP (HyperText Transport Protocol) - The communications protocol used to connect to servers on the World Wide Web.
NetComm VoIP WiFi Phone V24W User Guide Subnet Mask - An address code that determines the size of the network. Switch - 1. A data switch that connects computing devices to host computers, allowing a large number of devices to share a limited number of ports. 2. A device for making, breaking, or changing the connections in an electrical circuit. TCP (Transmission Control Protocol) - A network protocol for transmitting data that requires acknowledgement from the recipient of data sent.
Legal & Regulatory Information This manual is copyright. Apart from any fair dealing for the purposes of private study, research, criticism or review, as permitted under the Copyright Act, no part may be reproduced, stored in a retrieval system or transmitted in any form, by any means, be it electronic, mechanical, recording or otherwise, without the prior written permission of NetComm Limited. NetComm Limited accepts no liability or responsibility, for consequences arising from the use of this product.
Product Warranty The warranty is granted on the following conditions: 1. This warranty extends to the original purchaser (you) and is not transferable; 2. This warranty shall not apply to software programs, batteries, power supplies, cables or other accessories supplied in or with the product; 3. The customer complies with all of the terms of any relevant agreement with NetComm and any other reasonable requirements of NetComm including producing such evidence of purchase as NetComm may require; 4.
NetComm Limited ABN 85 002 490 486 PO Box 1200, Lane Cove NSW 2066 Australia E – sales@netcomm.com.au W – www.netcomm.com.