Contents Chaper 1: Introduction ......................................................................................... 4 About VoIP ................................................................................................... 4 Chapter 2: Getting to know your V85 ..................................................................... 6 Before you begin... ......................................................................................... 6 Package Contents ......................................
Appendix A: V85 Keypad Configuration Menu Structure ......................................... 36 Appendix B: V85 Status and Error Messages ........................................................ 40 Appendix C: Setting your Computer’s IP Address .................................................. 41 Appendix D: Alternative V85 Connection Types ..................................................... 44 Examples of V85 Port-Forwarding Configuration ................................................
Chaper 1: Introduction NetComm’s V85 VoIP Desktop Phone is a next-generation IP Phone that provides a costeffective solution for home and SOHO users who want to use their broadband Internet connections to make telephone calls. The V85 supports the popular SIP protocol allowing for ease of installation with VoIP service providers. By using state-of-the-art DSP (Digital Signal Processing) technology, the V85 delivers outstanding voice quality that is comparable to the PSTN (normal phone) voice quality.
PSTN-to-VoIP Services This is part of a full-service VoIP plan that also provides a real-world telephone number instead of just a virtual VoIP (telephone) number. Normally these plans have a monthly subscription fee and enable you to make free calls to other subscribers on the same VoIP service and also to make and receive calls from PSTN numbers local, Interstate and International through a ‘gateway’ service.
Chapter 2: Getting to know your V85 Before you begin...
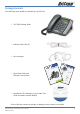
Package Contents The following items should be contained in your V85 box: • V85 VoIP Desktop Phone • Ethernet Cable (RJ-45) • Power Adaptor • Quick Start Guide and Package Contents Note • Installation CD (Containing a copy of this User Guide and Adobe Acrobat Reader) If any of the above items are missing or damaged, please contact your reseller.
Rear of the V85 The rear panel shows the ports for the following connections: • Power • LAN • PC Power LAN to connect to your Modem/ Router/Switch PC to connect your Computer via an ethernet cable Figure 2-2 Rear Panel of the IP Phone 8 V85 Desktop VoIP Phone User Guide YML772 Rev1
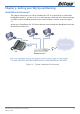
Chapter 3: Getting your V85 Up and Running Installation Environment This chapter assumes that you will be installing the V85 in a typical home or small-office broadband network i.e. you have one or several computers connected to the Internet through an ADSL or cable broadband modem router (with or without a switch) as shown in figure 3-1. In this type of installation, the V85 shares Internet access through the Broadband router with the other network devices.
Step 1: Connecting your V85 a) Remove IP phone and handset from packaging and connect the handset to the phone body via handset cable. b) Connect the V85’s LAN Ethernet port to an available Ethernet port on your broadband router using the Ethernet cable (supplied). If you would like your PC to be connected to the network through the V85, you can connect another Ethernet cable (not supplied) from your PC to the V85’s PC Ethernet port.
c) Check the V85 IP address In the ‘typical’ environment the broadband router will assign IP addresses to the V85.
Figure 3-3 If you can not connect from your PC or the configuration screen is not displayed If your V85 does not show the “DHCP fail” error message in its LCD screen, you can assume the V85 is connected to your network. However in some cases you still may not be able to open the V85 Configuration Page by entering the IP address of the device in your PC web browser. This is generally due to network configuration issues. Try the following procedure.
VoIP Account Identifiers Description Phone Number:* (also called SIP username) In a full-service plan this number is mapped against your regular PSTN phone number Password:* Provides account security to protect against unauthorised use VoIP account authentication ID:* [=Auth.
Figure 3-4 Example of SIP account setting Notes: When you configure the SIP proxy server (Proxy Addr:), Outbound Proxy and STUN Server, � First check the box to turn the function on � Then click the “Set” button � Then enter values in the settings fields. When you finish your configuration, click the “Set” button to save your settings. Keep a copy of your configuration settings handy in case you need to re-enter them later. Step 4: Reboot the V85 To reboot your V85, click “System” and select “Reboot”.
Step 5: Checking Your V85 Status When the V85 completes the reboot, you should see a message in your V85 LCD similar to that shown as below. If you see this kind of message and note that the V85 shows correct time (Australian EST), it means configuration is successful and your V85 is ready to use. SIP (number) Date Note: Time If you don’t see this message in the V85 LCD, please check the ‘Phone Configuration’ section in Chapter 5 of the user guide.
Chapter 4: Configuring your V85 via the Keypad The user-friendly design of the V85 series IP Phone enables most configuration tasks to be made through the keypad if desired. Advanced settings may be entered through Web interface, mentioned above and described in detail in Chapter 5.
Summary of Key Functions and Displays Key Description Light The red light blinks on-off when there is an incoming call. LCD Display Displays menu and status indicators. ◄ UP Key When navigating the IP Phone’s Main Menu, this key is used to scroll up through menu items. When editing menu items, this key functions as “delete” key and deletes a character for each key press. When the IP Phone is in Dial Mode, the “◄ UP” key functions as “delete” key for entered digits.
Key Description NET When users are not successfully registered with their VoIP service provider, this alert will blink on-off. MESSAGE [reserved for future functionality]. Menu / OK When the phone is idle, this key is used as “Menu” key to call the menu selection on the LCD display. While inside the menu selection/setting on the LCD display, this key is used as “OK” key to enter a lower layer of menu selection, or to accept the edited item’s contents.
Key Description Phone Book Users are able to store up to 50 phone numbers by pressing the “PhoneBook” button. For each of the 50 phone book numbers, the user can store both a number and name for display. Speed Dial M1 – M10 Users are able to store 10 phone book entries against M1-M10. Users are able to make a speed dial call to the specific party by pressing the speed dial key from M1 – M10. Notes: (1). When the input is set “digit” mode only ‘0’~’9’ and ‘*’,’#’ can be entered.
Further Network Configuration Options A ‘typical’ network configuration has been described above. If a different network configuration is required, the following section will show how to set the IP address of the V85 through the keypad to match your network requirements. Dynamic IP Method (DHCP) Dynamic IP address assignment is suitable for most common network environments. To set this option, follow the steps below.
Network Settings Verification Once you complete network settings, restart your V85. Then you should be able to check your V85 network settings. To check V85 IP address, please follow the steps below: MENU ► View ► Network Value ► IP Address You can use V85 keypad PING utility to check whether V85 has Internet access: MENU ► View ► Ping Input an Internet host IP address or URL such as 69.90.168.13 or www.google.com, and then press “OK”.
VoIP Account Identifiers About… Proxy On:* Select “Yes” to register in the proxy server. This is required for SIP services to be enabled. When this item is enabled, two more menu items will be enabled. Proxy Addr:* Set the IP address or domain name address of the proxy server. Proxy Port: Leave as default unless advised by Service Provider Outbound Proxy: Set this item to “Yes” if the call requests need to pass through the Outbound Proxy server.
Keypad “View” Operation The submenu items under “View” menu are mainly for getting quick information about the phone status and checking its network setting. Network settings MENU ► View ► Network Value ► IP Address Here you can check current V85 IP address, network mask, default router and DNS server address. Depending on settings under the Configure ► Network submenu, the IP Phone may get its IP address through PPPoE, DHCP, or static settings.
Call Forward Configuration The V85 IP Phone supports three different kinds of call forward function: Immediate Forward, Busy Forward and No Answer Forward. They can be selected in Configure► Forward mode menu. Immediate Forward MENU ► Configure ► Forward Mode ► (Yes/No) Immediate Under the “Forward Mode” submenu, you are able to enter an immediate forward by selecting “Yes” on “(Yes / No) Immediate” option and inputting the forward-to phone number.
Chapter 5: V85 Web-based Configuration Web Login Open your Web browser (IE or Netscape) and enter the IP address of the V85 in its address bar. You will see the login window. Figure 5-1 Enter the default username “admin” and password “admin”, and then press the “enter” to go to the home configuration page of the V85 as shown below. This page displays the V85 IP address information and the V85 Main Menu: Network, SIP, Phone and System. Choose the section heading appropriate to your required destination.
V85 Network Menu Click on the “Network” icon on left to display network settings. Figure 5-3 Basic Under the Basic heading, you are able to verify or update the Network mode in which the V85 is operating. These are: Dynamic IP (Default) which is the configuration used in most typical environments; PPPoE which enables the V85 to establish a direct link with an ISP or VoIP service provider; and Static IP with the corresponding fields setting the parameters to operate in this mode.
SIP Configuration By clicking on the “SIP” icon on the left banner, the following page will display to allow you to set all the SIP-related configurations. The following picture shows you an example, in which the V85 use 676485 as its VoIP phone number to register on SIP proxy server at “fwd.pulver.com” and use STUN to traverse your router NAT/Firewall.
Field Description Port Forwarding Support Check this option if you want to use the portforwarding method to traverse a firewall. Public IP Addr This is the public IP address of your broadband router. Note: If you do not have a fixed public IP address for your broadband service, you are not able to use Port Forwarding feature. Appendix D provides you with an example of how to use this Port Forwarding feature.
Field Description Busy Forward Check the Busy box and enter the Busy forward number in the field. For example, if user A’s phone has Busy checked with the number set to 555-5555, then incoming calls for A’s phone will be forwarded to number 555-5555 if A’s phone is currently busy. No Answer Forward Check the No Answer box and enter the no answer forward number and time in the field supplied.
Phone Configuration Click on the “Phone” icon on the left banner to display the following page in order to set phonerelated configurations. Figure 5-6 Voice Ring Adjust volume of ring tone. Handset Adjust volume of handset/speaker. Handfree Volume Adjust volume of handfree loud-speaker. CodecTxGain Adjust the transmitting (outgoing) voice volume. Note: See also the Summary of Key Functions and Displays in Chapter 4. Ring Type Adjust the ring type(ring pattern) of an incoming call.
System Configuration By clicking on the “System” icon on the left banner, the following page will display to allow you to set all system-related configurations. On this page, you can perform V85 firmware upgrades, change username/password for the web login and keypad password, and reboot the V85. Figure 5-7 Upgrade Firmware upgrade are downloaded via FTP protocol. Input a correct FTP Server IP address and firmware image file name and click “Set” button.
Chapter 6: Call Handling Making Calls To make a call, pick up the handset, dial the destination party’s number, and end with either the “#” or “MENU/OK” key to complete the dial. An alternative way to make a call is to press the light blue button (“SPEAKER” key) at the left down corner, dial the destination number, and end with “#” or “MENU/OK” key to complete the dial.
Configuring Call Forward using Web Configuration Logon to the V85 Web-based Configuration screens and click on the “SIP” icon in the left banner. Go to the Call Forward section and select the function you wish to enable. Field Description Immediate Forward Check the Immediate box and enter the immediate forward number in the field. For example, if user A’s phone has Immediate checked with the number set to 555-5555, then all incoming calls for A’s phone will be forwarded to number 555-5555 immediately.
No Answer Forward MENU ► Configure ► Forward Mode ► (Yes/No) No Answer Under “Forward mode” submenu, users are able to setup for no-answer forward by selecting “Yes” on “(Yes / No) No Answer” and inputting forward-to phone number. For example, if user A’s phone is receiving an incoming call and has “Yes” on “(Yes / No) No Answer” with number 555-5555 and the no-answer time equals 10, then this phone call will be forwarded to number 555-5555 if it is not answered for 10 seconds.
Call Hold During a call pressing HOLD once will invoke the V85 “consultant transfer” state; a dial tone will be heard. In this state call transfer can be initiated. Press HOLD again to enter the V85 “Hold” state; a “call hold tone” will be heard. To retrieve a on-hold call, press HOLD again and both ends will be able to continue the conversation.
Appendix A: V85 Keypad Configuration Menu Structure Figure A-1 Continue on following page … 36 V85 Desktop VoIP Phone User Guide YML772 Rev1
Figure A-2 Continued on following page … V85 Desktop VoIP Phone User Guide YML772 Rev1 37
Figure A-3 Continue on following page … 38 V85 Desktop VoIP Phone User Guide YML772 Rev1
Figure A-4 V85 Desktop VoIP Phone User Guide YML772 Rev1 39
Appendix B: V85 Status and Error Messages Message SIP (number) Date Time SIP (Proxy Off) Date Time Registering (number) Date Time RegFail (Failed Message) Date Time DHCPFail (number) Date Time Indicates V85 is working OK, is registered on a SIP proxy server and ready for outgoing/incoming calls. The number inside brackets () is the IP phone number. V85 will only operate in Peer-to-Peer Call mode.
Appendix C: Setting your Computer’s IP Address This section provides instructions for configuring the TCP/IP (Network) settings on your computer to work with your modem. These steps are only required if you are having trouble accessing your modem. Windows® XP PCs 1. In the Windows task bar, click the Start button, and then click Control Panel. 2. Click on Network & Internet Connections icon. (Category mode only). 3. Click the Network Connections icon. 4.
6. In the Select Network Component Type dialog box, select Protocol, and then click Add… 7. Select Microsoft in the Manufacturers box. 8. Select Internet Protocol (TCP/IP) in the Network Protocols list, and then click OK. You may be prompted to install files from your Windows ME installation CD or other media. Follow the instructions to install the files. If prompted, click OK to restart your computer with the new settings. Next, configure the PC to accept IP information assigned by the modem: 9.
11. In the TCP/IP Properties dialog box, click the IP Address tab. 12. Click the radio button labelled Obtain an IP address automatically. 13. Click OK twice to confirm and save your changes. You will be prompted to restart Windows. 14. Click Yes. Note: For detailed information regarding the advanced features of this product, please refer to the configuring sections in the NB5 User Guide on the supplied CD-ROM.
Appendix D: Alternative V85 Connection Types The following figure show alternative connection types with ADSL (Figure D-1) and Cable (Figure D-2) broadband. In these connection types, the Internet access will be dedicated to the V85 which will be assigned a public IP address. In these cases, the V85 cannot share Internet access with other network devices, even with the PC which is directly connected with the V85 via its PC port.
Examples of V85 Port-Forwarding Configuration The V85 port forwarding support feature will enable it to traverse any type of NAT/Firewall if you configure it properly. There are two conditions for use of the V85 port forwarding support. 1) Your broadband Internet service needs to have a fixed public IP address 2) In addition to configuring the V85, you also need to configure your broadband router to forward a range of ports on its Internet interface to the V85 IP address.
In this example, the user configured the V85 to send SIP messages from port 5999 and RTP packets from port 20000, which are same port numbers configured in NB620W. Figure D-4 Note: 46 The V85 needs a range UDP ports (RTP base port to RTP base port+6); the RTP port specified (port 20000) in the V85 is the RTP base port so its RTP range is 20000 ~ 20006.
Appendix E: Summary of Key Features and Hardware VoIP Standards Compliance • • • • • Session Initiation Protocol (SIP, RFC 3261) Session Description Protocol (SDP, RFC 2327) Transport Protocol for Real-Time Applications (RTP, RFC 1889) User account authentication using MD5 Out-band DTMF relay: RFC 2833 and SIP Info Supports most frequently-used voice codecs: • G.723.1, G.729A/B, G.
Both LAN and PC Ports are 802.3 10/100 BaseT auto sensing and auto crossing capable *Note: The availability of some listed call features are dependent on the service supported by your VoIP service provider. Please consult them for further information. Hardware Specifications PC Port 1xRJ45 10/100 Base-T Ethernet, auto-sensing/ crossing. LAN Port 1xRJ45 10/100 Base-T Ethernet, auto-sensing/ crossing.
Appendix F: Glossary of Network and VoIP Terms 10BASE-T A designation for the type of wiring used by Ethernet networks with a data rate of 10 Mbps. Also known as Category 3 (CAT 3) wiring. See also data rate, Ethernet. 100BASE-T A designation for the type of wiring used by Ethernet networks with a data rate of 100 Mbps. Also known as Category 5 (CAT 5) wiring. See also data rate, Ethernet. ADSL Asymmetric Digital Subscriber Line. The most commonly deployed type of DSL for home users.
CO Central Office A circuit switch that terminates all the local access lines in a particular geographic serving area; a physical building where the local switching equipment is found. xDSL lines running from a subscriber’s home connect at their serving central office. DHCP Dynamic Host Configuration Protocol DHCP automates address assignment and management.
Filtering can be applied in one direction (upstream or down stream), or in both directions. Filtering rule A rule that specifies what kinds of data a routing device will accept and/or reject. Filtering rules are defined to operate on an interface (or multiple interfaces) and in a particular direction (upstream, downstream, or both). Firewall Any method of protecting a computer or LAN connected to the Internet from intrusion or attack from the outside.
in-line filter See Microfilter Internet The global collection of interconnected networks used for both private and business communications. intranet A private, company-internal network that looks like part of the Internet (users access information using web browsers), but is accessible only by employees. IP See TCP/IP. IP address Internet Protocol address The address of a host (computer) on the Internet, consisting of four numbers, each from 0 to 255, separated by periods, e.g., 209.191.4.240.
network A group of computers that are connected together, allowing them to communicate with each other and share resources, such as software, files, etc. A network can be small, such as a LAN, or very large, such as the Internet. Network mask A network mask is a sequence of bits applied to an IP address to select the network ID while ignoring the host ID. Bits set to 1 mean “select this bit” while bits set to 0 mean “ignore this bit.” For example, if the network mask 255.255.255.
RIP Routing Information Protocol The original TCP/IP routing protocol. There are two versions of RIP: version and version II. RJ-11 Registered Jack Standard-11 The standard plug used to connect telephones, fax machines, modems, etc. to a telephone jack. It is a 6-pin connector usually containing four wires. RJ-45 Registered Jack Standard-45 The 8-pin plug used in transmitting data over phone lines. Ethernet cabling usually uses this type of connector.
while IP is responsible for delivering the packets from source to destination. When TCP and IP are bundled with higher-level applications such as HTTP, FTP, Telnet, etc., TCP/IP refers to this whole suite of protocols. Telnet An interactive, character-based program used to access a remote computer. While HTTP (the web protocol) and FTP only allow you to download files from a remote computer, Telnet allows you to log into and use a computer from a remote location. TFTP Trivial File Transfer Protocol.
Protocol (HTTP). Popular web browsers include Netscape Navigator and Microsoft Internet Explorer. See also HTTP, web site, WWW. Web page A web site file typically containing text, graphics and hyperlinks (cross-references) to the other pages on that web site, as well as to pages on other web sites. When a user accesses a web site, the first page that is displayed is called the Home page. See also hyperlink, web site.
Appendix G: Cable Information This cable information is provided for your reference only. Please ensure you only connect the appropriate cable into the correct socket on either this product or your computer. If you are unsure about which cable to use or which socket to connect it to, please refer to the hardware installation section in this manual. If you are still not sure about cable connections, please contact a professional computer technician or NetComm for further advice.
Straight and crossover cable configuration There are two types of the wiring: Straight-Through Cables and Crossover Cables. Category 5 UTP/ STP cable has eight wires inside the sheath. The wires form four pairs. Straight-Through Cables has same pinouts at both ends while Crossover Cables has a different pin arrangement at each end. In a straight-through cable, wires 1,2,3,4,5,6,7 and 8 at one end of the cable are still wires 1~8 at the other end.
Appendix H: Registration and Warranty Information All NetComm Limited (“NetComm”) products have a standard 12 month warranty from date of purchase against defects in manufacturing and that the products will operate in accordance with the specifications outlined in the User Guide. However some products have an extended warranty option (please refer to your packaging).
Product Warranty The warranty is granted on the following conditions: 1. This warranty extends to the original purchaser (you) and is not transferable; 2. This warranty shall not apply to software programs, batteries, power supplies, cables or other accessories supplied in or with the product; 3. The customer complies with all of the terms of any relevant agreement with NetComm and any other reasonable requirements of NetComm including producing such evidence of purchase as NetComm may require; 4.