User Guide V90 VoIP Desktop Phone
Want to network your home quickly and easily without any hassles? NetComm HomePlugs are the simplest method available to set up a home network, without any of the hassle of laying meters of cable or drilling holes into walls. Simply put, a NetComm HomePlug turns the existing electrical wiring in your home into a network capable of transmitting data at up to 200Mbps. Setting up a network couldn’t be easier.
Contents Overview........................................................................................................................................................4 NetComm V90 Physical Layout...................................................................................................................5 NetComm V90 VoIP Phone Specification.....................................................................................................6 Shipping Contents.........................................
NetComm V90 VoIP Phone Operation...........................................................................................................21 Making and Answering Calls....................................................................................................................21 Making a Basic Call..........................................................................................................................21 Making a Hands-Free Call.........................................................
Chapter 1 Overview NetComm V90 VoIP Phone is a fully fledged VoIP Phone which is fully compatible with the SIP standard. It is designed mainly as a third-party enterprise grade VoIP device, which makes it easy to integrate into an existing SIP network. The feature-rich NetComm V90 VoIP Phone is designed to work seamlessly with most of the existing SIP VoIP systems currently available. YML871 Rev1 ������������������������� V90 VoIP Phone User Guide www.netcomm.com.
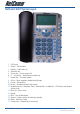
NetComm V90 Physical Layout 1 2 9 8 3 4 11 12 5 10 13 6 7 17 14 1. 2. 3. 4. 5. 6. 7. 8. 9. 10. 11. 12. 13. 14. 15. 16. 17. 15 16 LCD Display VM Key – Call Voice Mail. Hold Key – Hold current call Conference Key Transfer Key – Transfer current call L1 – L4 line Keys – Profile/Contact selection key Handset Key – To activate headset OK Key – Menu navigation, Sending Invite Message. Esc Key – Exiting Menus. Del Key – Removing characters when typing.
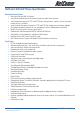
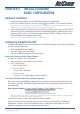
NetComm V90 VoIP Phone Specification Advanced System Features • Power over Ethernet (802.3af) Support • Setup Wizard for different types of network environment and IP phone accounts • Auto Configuration Support via TFTP and HTTP (Plug-n-Play operation - requires no user setup when network access is available.
Standards Supported • SIP V2.0 Standard (RFC 3261) • SDP (RFC 2327) • Digest authentication and MD5 encryption (SIP) • ITU-T G.711 Alaw/Ulaw, G.729A, G.729AB, G.723.
Chapter 2 Installation and Basic Configuration Hardware Installation 1. Connect the handset to the base of the V90 VoIP Phone using the supplied cable. 2. Use the enclosed Ethernet cable to connect the LAN port to a hub/switch, or DSL Router/Cable Modem. Note: If your network is not PoE (Power over Ethernet) enabled then you will require an external power adapter before you can use the VoIP Phone. Please contact NetComm to purchase the correct power adapter for this product. 3.
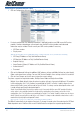
Configuring the NetComm V90 VoIP Phone • Click on Configurations links on the left. The configuration page will appear • For basic configuration, the following information is required to register your V90 to your VoIP service provider. However, depending on your network setup and VoIP service provider, more advanced information may be needed. Please consult your VoIP service provider if necessary.
Chapter 3 More Configurations Preference Changing the Time Zone The SIP Phone uses Network Time Protocol (NTP) to retrieve date and time information from an NTP server. The time is in GMT ± offset. For example, Australian Eastern Standard Time is GMT +10. To change the Time Zone: On the Preferences screen under Configurations menu, enter GMT+x where x is the time difference between your time zone and GMT.
Network Configuration The Network Configurations screen allows you to set up the IP addresses of the LAN and PC port, Bridge or Router mode (static IP for PC port), default Gateway Address, and Primary and Secondary DNS server IP addresses. Note: Default setting for V90 PC port is in Bridge mode. LAN Port Configuration The V90 VoIP Phone LAN port can be configured to obtain the IP address automatically via a DHCP server or manually using Static IP.
Call Settings Setting the SIP Authentication ID and Password To set the SIP Authentication ID and Password. On the Call Settings screen under Configurations screen, enter the Authentication ID and Password in corresponding fields for each profile or contact. Setting Call Forwarding To set the call forwarding feature on the V90 VoIP Phone.
Example: [1-2]xx|34xx|3[1-3,5-9]xxx|0xxxxxxxxx|. • • • • • Dialing 1 or 2 will send invite after 3 digits. Dialing 31, 32 ,33, 35, 36, 37, 38, 39 will send INVITE after 5 digits. Dialing 34 will wait for two more digits before sending INVITE. Dialing 0 will send invite after 10 digits. The “.” On the end will allow for any number not specified in the digit map to be dialed normally requiring the user to enter a delimiter or wait for a timeout.
Phone Settings Setting the LCD Default display You can set up the phone LCD to display two lines of customize text during idle condition. To set the Vendor Name (title) and Title on LCD (subtitle): On the Phone Settings screen under Configurations menu, enter the text for these two fields as desired. If the title field is not filled, the phone will display the phone number assigned by default.
Reset Configuration Settings If you would like to reset the V90 VoIP Phone to factory default settings, click on Tools and then Reset Config button. Press OK in the dialog box to confirm the reset. Please remember to use the default password to access the phone again. Note: This will reset the entire phone configuration back to factory settings. Please note that all settings in Phone Book will be erased as well.
Chapter 4 NetComm V90 VoIP Phone Operation Making and Answering Calls Making a Basic Call 1. Pick up the handset 2. Dial the phone number 3. Press OK or # to dial out immediately (# key is configured as delimiter key by default). Depending on the configuration mode, Profile 1 or Contact 1 will be used by default. Making a Hands-Free Call 1. Press the Speaker button 2. Dial the phone number 3. Press OK or # to dial out immediately (# key is configured as delimiter key by default).
Dialing from the Call History 1. Pick up handset 2. Press Menu 3. Select CALL HISTORY 4. Choose the correct profile or contact 5. Choose one category: ANSWERED CALLS, MISSED CALLS or DIALED CALLS Or A. Press UP to view the Missed Call List while on hook / idle then choose the correct profile or contact B. Press DOWN to view the Answered Call List while on hook / idle then choose the correct profile or contact C.
Using other Call Features* Putting a Call on Hold To put a call on hold: 1. Press Hold button To release a call on hold: 1. Press Hold button again Transferring a Call To transfer a call to another extension: 1. Press Transfer button 2. Dial phone number 3. Press OK 4A. Hang up for unattended transfer. 4B. Wait for the call to be answered and then hang up for attended transfer. Using Voicemail To listen to your voicemail messages, (voicemail parameter must be set in the web configuration page): 1.
Other Phone Operations Checking Call History 1. Press Menu 2. Select CALL HISTORY 3. Choose the correct profile or contact 4. Select one category: ANSWERED CALLS, MISSED CALLS or DIALED CALLS 5. Press Enter 6. Use the Up or Down key to find the number you want in the entries listed. You can either dial this number or add the number to your phonebook. Accessing Phonebook The V90 VoIP Phone has phonebook with a maximum storage capacity of 100 records.
Adjusting the LCD Contrast 1. While the phone is idle, press Right or Left button to increase or decrease the LCD Contrast level as shown on the LCD. Resetting Phone Configuration To reset the V90 VoIP Phone to factory configuration: 1. Press Menu 2. Select SYSTEM TOOLS 3. Select RESET CONFIG 4. Press Enter 5. Enter the Username (default is admin) and Password (default is admin) This will reset the entire phone configuration back to factory settings.
LCD Indicators Date and Time The V90 VoIP Phone displays the date and time at the top of the LCD screen. Ensure that the time zone configuration (GMT±) is set to reflect the GMT time offset. Unanswered Calls When there are unanswered calls, the LCD screen will display the following message: X CALLS MISSED You can use the CALL HISTORY to look up the numbers of calling parties. Menu Display When in Menu mode, use the scroll arrow button to highlight an item. Press Enter to select the item.
Appendix A Function Key The NetComm V90 VoIP Phone has five programmable function keys. These function keys can be defined using the Web Configuration page under Configuration > Phone Settings. Note: the above image shows the default configuration of the function keys To redefine the function key, you need to tick Enable for the corresponding key and select or enter the new variable for it. YML871 Rev1 ������������������������� V90 VoIP Phone User Guide www.netcomm.com.
Function that can be used for the function keys: 1. Phone Book. This will open up the Phone Book on the LCD screen. This function can be configured by changing the Function Mode to Fixed and change the Function to Phone Book. 2. Do Not Disturb. This will disable all incoming calls on all profile/contact. This function can be configured by changing the Function Mode to Fixed and change the Function to Do Not Disturb. 3. Show Pending Call List.
Appendix B: Legal & Regulatory Information This manual is copyright. Apart from any fair dealing for the purposes of private study, research, criticism or review, as permitted under the Copyright Act, no part may be reproduced, stored in a retrieval system or transmitted in any form, by any means, be it electronic, mechanical, recording or otherwise, without the prior written permission of NetComm Limited.
Product Warranty The warranty is granted on the following conditions: 1. This warranty extends to the original purchaser (you) and is not transferable; 2. This warranty shall not apply to software programs, batteries, power supplies, cables or other accessories supplied in or with the product; 3. The customer complies with all of the terms of any relevant agreement with NetComm and any other reasonable requirements of NetComm including producing such evidence of purchase as NetComm may require; 4.
Did you know your phones will disrupt your ADSL2+ connection... Even If You Have Older ADSL Filters? Due to faster ADSL speeds, an inline ADSL2+ Microfilter stops your ADSL connection being disrupted by telephones connected to the same line. Older filters cannot handle these speeds. A high-quality Microfilter from NetComm will ensure you have a stable broadband Internet connection with no reduction in the quality of your telephone service.
Product Warranty NetComm products have a standard 12 months warranty from date of purchase. However some products have an extended warranty option, via registering your product online at the NetComm website www.netcomm.com.au. Refer to the User Guide for complete product warranty conditions, limitations of warranty and other legal and regulatory information. Contact Information If you have any technical difficulties with your product, please do not hesitate to contact NetComm’s Customer Support Department.