
User's Manual
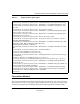
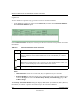
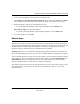
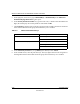
Table Of Contents
- Reference Manual for the NETGEAR ProSafe VPN Client
- Contents
- Chapter 1 About This Manual
- Chapter 2 Introduction
- Chapter 3 Installation
- Chapter 4 Configuring L2TP Connections
- Chapter 5 Using the Security Policy Editor
- What is the Security Policy Editor?
- Basic Steps to Configure a Security Policy
- How to Secure All Connections
- How to Configure Global Policy Settings
- How to Configure Other Connections
- How to Add and Configure a Connection
- How to Enter a Preshared Key
- How to Configure a Gateway
- Configure My Identity
- Configure Security Policy Connection Options
- Configure Authentication (Phase 1)
- Configure Key Exchange (Phase 2)
- Edit a Distinguished Name
- Configure and Manage Connections
- Manage Proposals
- Manage Redundant Gateways
- Manage the Security Policy
- Chapter 6 Using the Certificate Manager
- What is the Certificate Manager?
- Obtain Certificates
- With Online (SCEP) Enrollment
- CAs that Support SCEP
- Retrieve a CA Certificate Online
- Configure a CA Certificate
- Use an HTTP Proxy Server for Online Certificate Requests and CRL Updates
- Import a CA Certificate
- Select a CSP
- Request a Personal Certificate
- Define How Often to Check for and Retrieve New Personal Certificates
- Retrieve a Personal Certificate Manually
- Manage Certificate Requests
- With Manual (File-Based) Enrollment
- Obtain Certificates Through Internet Explorer
- With Online (SCEP) Enrollment
- Manage Certificates
- Manage Certificate Revocation Lists (CRLs)
- Manage the Trust Policy
- Chapter 7 Using Sessions
- Chapter 8 Distributing Customized Profiles
- Chapter 9 Troubleshooting
- Appendix A Networks, Routing, and Firewall Basics
- Appendix B Virtual Private Networking
- Appendix C NETGEAR ProSafe VPN Client to NETGEAR FVS318 or FVM318 VPN Routers
- Appendix D NETGEAR VPN Client to NETGEAR FVL328 or FWAG114 VPN Router
- Glossary
- Index

Reference Manual for the NETGEAR ProSafe VPN Client
Troubleshooting 9-9
202-10015-01
1.
In the Connection Monitor, click the specific connection entry.
2. Click Details. The Security Association Details dialog box opens with a Phase 1 tab, Phase
2 tab, or both, based on whether the entry represents a Phase 1 SA, Phase 2 SA, or both.
3. If both tabs appear, click the one with the details to view:
• To view Authentication (Phase 1) SAs negotiated by IKE, click the Phase 1 tab.
Note: Private Addr is the internal IP address.
• To view Key Exchange (Phase 2) SAs negotiated by IPSec, click the Phase 2 tab.
4. To exit the dialog box, click Close.
Manual keys
Manual keys are IPSec encryption and authentication keys that you type in instead of having the
client generate them automatically. They eliminate the need for a certificate or preshared keys and
all IKE negotiations during Authentication (Phase 1) and Key Exchange (Phase 2). They are
designed to help you determine if secure communications are possible.
Warning! Manual keys are intended for troubleshooting problem connections only. Because the
process of distributing these keys is not secure, do not include them in an ongoing security policy.
After you Enable manual keys in the Security Policy Editor, the client makes two buttons available
on the right pane when you Configure the Key Exchange (Phase 2) proposal: Inbound Keys and
Outbound Keys. Why two buttons? Because the secure connection between the two parties
transmits communications in two directions: incoming and outgoing.
You and the remote party must enter the same keys, but in the reverse order. The key that you enter
as an inbound key is entered by the remote party as an outbound key, and vice versa, as this
illustration shows: