
User's Manual

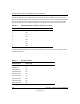
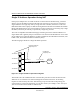

Table Of Contents
- Reference Manual for the NETGEAR ProSafe VPN Client
- Contents
- Chapter 1 About This Manual
- Chapter 2 Introduction
- Chapter 3 Installation
- Chapter 4 Configuring L2TP Connections
- Chapter 5 Using the Security Policy Editor
- What is the Security Policy Editor?
- Basic Steps to Configure a Security Policy
- How to Secure All Connections
- How to Configure Global Policy Settings
- How to Configure Other Connections
- How to Add and Configure a Connection
- How to Enter a Preshared Key
- How to Configure a Gateway
- Configure My Identity
- Configure Security Policy Connection Options
- Configure Authentication (Phase 1)
- Configure Key Exchange (Phase 2)
- Edit a Distinguished Name
- Configure and Manage Connections
- Manage Proposals
- Manage Redundant Gateways
- Manage the Security Policy
- Chapter 6 Using the Certificate Manager
- What is the Certificate Manager?
- Obtain Certificates
- With Online (SCEP) Enrollment
- CAs that Support SCEP
- Retrieve a CA Certificate Online
- Configure a CA Certificate
- Use an HTTP Proxy Server for Online Certificate Requests and CRL Updates
- Import a CA Certificate
- Select a CSP
- Request a Personal Certificate
- Define How Often to Check for and Retrieve New Personal Certificates
- Retrieve a Personal Certificate Manually
- Manage Certificate Requests
- With Manual (File-Based) Enrollment
- Obtain Certificates Through Internet Explorer
- With Online (SCEP) Enrollment
- Manage Certificates
- Manage Certificate Revocation Lists (CRLs)
- Manage the Trust Policy
- Chapter 7 Using Sessions
- Chapter 8 Distributing Customized Profiles
- Chapter 9 Troubleshooting
- Appendix A Networks, Routing, and Firewall Basics
- Appendix B Virtual Private Networking
- Appendix C NETGEAR ProSafe VPN Client to NETGEAR FVS318 or FVM318 VPN Routers
- Appendix D NETGEAR VPN Client to NETGEAR FVL328 or FWAG114 VPN Router
- Glossary
- Index

Reference Manual for the NETGEAR ProSafe VPN Client
A-2 Networks, Routing, and Firewall Basics
202-10015-01
Routing Information Protocol
One of the protocols used by a router to build and maintain a picture of the network is the Routing
Information Protocol (RIP). Using RIP, routers periodically update one another and check for
changes to add to the routing table.
The NETGEAR VPN Client supports both the older RIP-1 and the newer RIP-2 protocols. Among
other improvements, RIP-2 supports subnet and multicast protocols. RIP is not required for most
home applications.
IP Addresses and the Internet
Because TCP/IP networks are interconnected across the world, every machine on the Internet must
have a unique address to make sure that transmitted data reaches the correct destination. Blocks of
addresses are assigned to organizations by the Internet Assigned Numbers Authority (IANA).
Individual users and small organizations may obtain their addresses either from the IANA or from
an Internet service provider (ISP). You can contact IANA at www.iana.org.
The Internet Protocol (IP) uses a 32-bit address structure. The address is usually written in dot
notation (also called dotted-decimal notation), in which each group of eight bits is written in
decimal form, separated by decimal points.
For example, the following binary address:
11000011 00100010 00001100 00000111
is normally written as:
195.34.12.7
The latter version is easier to remember and easier to enter into your computer.
In addition, the 32 bits of the address are subdivided into two parts. The first part of the address
identifies the network, and the second part identifies the host node or station on the network. The
dividing point may vary depending on the address range and the application.
There are five standard classes of IP addresses. These address classes have different ways of
determining the network and host sections of the address, allowing for different numbers of hosts
on a network. Each address type begins with a unique bit pattern, which is used by the TCP/IP
software to identify the address class. After the address class has been determined, the software
can correctly identify the host section of the address. The follow figure shows the three main
address classes, including network and host sections of the address for each address type.