
User's Manual
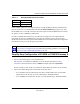
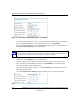
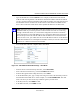
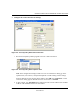
Table Of Contents
- Reference Manual for the NETGEAR ProSafe VPN Client
- Contents
- Chapter 1 About This Manual
- Chapter 2 Introduction
- Chapter 3 Installation
- Chapter 4 Configuring L2TP Connections
- Chapter 5 Using the Security Policy Editor
- What is the Security Policy Editor?
- Basic Steps to Configure a Security Policy
- How to Secure All Connections
- How to Configure Global Policy Settings
- How to Configure Other Connections
- How to Add and Configure a Connection
- How to Enter a Preshared Key
- How to Configure a Gateway
- Configure My Identity
- Configure Security Policy Connection Options
- Configure Authentication (Phase 1)
- Configure Key Exchange (Phase 2)
- Edit a Distinguished Name
- Configure and Manage Connections
- Manage Proposals
- Manage Redundant Gateways
- Manage the Security Policy
- Chapter 6 Using the Certificate Manager
- What is the Certificate Manager?
- Obtain Certificates
- With Online (SCEP) Enrollment
- CAs that Support SCEP
- Retrieve a CA Certificate Online
- Configure a CA Certificate
- Use an HTTP Proxy Server for Online Certificate Requests and CRL Updates
- Import a CA Certificate
- Select a CSP
- Request a Personal Certificate
- Define How Often to Check for and Retrieve New Personal Certificates
- Retrieve a Personal Certificate Manually
- Manage Certificate Requests
- With Manual (File-Based) Enrollment
- Obtain Certificates Through Internet Explorer
- With Online (SCEP) Enrollment
- Manage Certificates
- Manage Certificate Revocation Lists (CRLs)
- Manage the Trust Policy
- Chapter 7 Using Sessions
- Chapter 8 Distributing Customized Profiles
- Chapter 9 Troubleshooting
- Appendix A Networks, Routing, and Firewall Basics
- Appendix B Virtual Private Networking
- Appendix C NETGEAR ProSafe VPN Client to NETGEAR FVS318 or FVM318 VPN Routers
- Appendix D NETGEAR VPN Client to NETGEAR FVL328 or FWAG114 VPN Router
- Glossary
- Index

Reference Manual for the NETGEAR ProSafe VPN Client
C-6 NETGEAR ProSafe VPN Client to NETGEAR FVS318 or FVM318 VPN Routers
202-10015-01
– Check the NETBIOS Enable box if you wish to pass NetBIOS traffic over the VPN
tunnel, allowing functions such as Microsoft Network Neighborhood browsing.
3. Click Apply to save all changes. This will return you to the VPN Settings screen.
4. When the screen returns to the VPN Settings, make sure the Enable checkbox is selected.
Step-By-Step Configuration of the NETGEAR VPN Client B
This procedure describes linking a remote PC and a LAN. The LAN will connect to the Internet
using an FVS318 with a dynamic address and a dynamic DNS host name. The PC can be directly
connected to the Internet through dialup, cable or DSL modem, or other means, and we will
assume it has a dynamically assigned IP address.
1. Install the NETGEAR VPN Client Software on the PC.
• You may need to insert your Windows CD to complete the installation.
• Reboot your PC after installing the client software.
Note: The NETGEAR ProSafe VPN Client has the ability to “Import” a predefined
configuration profile. The FVS318.SPD file on the NETGEAR ProSafe VPN Client
Resource CD (230-10007-01) includes all the settings identified in this procedure.
Whenever importing policy settings, you should first export any existing settings you
may have configured to prevent the new imported settings from replacing an existing
working configuration.
To import this policy, use the Security Policy Editor File menu to select Import Policy,
and select the FVS318.SPD file at D:\Software\Policies where D is the drive letter of
your CD-ROM drive.
Note: Before installing the NETGEAR ProSafe VPN Client software, be sure to turn off
any virus protection or firewall software you may be running on your PC.