
User's Manual
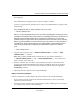


Table Of Contents
- Reference Manual for the NETGEAR ProSafe VPN Client
- Contents
- Chapter 1 About This Manual
- Chapter 2 Introduction
- Chapter 3 Installation
- Chapter 4 Configuring L2TP Connections
- Chapter 5 Using the Security Policy Editor
- What is the Security Policy Editor?
- Basic Steps to Configure a Security Policy
- How to Secure All Connections
- How to Configure Global Policy Settings
- How to Configure Other Connections
- How to Add and Configure a Connection
- How to Enter a Preshared Key
- How to Configure a Gateway
- Configure My Identity
- Configure Security Policy Connection Options
- Configure Authentication (Phase 1)
- Configure Key Exchange (Phase 2)
- Edit a Distinguished Name
- Configure and Manage Connections
- Manage Proposals
- Manage Redundant Gateways
- Manage the Security Policy
- Chapter 6 Using the Certificate Manager
- What is the Certificate Manager?
- Obtain Certificates
- With Online (SCEP) Enrollment
- CAs that Support SCEP
- Retrieve a CA Certificate Online
- Configure a CA Certificate
- Use an HTTP Proxy Server for Online Certificate Requests and CRL Updates
- Import a CA Certificate
- Select a CSP
- Request a Personal Certificate
- Define How Often to Check for and Retrieve New Personal Certificates
- Retrieve a Personal Certificate Manually
- Manage Certificate Requests
- With Manual (File-Based) Enrollment
- Obtain Certificates Through Internet Explorer
- With Online (SCEP) Enrollment
- Manage Certificates
- Manage Certificate Revocation Lists (CRLs)
- Manage the Trust Policy
- Chapter 7 Using Sessions
- Chapter 8 Distributing Customized Profiles
- Chapter 9 Troubleshooting
- Appendix A Networks, Routing, and Firewall Basics
- Appendix B Virtual Private Networking
- Appendix C NETGEAR ProSafe VPN Client to NETGEAR FVS318 or FVM318 VPN Routers
- Appendix D NETGEAR VPN Client to NETGEAR FVL328 or FWAG114 VPN Router
- Glossary
- Index

Reference Manual for the NETGEAR ProSafe VPN Client
Using the Certificate Manager 6-15
202-10015-01
Dear Applicant,
Your Administrator has approved your request for an IPSec certificate.
If you have any questions or problems, please contact your Administrator by replying to this
email message.
THE COMMON NAME OF THIS CERTIFICATE: Kerry Smith
-----BEGIN CERTIFICATE-----
MIICzCCAmigAwIBAgIQRFfr0rQ4W2xUCfmYzDKCqDANBgkqhkiG9w0BAQQFADCB
zjEXMBUGA1UEChMOVmVyaVNpZ24sIEluYy4xRzBFBgNVBAsTPkZvciBWZXJpU2ln
biBhdXRob3JpemVkIHRlc3Rpbmcgb25seS4gTm8gYXNzdXJhbmNlcyAoQykgVlMx
OTk4MUcwRQYDVQQLEz53d3cudmVyaXNpZ24uY29tL3JlcG9zaXRvcnkvVGVzdENQ
MA0GCSqGSIb3DQEBBAUAA4GBACBA6T+yqr8xoJfBv2T0P1AcLxG9tjOMuUPELvV
mg4jNB2Jj9oD+iIpEp4yf4NhKq6N3p8vcdXXz2FMxhNMHGAqY8mwKhRAPQrJKnVi
/o9Adoh7SQ3Aoh4ds8CfRcgcrHdQeQBdgszwzRJMTNKP3zj/qvRevIZ/h72MbfWl
gnvK
-----END CERTIFICATE-----
2. Copy the entire certificate, from -----BEGIN CERTIFICATE----- through -----END
CERTIFICATE-----, inclusive.
Note: When working with Microsoft Certificate Server, copy only the data between
-----BEGIN CERTIFICATE----- and -----END CERTIFICATE-----, not inclusive, and
insert a carriage return at the end.
3. Paste the certificate into a text editor, such as Notepad. Do not use a full featured word
processor such as MicorSoft Word that will add extra formatting data to the file. Name it
CertReq.der, and save it to the same drive and directory that the certificate request file,
CertReq.req, resides in.
4. Import the personal certificate to the Certificate Manager.
Import a Personal Certificate
In these two situations, you must import a personal certificate to the Certificate Manager:
• If you created a personal certificate file from the email that the CA when you manually
requested a personal certificate
• To bring a personal certificate file exported from the Certificate Manager (not necessarily in
your client) to your client's Certificate Manager