
User Manual


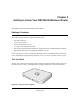

Table Of Contents
- NETGEAR Wireless Router Setup Manual
- Contents
- Chapter 1 About This Guide
- Chapter 2 Getting to Know Your NETGEAR Wireless Router
- Chapter 3 Connecting the Router to the Internet
- Prepare to Install Your Wireless Router
- First, Connect the Wireless Router to the Internet
- Now, Set Up a Computer for Wireless Connectivity
- Troubleshooting Tips
- Overview of How to Access the Wireless Router
- How to Manually Configure Your Internet Connection
- Using the Smart Setup Wizard
- NETGEAR Product Registration, Support, and Documentation
- Chapter 4 Optimizing Wireless Connectivity and Security
- Chapter 5 Doing Basic Router Housekeeping
- Chapter 6 Troubleshooting Common Problems
- Appendix A Technical Specifications
- Appendix B Preparing Your Network
- What You Need To Use a Router with a Broadband Modem
- Preparing Your Computers for TCP/IP Networking
- Configuring Windows 95, 98, and Me for TCP/IP Networking
- Configuring Windows NT4, 2000 or XP for IP Networking
- Configuring the Macintosh for TCP/IP Networking
- Verifying the Readiness of Your Internet Account
- Restarting the Network
- Glossary

Getting to Know Your NETGEAR Wireless Router 2-1
February 2005
Chapter 2
Getting to Know Your NETGEAR Wireless Router
This chapter introduces the NETGEAR Wireless Router.
Package Contents
The product package should contain the following items:
• The Wireless Router.
• An AC power adapter.
• Feet for standing the router up.
• A Category 5 (CAT5) Ethernet cable.
• The Setup CD, including: Documentation, Application Notes and other helpful information.
• Registration, Warranty Card, and Support Information Card.
If any of the parts are incorrect, missing, or damaged, contact your NETGEAR dealer. Keep the
carton, including the original packing materials, in case you need to return the router for repair.
The Top Panel
The top of the wireless router includes a dome with status lights that identify which of the seven
internal antennas are active. The lights flash according to the direction of the wireless signal.
Figure 2-1: wireless router top panel