
User Manual
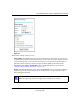
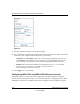
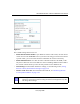
Table Of Contents
- NETGEAR Wireless-N Router WNR2000 User Manual
- Contents
- About This Manual
- Chapter 1 Configuring Basic Connectivity
- Chapter 2 Safeguarding Your Network
- Choosing Appropriate Wireless Security
- Recording Basic Wireless Settings Setup Information
- Changing Wireless Security Settings
- Viewing Advanced Wireless Settings
- Using Push 'N' Connect (Wi-Fi Protected Setup)
- Restricting Wireless Access by MAC Address
- Changing the Administrator Password
- Backing Up Your Configuration
- Understanding Your Firewall
- Chapter 3 Restricting Access From Your Network
- Chapter 4 Customizing Your Network Settings
- Chapter 5 Fine-Tuning Your Network
- Allowing Inbound Connections to Your Network
- Configuring Port Forwarding to Local Servers
- Configuring Port Triggering
- Using Universal Plug and Play
- Optimizing Wireless Performance
- Configuring Quality of Service
- Changing the MTU Size
- Optimizing Your Network Bandwidth
- Overview of Home and Small Office Networking Technologies
- Chapter 6 Using Network Monitoring Tools
- Chapter 7 Troubleshooting
- Troubleshooting Quick Tips
- Troubleshooting Basic Functions
- Troubleshooting the Web Configuration Interface
- Troubleshooting the Internet Connection
- Troubleshooting a Network Using the Ping Utility
- Problems with Date and Time
- Solving Wireless Connection Problems
- Restoring the Default Configuration and Password
- Appendix A Technical Specifications
- Appendix B Related Documents
- Index

NETGEAR Wireless-N Router WNR2000 User Manual
2-10 Safeguarding Your Network
v1.0, May 2008
.
3. Select the authentication type and encryption strength.
4. You can manually or automatically program the four data encryption keys. These values must
be identical on all computers and access points in your network.
• Automatic. In the Passphrase field, enter a word or group of printable characters, and
click Generate. The passphrase is case-sensitive. For example, NETGEAR is not the
same as nETgear. The four key fields are automatically populated with key values.
• Manual. Enter 10 hexadecimal digits (any combination of 0–9, a–f, or A–F). These
entries are not case-sensitive. For example, AA is the same as aa.
Select which of the four keys to activate.
5. Click Apply to save your settings.
Configuring WPA-PSK and WPA2-PSK Wireless Security
Wi-Fi Protected Access with Pre-Shared Key (WPA-PSK and WPA2-PSK) data encryption
provides extremely strong data security, very effectively blocking eavesdropping. Because WPA
and WPA2 are relatively new standards, older wireless adapters and devices might not support
Figure 2-3